

Enable or Disable Upgrade to Windows 10 in Windows Update for Windows 7 and 8.1
Information
Microsoft is making Windows 10 available for free for one year from the date of availability. This offer is available to customers who are using non-Enterprise, non-Embedded editions of Windows 7 and Windows 8.1.
If you like, you can disable the Upgrade to Windows 10 update to no longer have the update available in Windows Update.
This tutorial will show you how to enable or disable the Upgrade to Windows 10 update in Windows 7 and Windows 8.1.
Note
You must be signed in as an administrator to be able to enable or disable the Upgrade to Windows 10 update.
For more details, see: https://support.microsoft.com/en-us/kb/3080351
Warning
Microsoft will only offer the free upgrade to Windows 10 for qualifying Windows 7 and Windows 8.1 PCs and tablets until the end of July 2016.
After this date, you will have to pay for Windows 10 if you did not take advantage of the free Upgrade to Windows 10 update in Windows Update or Get Windows 10 app.
CONTENTS:
- Option One: To Remove Windows 10 Upgrade Offer using KB3184143 Update
- Option Two: To Enable or Disable Upgrade to Windows 10 Update using a REG file
- Option Three: To Enable or Disable Upgrade to Windows 10 Update using Group Policy
EXAMPLE: Upgrade to Windows 10 in Windows Update Enabled and Disabled
1. Install the KB3184143 update in Windows Update.
For more details, see: Remove software related to the Windows 10 free upgrade offer - KB3184143
The .reg files below will add and change the DWORD value in the registry key below.
HKEY_LOCAL_MACHINE\SOFTWARE\Policies\Microsoft\Windows\WindowsUpdate
DisableOSUpgrade DWORD
0 = enable
1 = disable
1. Do step 2 (enable) or step 3 (disable) below for what you would like to do.
NOTE: This is the default setting.
A) Click/tap on the Download button below to download the file below, and go to step 4 below.
Enable_Upgrade_to_Windows_10_update.reg
Download
A) Click/tap on the Download button below to download the file below, and go to step 4 below.
Disable_Upgrade_to_Windows_10_update.reg
Download
4. Save the .reg file to your desktop.
5. Double click/tap on the downloaded .reg file to merge it.
6. If prompted, click/tap on Run, Yes (UAC), Yes, and OK to approve the merge.
7. If you like, you can now delete the downloaded .reg file.
8. To apply, you can either click/tap on Check for updates in Windows Update or restart the computer. (screenshots below)
9. If you like, you may also wish to enable or disable the "Get Windows 10" (GWX) icon on your taskbar.
In Windows 7, the Local Group Policy Editor will only be available in the Professional, Ultimate, and Enterprise editions.
In Windows 8.1, the Local Group Policy Editor will only be available in the Pro and Enterprise editions.
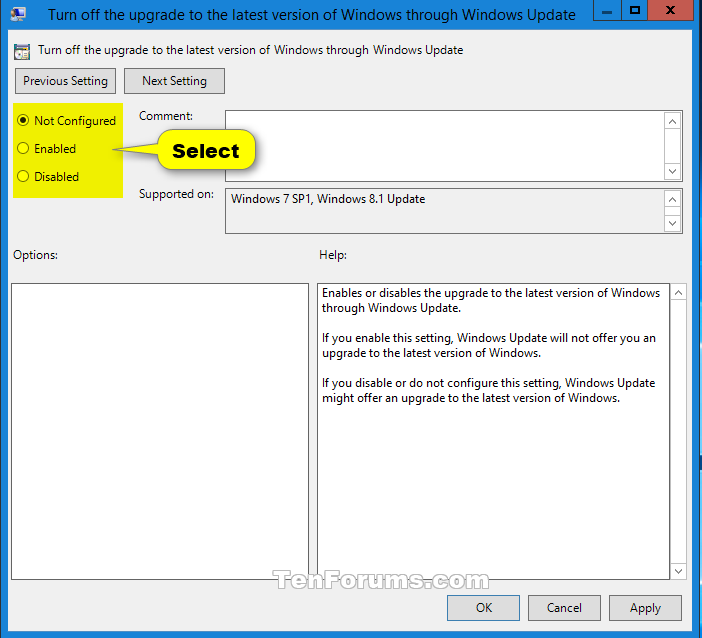
1. Open the Local Group Policy Editor.
2. In the left pane of Local Group Policy Editor, navigate to the location below. (see screenshot below)
Computer Configuration/Administrative Templates/Windows Components/Windows Update
3. In the right pane of Update in Local Group Policy Editor, double click/tap on the Turn off the upgrade to the latest version of Windows through Windows Update policy to edit it. (see screenshot above)
4. Do step 5 (enable) or step 6 (disable) below for what you would like to do.
A) Select (dot) Not Configured or Disabled, click/tap on OK, and go to step 7 below. (see screenshot below)
NOTE: Not Configured is the default setting.
7. When finished, you can close the Local Group Policy Editor if you like.
8. To apply, you can either click/tap on Check for updates in Windows Update or restart the computer. (screenshots below)
9. If you like, you may also wish to enable or disable the "Get Windows 10" (GWX) icon on your taskbar.
That's it,
Shawn
Related Tutorials
Disable Upgrade to Windows 10 Update in Windows 7 or 8.1
-
New #1
It worked absolutely wonderfully, Shawn! Great work once again.
Stick that in your pipe and smoke it, MS! Great job developing OSs through the years that became more and more automated so far as maintenance and with more security, but don't force items on OUR machines that we don't want.
Attachment 38138
-
-
Posts : 11,062 Windows 10 Pro version 22H2 0n one desktop and running Window 11 Pro 22H2 on unsupported desktopNew #3
Hello Shawn thanks for the reply re the 10 upgrade I knew you would come up with something.
Now I have done the options in the first tutorial and downloaded the disable option in the second tutorial link (this one)
Now I pick out some really obvious non 10 updates and I still get that Get started thing and it goes on to say downloading 10 now yet when I stop it - it tells me the picked out updates were cancelled.
Now I know I am not the worlds greatest at this stuff but why does it keep referring to downloading 10 and not just those updates - I really don't want to have to reinstall but if I do I will and I still cannot find how to attach pics / snips??
JOhn
-
New #4
If it's downloading Windows 10, then it sounds like the update has already been selected to download and install.
You should be able to cancel the update, and may need to reset Windows Update using OPTION THREE below to apply the policy you set to disable it.
Windows Update - Reset - Windows 7 Help Forums
-
Posts : 11,062 Windows 10 Pro version 22H2 0n one desktop and running Window 11 Pro 22H2 on unsupported desktopNew #5
Thanks Shawn for your patience and help as always but as I suspected the upgrade is sitting there ready in the update history so it looks like I have no choice but to clean install and watch out for the updates as they come in.
I reckon I was really naïve to think that I could be taken in as that update I have downloaded with a lot of other updates after the clean install. I wish Microsoft could make it a bit clearer when they slip these things in and I think they have been extremely rude in that I cannot get rid of any trace of anything to do with 10.
I certainly cannot download any important updates for 7 and 7 based programs and drivers that come in updates without having to install 10. So as I said I am left with no option but to clean install all over again
But that is not to take anything away from you because you have always been up front and is something I reckon that if left to you just would not happen.
Thanks so much again for putting up with me
John:)
-
Posts : 11,062 Windows 10 Pro version 22H2 0n one desktop and running Window 11 Pro 22H2 on unsupported desktopNew #6
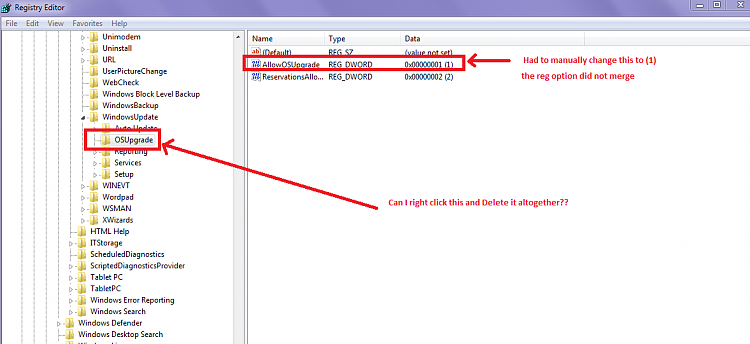
Hello Shawn I am sorry for being such a pain about this but I found the original SSD that I cloned to try the 10 on the cloned drive. Unfortunately or fortunately it has a message to say 10 is ready to go so I have hidden the icon and notifications on the taskbar and stopped the process in Task Manager.
Now I downloaded the disable upgrade link and ran it but it did not "merge" I had to manually change (Modify) the entry to read (1) which if I have it right is do not allow the OS upgrade.
Now while I was in the reg checking I did think of if at that entry in the reg of Windows > Windows update > OSUpgrade can I right click it and delete it completely from the registry?? Plus are there any more of those entries I can expunge from the reg??
I am attempting to attach a snip / pic but don't know if I am doing it right yet.
Last edited by Brink; 23 Oct 2015 at 09:42. Reason: attached your uoploaded image
-
New #7
John,
Did you reset Windows Update to clear any current pending updates?
I would check the AllowOSUpgrade DWORD to 0 instead to disable it.
-
Posts : 11,062 Windows 10 Pro version 22H2 0n one desktop and running Window 11 Pro 22H2 on unsupported desktopNew #8
Hmm have changed that reg entry back again to (0) and no mate I didn't because there are loads of them re security on 7 NET Framework Vista and Seven etc and still some for Windows Defender Malicious removal tool etc so I was thinking they would be ok.
I still have it set for let me know first and while I am thinking of it deleting that reg entry is that a possibility to end anything happening??
If I could fin how to attach pics I could show you but it just will not work for me using that info you posted about enhancements in your profile.
-
-
New #9
John,
Once you upload the image, you would need to click on the paperclip icon again and select the uploaded image to attach it in the post.
https://www.tenforums.com/tutorials/1...en-forums.html
If you could post what you're seeing in Window Update, that would better help determine what may be best for it. :)
Disable Upgrade to Windows 10 Update in Windows 7 or 8.1
Enable or Disable Upgrade to Windows 10 in Windows Update for Windows 7 and 8.1Published by Shawn BrinkCategory: Windows Update & Activation
28 Aug 2017


 Quote
Quote
Tutorial Categories

Related Discussions
