

How to Enable or Disable Scan Network Files with Windows Defender Antivirus in Windows 10
Windows Security is built-in to Windows 10 and includes an antirvirus program called Windows Defender Antivirus.
Windows Defender Antivirus helps protect your PC against malware (malicious software) like viruses, spyware, and other potentially unwanted software. Malware can infect your PC without your knowledge: it might install itself from an email message, when you connect to the Internet, or when you install certain apps using a USB flash drive, CD, DVD, or other removable media. Some malware can also be programmed to run at unexpected times, not only when it's installed.
You can configure the Scan files on the network group policy to enable or disable if network files will be scanned by Windows Defender Antivirus.
This tutorial will show you how to enable or disable Windows Defender Antivirus to scan files on the network in Windows 10.
You must be signed in as an administrator to enable or disable Windows Defender Antivirus to scan files on the network.
Contents
- Option One: Enable or Disable Scan Network Files with Windows Defender Antivirus in PowerShell
- Option Two: Enable or Disable Scan Network Files with Windows Defender Antivirus in Group Policy
- Option Three: Enable or Disable Scan Network Files with Windows Defender Antivirus using a REG file
1 Open an elevated PowerShell.
2 Copy and paste the command below you want to use into PowerShell, and press Enter. (see screenshots below)
(Enable)
Set-MpPreference -DisableScanningNetworkFiles 0
OR
(Disable)
Set-MpPreference -DisableScanningNetworkFiles 1
3 When finished, you can close PowerShell if you like.

The Local Group Policy Editor is only available in the Windows 10 Pro, Enterprise, and Education editions.
All editions can use Option One or Option Three.
1 Open the Local Group Policy Editor.
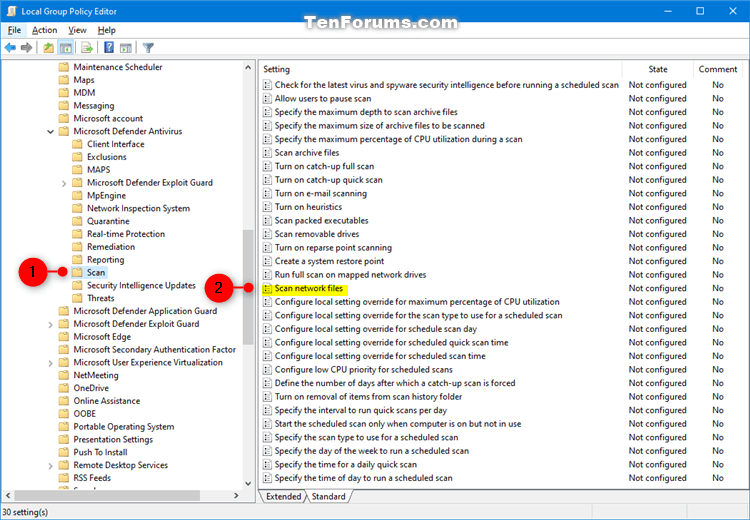
2 Navigate to the location below in the left pane of Local Group Policy Editor. (see screenshot below)
Computer Configuration/Administrative Templates/Windows Components/Windows Defender Antivirus/Scan
OR
(Windows 10 version 2004 and higher)
Computer Configuration/Administrative Templates/Windows Components/Microsoft Defender Antivirus/Scan
3 In the right pane of Scan in Local Group Policy Editor, double click/tap on the Scan network files policy to edit it. (see screenshot above)
4 Do step 5 (enable) or step 6 (disable) below for what you would like to do.
A) Select (dot) Enabled, click/tap on OK, and go to step 7 below. (see screenshot below)
A) Select (dot) Not Configured or Disabled, click/tap on OK, and go to step 7 below. (see screenshot below)
Not Configured is the default setting.
7 When finished, you can close the Local Group Policy Editor if you like.
The downloadable .reg files below will add and modify the DWORD value in the registry key below.
HKEY_LOCAL_MACHINE\SOFTWARE\Policies\Microsoft\Windows Defender\Scan
DisableScanningNetworkFiles DWORD
0 or (delete) = enable scan
1 = disable scan
1 Do step 2 (enable) or step 3 (disable) below for what you would like to do.
A) Click/tap on the Download button below to download the file below, and go to step 4 below.
Enable_scan_network_files_in_Windows_Defender.reg.reg
Download
This is the default setting.
A) Click/tap on the Download button below to download the file below, and go to step 4 below.
Disable_scan_network_files_in_Windows_Defender.reg
Download
4 Save the .reg file to your desktop.
5 Double click/tap on the downloaded .reg file to merge it.
6 When prompted, click/tap on Run, Yes (UAC), Yes, and OK to approve the merge.
7 Restart the computer to apply.
8 If you like, you can now delete the downloaded .reg file.
That's it,
Shawn
Related Tutorials
- How to Manually Scan Files, Folders, and Drives with Windows Defender Antivirus in Windows 10
- How to Enable or Disable Scan Mapped Network Drives with Windows Defender in Windows 10
- How to Turn On or Off Microsoft Defender Antivirus in Windows 10
- How to Turn On or Off Windows 10 Limited Periodic Scanning with Windows Defender
- How to Enable or Disable Windows Defender Block at First Sight in Windows 10
- How to Add or Remove Exclusions for Windows Defender in Windows 10
- How to Enable or Disable Real-time Protection for Microsoft Defender Antivirus in Windows 10
- How to Add or Remove 'Scan with Microsoft Defender' Context Menu in Windows 10
- How to Add or Remove Microsoft Defender context menu in Windows 10
- How to Enable or Disable Scan Archive Files by Windows Defender in Windows 10
- Enable or Disable Scan Removable Drives during Windows Defender Full Scan in Windows 10
- How to Schedule a Scan in Microsoft Defender Antivirus in Windows 10
- How to Specify Scheduled Scan Type for Microsoft Defender Antivirus in Windows 10
- How to Change Windows Defender Antivirus Maximum CPU Usage for a Scan in Windows 10
How to Enable Scan Network Files with Windows Defender in Windows 10

How to Enable Scan Network Files with Windows Defender in Windows 10
How to Enable or Disable Scan Network Files with Windows Defender Antivirus in Windows 10Published by Shawn BrinkCategory: Security System
06 Jul 2020


Tutorial Categories

Related Discussions
