

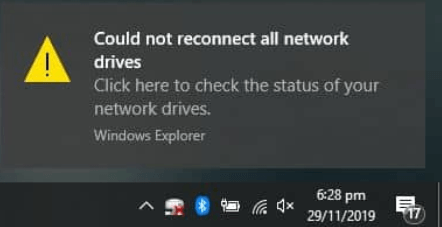
How to Disable "Could not reconnect all network drives" Notification in Windows 10
If you mapped a network drive to automatically connect at sign-in, you will get a Could not reconnect all network drives notification at sign-in from the AutoPlay service if Windows is unable to connect to the network drive for any reason.
Often when this happens, you will just need to open the mapped network drive to have it connect making this notification unnecessary or annoying if this message is always appearing at every sign-in.
This tutorial will show you how to disable the Could not reconnect all network drives notification at sign-in for all users in Windows 10.
You must be signed in as an administrator to enable or disable the "Could not reconnect all network drives" notification
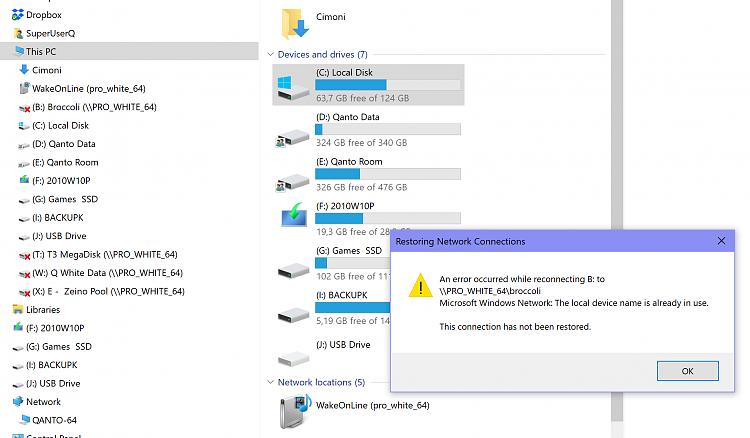
EXAMPLE: "Could not reconnect all network drives" notification
Here's How:
The downloadable .reg files below will modify the DWORD value in the registry key below.
HKEY_LOCAL_MACHINE\SYSTEM\CurrentControlSet\Control\NetworkProvider
RestoreConnection DWORD
0 = Disable
<delete> = Enabled
1 Do step 2 (enable) or step 3 (disable) below for what you would like to do.
This is the default setting.
A) Click/tap on the Download button below to download the file below, and go to step 4 below.
Enable_Could_not_reconnect_all_network_drives_notification.reg
Download
A) Click/tap on the Download button below to download the file below, and go to step 4 below.
Disable_Could_not_reconnect_all_network_drives_notification.reg
Download
4 Save the .reg file to your desktop.
5 Double click/tap on the downloaded .reg file to merge it.
6 When prompted, click/tap on Run, Yes (UAC), Yes, and OK to approve the merge.
7 Restart the computer to apply.
8 You can now delete the downloaded .reg file if you like.
That's it,
Shawn
Related Tutorials
- How to Map Network Drive or Disconnect Network Drive in Windows 10
- How to Turn On or Off Notifications from Apps and Senders in Windows 10
- How to Change How Long to Show Notifications in Windows 10
Disable Could not reconnect all network drives Notification in Windows
-
New #1
Hello Brink,
I keep getting this error, so I suppose that's not the correct tutorial.
Am I right?
My issue is:
I have a twin system (White & Black) and I share their disks
so they are to be accessible from the other one when it is waken up.
Usually I fire up only one, and work on that one only, so I get the annoying error.
Sometime I need both and so I don't care if the error appear on one or the other.
The idea is not to have a list of Warnings ...
....missing reconnection.... at startup,
when I know perfectly why !!!
Thanks
AlainLast edited by AlainCh2; 21 Jan 2021 at 18:45.
-
New #2
Hello Alain,
That does indeed look like a separate issue than what this tutorial covers.
As a test, remove the network connection, and set it up again with a different drive letter than "A" or "B" since those are usually reserved for floppy drives.
-
New #3
Thanks for the answer Brink.
If I dont have B: to show up an error it will be the first next:
T: T3 Megadisk
Strange as it can be,
I have no clue where to find the root of these messages
Alain
-
-
New #5
hmmm, yes
When I start ONE computer it complain about not finding the other :-D
(but not when I WOL them simultaneously)
Why do you ask?
PS: it's not an issue, for sure.
Just a very annoying message I would get rid of
-
-
New #7
I have a pseudo Nas on the internal router.
That drive don't give instant error, even disconnected,
unless I try to access it.
That's the big difference ..
... you get the error even not using it,
if it's in the other PC.
- - - Updated - - -
Good news
I restarted the Black PC several time today, to dissect the reason it was not accepting WOL,
as it was doing yesterday.
Last three reboots the message has disappeared, no reason given.
I didnt change registry, nor any other connected item for what I know.
I was dealing with checking BIOS and device manager settings.
> where I discovered W10 was rolling back my setting
>re-enabling "authorize computer to sleep this device"

Before putting myself on WOL issue,
I was thinking to accept your suggestion to move out the B: letter for the download directory,
but that error _NOW_ don't even seems related to that.
If I discover something I report back.
Thanks again
Alain
-
New #8
Entering this reg settings presented in this tutorial really disables the Message.
But it also disables the "Reconnect at sign in" setting.
After this reg entry is set, the Mapped drives are crossed out red after logon.
This is why the message don't show up again.
syntoh
-
-
New #9

Disable Could not reconnect all network drives Notification in Windows
How to Disable Could not reconnect all network drives Notification in Windows 10Published by Shawn BrinkCategory: Network & Sharing
09 Dec 2019


 Quote
Quote
Tutorial Categories

Related Discussions
