

How to Add or Remove Excluded Folders for Search Indexer in Windows 10
Indexing the content of your PC helps you get faster results when your searching it for files, emails, or other local content.
The search index only includes your selected locations by default. These locations can be filtered for what file types (extensions), file properties, and file contents you want indexed.
Starting with Windows 10 build 18267, Microsoft added a new Enhanced Mode feature to improve search indexing that enables Windows to search all your folders and drives, instead of limiting search (Classic) to your documents, pictures, videos, and desktop by default.
To exclude a folder from search, you can add it to the Excluded Folders list.
This tutorial will show you how to add or remove Excluded Folders for Search Indexer for your account or all users in Windows 10.
Contents
- Option One: Add or Remove Excluded Folders for Search Indexer in Indexed Locations
- Option Two: Add Excluded Folders for Search Indexer in Settings
- Option Three: Remove Excluded Folders for Search Indexer in Settings
1 For how, see: How to Add or Remove Locations for Search Index in Windows 10
Unchecking a subfolder of an added location will add the subfolder to the Excluded Folders list for the search indexer.
You can click/tap on the Show all locations button to add or remove index locations for all users. You must be signed in as an administrator to use Show all locations.
This option is only available starting with Windows 10 build 18267.
This option gets applied to all users on the PC.
You must be signed in as an administrator to use this option.
1 Open Settings (Win+I), and click/tap on the Search icon.
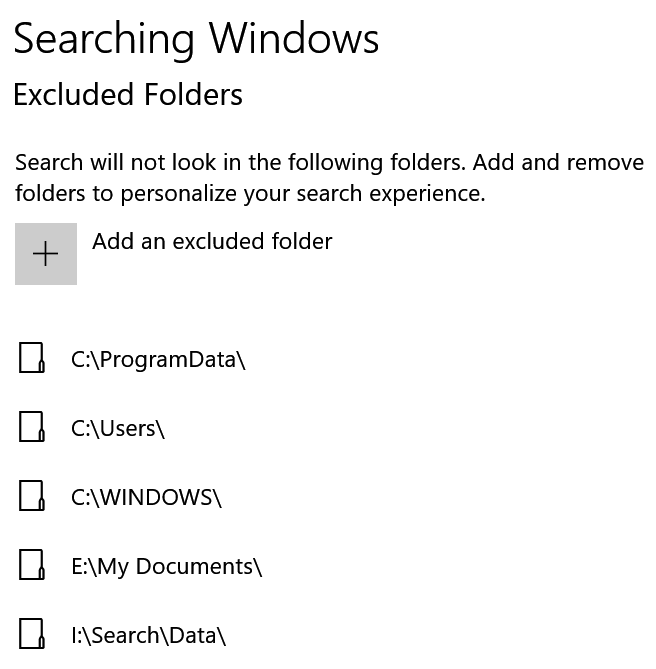
2 Click/tap on Searching Windows on the left side, and click/tap on Add an excluded folder on the right side under Excluded Folders. (see screenshot below)
3 Browse to and select the folder (ex: "C:\Users\Brink\Desktop") you want to exclude, and click/tap on Select Folder. (see screenshot below)
4 When you are finished adding folders to the Excluded Folders list, you can close Settings if you like.
This option is only available starting with Windows 10 build 18267.
This option gets applied to all users on the PC.
You must be signed in as an administrator to use this option.
1 Open Settings (Win+I), and click/tap on the Search icon.
2 Click/tap on Searching Windows on the left side. (see screenshot below)
3 Click/tap on the excluded folder (ex: "C:\Users\Brink\Desktop") you want to remove, and click/tap on the Remove excluded folder button.
It may sometimes take a few moments for the folder to be removed from the Excluded Folders list.
4 When you are finished removing folders from the Excluded Folders list, you can close Settings if you like.
That's it,
Shawn
Related Tutorials
- How to Turn On or Off Enhanced Mode for Search Indexer in Windows 10
- How to Enable or Disable Search Indexing in Windows
- How to Create an Indexing Options Shortcut in Windows 10
- How to Enable or Disable Indexer Backoff in Windows
- How to Reset and Rebuild Search Index in Windows 10
- How to Add or Remove Locations for Search Index in Windows 10
- How to Enable or Disable Modifying Indexed Locations in Windows
- How to Enable or Disable Advanced Indexing Options in Windows
- How to Add or Remove File Types for Search Index in Windows 10
- How to Turn On or Off Indexing Contents and Properties of Files on a Drive in Windows
- How to Turn On or Off to Index Encrypted Files in Windows 10
- How to Change Storage Location of Search Index in Windows 10
- How to Enable or Disable Indexing when on Battery Power in Windows
- How to Turn On or Off Search Indexer Respect Device Power Mode Settings in Windows 10
- How to Use Indexer Diagnostics App for Windows Search Issues in Windows 10
Add or Remove Excluded Folders for Search Indexer in Windows 10
-
New #1
Hi Brink,
You can see Windows trying to move components from Control Panel to Windows Settings.
You have a classic and enhanced mode. If I don't store my documents in my profile, would I need the enhanced mode if I want to find them?
-
New #2
Hello Mattie,
Enhanced mode can help make sure everything is included in the search index, but you could also manually add the new location of your Documents folder to be included in the index.
Add or Remove Search Index Locations in Windows 10 | Tutorials
Turn On or Off Enhanced Mode for Search Indexer in Windows 10 | Tutorials
-
New #3
Thank you.
I installed a Insider build. Classic seems the more restrictive mode where you need to add more location if you have more locations than your profile folders. Enhanced seems like the mode where you have to exclude if you don't want to search everthing.
If you want to have the fastest possible searches, you can better use classic and add other locations than using enhanced mode and exclude folders that you don't want (I think you can exclude a lot of locations on a clean Windows install).
If i'm wrong here, please correct me.
-
New #4
Hi Brink,
I am currently trying to teach win 10 the indexing settings I want (basically I want my C and D drives to be indexed but my H drive (backup) not. Should be simple enough... I thought.
But every time I go to the indexing locations, select my D drive (H remains un-checked), click "Ok" and open the select locations window again, it also checked H --> Problem: when I let the indexing then do it's thing and wait until it finishes, it only shows results from H, not D.
When I then go into the settings again, deselect H (let D checked), click "Ok" and open the select locations window again, then D is also deselected and all the indexing from both drives is deleted again. Ahh yes.. same thing happens, when I exclude H from the win 10 settings (option two in your post).
So it seems like the settings for those two are chained together for some weird windows-doing-it's-thing-reasons....
Could that have something to do with my current D drive (new SSD) being a clone of my former D drive (old HDD, later renamed to H and only used for backups)? And could you think of a way to fix this without completely formatting one of the drives?
Cheers!
-
New #5
Hello EMMURE, and welcome to Ten Forums.
After unchecking "H" in option 1, did you rebuild the index to update it with your changes?
Rebuild Search Index in Windows 10
-
New #6
Thanks for the fast reply!
I think the first time I changed the locations, I did. But later I didn't bother, since each time I change something in the indexing locations, the indexing instantly starts doing it's thing (either deleting the indexing of H and D, or indexing both) without me clicking on rebuild... so I thought this is enough.
Right now it is again indexing both drives... but I have the hunch, that it will again not show any results for D but only for H. If that is indeed the case, I will deselect H and rebuild as you proposed.
(By the way, even right now when both drives are being indexed, the win 10 search settings still show that H is excluded...)
UPDATE: As I expected: In the indexing options it says only H and C are included - when clicking on "Change", both D and H are checked... but search results only show files from H. Then I tried deselecting H and instantly rebuild the indexing, but then again both D and H were deselected
-
New #7
Hi Brink,
I just enabled indexing. Chose the locations
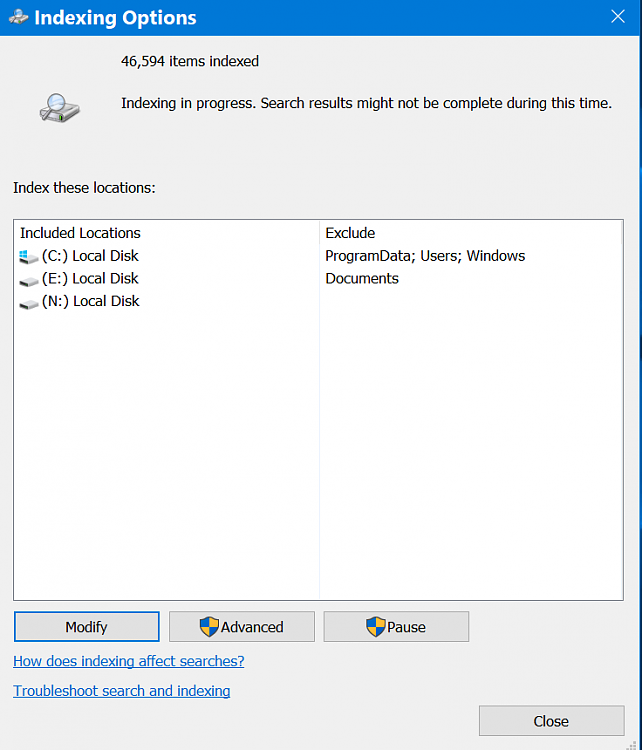
Here's my excluded list
Why is "My Documents" on the list if it resides E:\? Should I just remove it from the list?
-
-
-
Add or Remove Excluded Folders for Search Indexer in Windows 10
How to Add or Remove Excluded Folders for Search Indexer in Windows 10Published by Shawn BrinkCategory: General Tips
28 Jan 2021


 Quote
Quote
Tutorial Categories

Related Discussions
