

How to Backup and Restore On-Screen Keyboard Options in Windows
There are several different kinds of keyboards for PCs. The most common type is a physical, external keyboard that you plug into your PC. While Windows 10 has a touch keyboard, all Windows have a built-in Ease of Access tool called the On-Screen Keyboard (OSK) that can be used instead of a physical keyboard to move around a PC's screen or enter text. You dont need a touchscreen to use the OSK. It displays a visual keyboard with all the standard keys, so you can use your mouse or another pointing device to select keys, or use a physical single key or group of keys to cycle through the keys on the screen.
When you turn on the OSK, a keyboard appears on the screen that can be used to move around the screen and enter text. The keyboard will remain on the screen until you close it.
With the OSK open, you can click/tap on the Options key, and then choose the options you want:
- Use click sound - Use this option if you want to hear a sound when you press a key.
- Show keys to make it easier to move around the screen - Use this option if you want the keys to light up as you type.
- Turn on numeric keypad - Use this option to expand the OSK to show a numeric keypad.
- Click on keys - Use this mode if you prefer to click or tap the on-screen keys to enter text.
- Hover over keys - Use this mode if you use a mouse or joystick to point to a key. The characters you point to are entered automatically when you point to them for a specified time.
- Scan through keys - Use this mode if you want the OSK to continually scan the keyboard. Scan mode highlights areas where you can type keyboard characters by pressing a keyboard shortcut, using a switch input device, or using a device that simulates a mouse click.
- Use Text Prediction - Use this option if you want the OSK to suggest words for you as you type so you don't need to type each complete word.
This tutorial will show you how to back up and restore the On-Screen Keyboard options set by any user account on any Windows 7, Windows 8, and Windows 10 PC.
Contents
- Option One: To Backup On-Screen Keyboard Options of Current Account
- Option Two: To Restore On-Screen Keyboard Options to Current Account
EXAMPLE: On-Screen Keyboard Options
1 Sign in to the user account you want to backup its Filter Keys settings.
2 Press the Win + R keys to open Run, type regedit into Run, and click/tap on OK to open Registry Editor.
3 Navigate to the key below in the left pane of Registry Editor. (see screenshot below)
HKEY_CURRENT_USER\Software\Microsoft\Osk
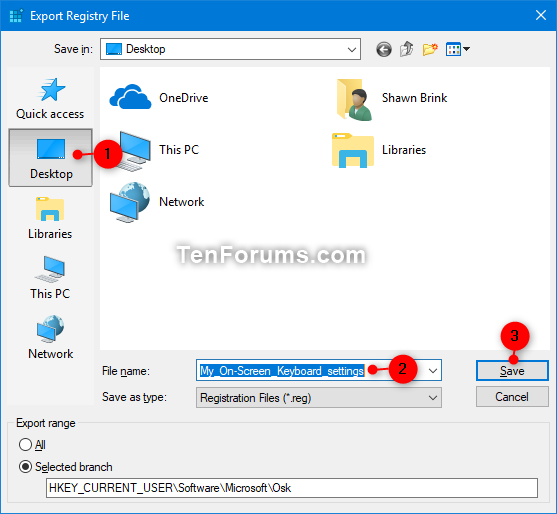
4 Right click on the Osk key in the left pane of Registry Editor, and click/tap on Export. (see screenshot above)
5 Navigate to where you want to export this Osk key to as a .reg file, type a file name (ex: "My_On-Screen_Keyboard_settings") you want for this .reg file, and click/tap on Save. (see screenshot below)
This .reg file is the backup of the current account's On-Screen Keyboard options that you can restore to any user account on any Windows 7, 8, or 10 computer.
6 You can now close Registry Editor if you like.
1 Sign in to the user account you want to restore a backup of Filter Keys settings.
2 If the On-Screen Keyboard is currently open, close it before proceeding to the next step.
3 Double click/tap on the .reg file (ex: "My_On-Screen_Keyboard_settings.reg") created using Option One.
4 When prompted, click/tap on Yes (UAC), Yes, and OK to approve merging the .reg file.
That's it,
Shawn Brink
Backup and Restore On-Screen Keyboard Options in Windows

Backup and Restore On-Screen Keyboard Options in Windows
How to Backup and Restore On-Screen Keyboard Options in WindowsPublished by Shawn BrinkCategory: Backup & Restore
21 May 2021


Tutorial Categories

Related Discussions
