

How to Remove a Drive Letter in Windows 10
By default, Windows 10 will automatically assign an available drive letter to any connected internal and external storage devices.
Windows progresses through the alphabet from A to Z to assign available drive letters to devices as connected.
- Windows usually assigns the drive letters A and B for floppy drives, but they can still be used to manually assign to drives if wanted.
- The drive letter C can only be used for the drive Windows is installed on. If you multi boot operating systems, the currently running Windows will always show its drive letter as C.
- If non-assigned drives are connected then the letters D onwards are allocated in turn.
- If the assigned drive is not connected then Windows will give away its drive letter as part of these allocations.
- If the drive with the assigned drive letter is connected later on then it will simply be allocated the next letter that happens to be available.
If you remove the drive letter from a volume, partition, or disk, it will no longer be available to show as a drive in File Explorer "This PC".
This tutorial will show you different ways to remove a drive letter in Windows 10.
You must be signed in as an administrator to remove a drive letter.
Contents
- Option One: To Remove Drive Letter in Disk Management
- Option Two: To Remove Drive Letter in Command Prompt using Diskpart
- Option Three: To Remove Drive Letter in Command Prompt using Mountvol
- Option Four: To Remove Drive Letter in PowerShell
- Option Five: Remove Drive Letters of Previously Connected Drives and Disks using DiskPart > automount Command
- Option Six: Remove Drive Letters of Previously Connected Drives and Disks using mountvol Command
- Option Seven: To Remove Drive Letter in Settings
1 Press the Win + R keys to open Run, type diskmgmt.msc into Run, and click/tap on OK to open Disk Management.
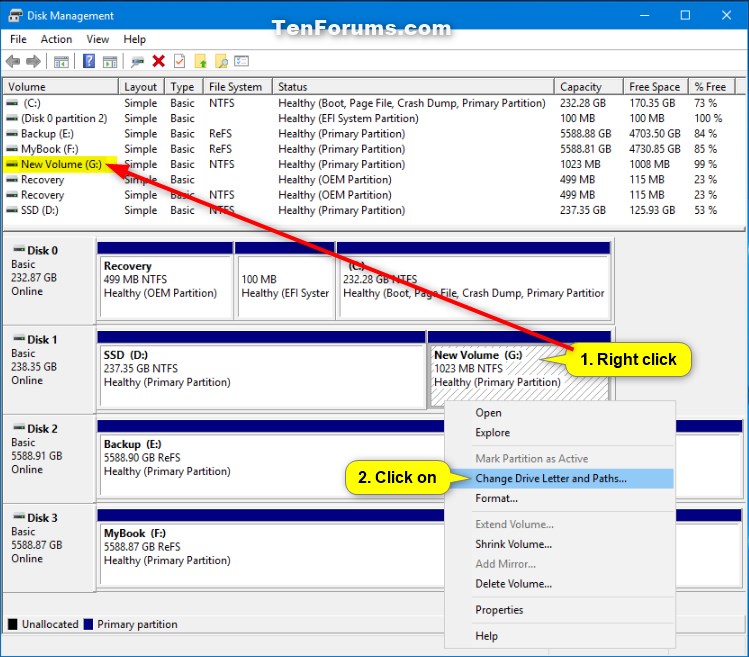
2 Right click or press and hold on the drive (ex: "G") you want to remove the drive letter of, and click/tap on Change Drive Letter and Paths. (see screenshot below)
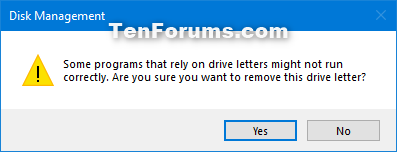
3 Click/tap on the Remove button. (see screenshot below)
4 Click/tap on Yes to confirm. (see screenshot below)
5 When finished, you can close Disk Management if you like.
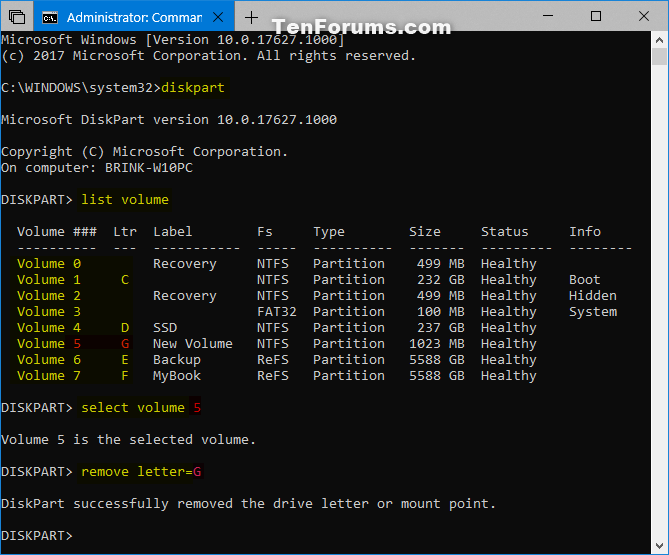
1 Open an elevated command prompt.
2 Typediskpartinto the elevated command prompt, and press Enter. (see screenshot below)
3 Typelist volumeinto the elevated command prompt, and press Enter.
4 Make note of the volume number (ex: 5) for the drive letter (ex: "G") you want to remove.
5 Type the command below into the elevated command prompt, and press Enter.6 Type the command below into the elevated command prompt, and press Enter.
select volume <volume number>
Substitute <volume number> in the command above with the actual volume number (ex: "5") from step 4 above for the drive letter (ex: "G") you want to remove.
For example:select volume 57 When finished, you can close the elevated command prompt if you like.
remove letter=<drive letter>
Substitute <drive letter> in the command above with the actual drive letter (ex: "G") you want to remove.
For example:remove letter=G
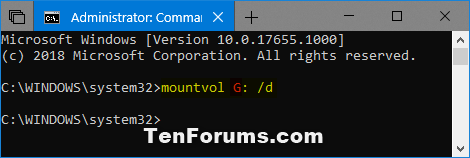
1 Open an elevated command prompt.
3 Type the command below into the elevated command prompt, and press Enter. (see screenshot below)4 When finished, you can close the elevated command prompt if you like.
mountvol <Drive Letter>: /d
Substitute <Drive Letter> in the command above with the actual drive letter (ex: "G") you want to remove.
For example:mountvol G: /d
1 Open an elevated PowerShell.
2 TypeGet-Partitioninto the elevated PowerShell, and press Enter. (see screenshot below)
3 Make note of the disk number (ex: "1") and PartitionNumber (ex: "3") for the DriveLetter (ex: "G") you want to remove.
The disks will be listed in numerical order starting with "0" at the top.
4 Type the command below into the elevated PowerShell, and press Enter to verify the disk number (ex: "1") is correct for the drive letter (ex: "G") you want to remove.5 Type the command below into the elevated PowerShell, and press Enter to verify the disk number (ex: "1") is correct for the drive letter (ex: "G") you want to remove.
Get-Disk <disk number> | Get-Partition
Substitute <disk number> in the command above with the actual disk number (ex: "1") from step 3 above for the drive letter (ex: "G") you want to remove.
For example:Get-Disk 1 | Get-Partition6 When finished, you can close the elevated PowerShell if you like.
Remove-PartitionAccessPath -DiskNumber <disk number> -PartitionNumber <partition number> -Accesspath <drive letter>:
Substitute <disk number> in the command above with the actual disk number (ex: "1") from step 3 and verified in step 4 above for the drive letter (ex: "G") you want to remove.
Substitute <partition number> in the command above with the actual PartitionNumber (ex: "3") from step 3 for the drive letter (ex: "G") you want to remove.
Substitute <drive letter> in the command above with the actual DriveLetter (ex: "G") from step 3 above you want to remove.
For example:Remove-PartitionAccessPath -DiskNumber 1 -PartitionNumber 3 -Accesspath G:
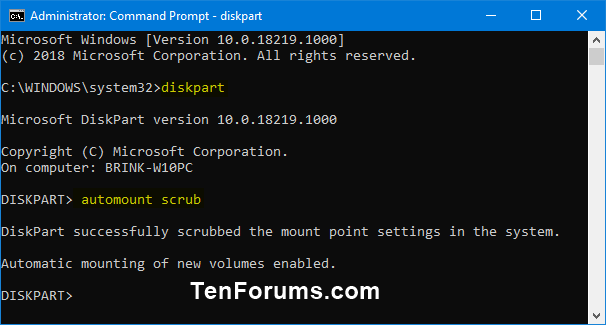
1 Open an elevated command prompt.
2 Typediskpartinto the elevated command prompt, and press Enter. (see screenshot below)
3 Typeautomount scrubinto the elevated command prompt, and press Enter.
4 Close the elevated command prompt.
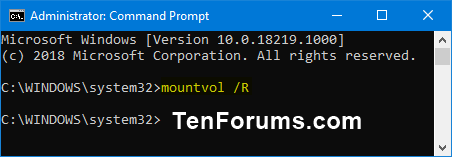
1 Open an elevated command prompt.
2 Typemountvol /rinto the elevated command prompt, and press Enter. (see screenshot below)
3 Close the elevated command prompt.
This option is only available starting with Windows 10 build 20197.
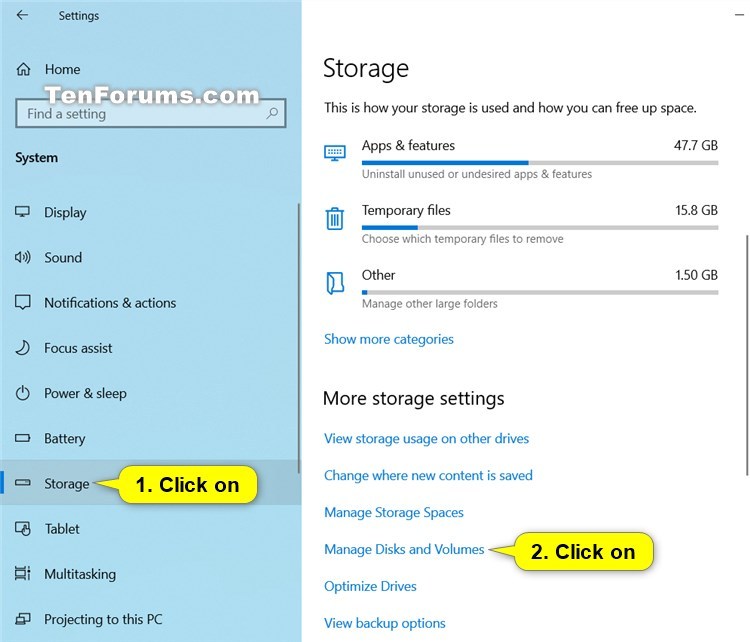
1 Open Settings, and click/tap on the System icon.
2 Click/tap on Storage on the left side, and click/tap on the Manage Disks and Volumes link on the right side. (see screenshot below)
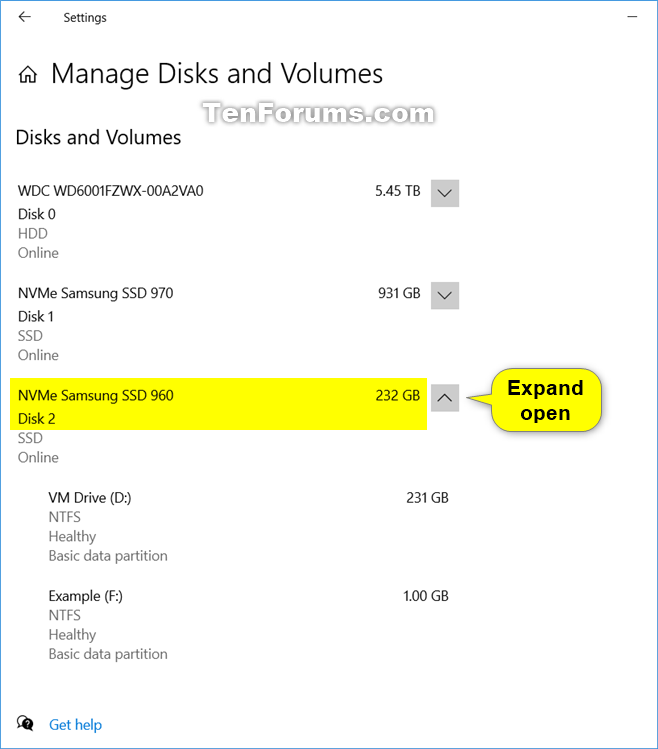
3 Expand open the disk (ex: "Disk 2") that contains the volume you want to remove the drive letter from. (see screenshot below)
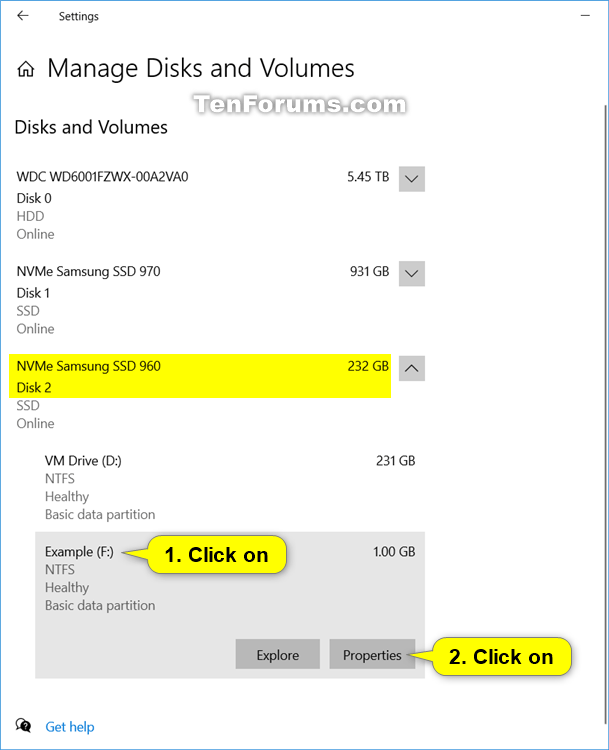
4 Click/tap on the drive (ex: "F") you want to remove the drive letter from, and click/tap on Properties. (see screenshot below)
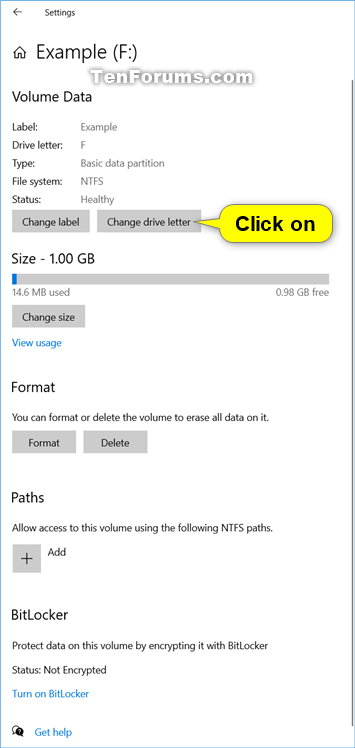
5 Click/tap on the Change drive letter button under the Volume Data section. (see screenshot below)
6 Select a None in the drop menu, and click/tap on OK. (see screenshot below)
7 You can now close Settings if you like.
That's it,
Shawn Brink
Related Tutorials
- How to Change and Assign Drive Letter in Windows 10
- How to Hide or Show Drive Letters in Windows 10
- How to Show Drive Letters Before or After Drive Name in Windows 10
- How to Hide Specified Drives in Windows
- How to Enable or Disable Automatic Mounting of New Disks and Drives in Windows
- How to Mount a Drive to a Folder in Windows 10
- How to Mount and Unmount a Drive or Volume in Windows
Remove Drive Letter in Windows 10
-
-
-
-
New #4
Brink,
Thank you, worked, "F" is no longer shown in "This PC". My brother was bothered by it.
I'm not an advanced user, but better than average I believe.
In Disk Manager it really doesn't matter which drive is listed as Disk 0 and so on, correct?
Mark
-
New #5
You're most welcome Mark.
Usually, Disk 0 would be the Windows drive by default, but it really just depends on which drive is connected the first SATA port and if any other drive was connected when Windows was installed.
It's fine to leave it as is as long you're not having any issues booting to Windows 10.
-
New #6
Brink,
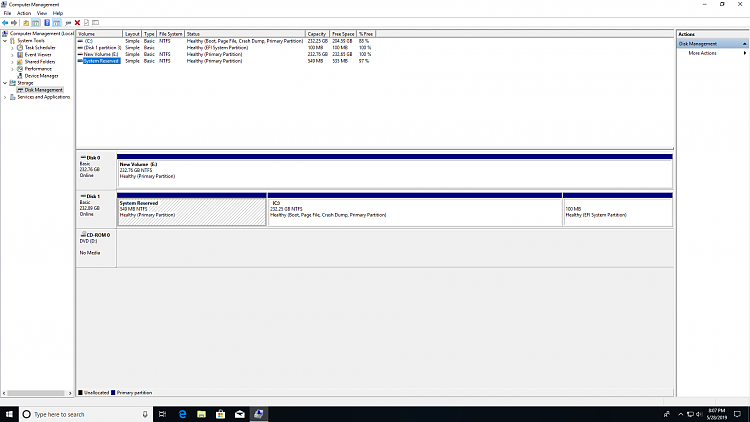
System Boot's and seems to run fine. After removing the "F" drive letter (did remove from This PC) I disconnected all SATA drives, re-booted and drive "C" was Disk "0".
Connected the SATA drives and booted again. Drive "C" moved to Disk "1".
Attached is another screenshot. The System Reserved partition precedes the drive C: partition. Should I assign a drive letter "C" to the System Reserved partition and leave C: on the second partition or remove it?
Mark
-
New #7
No, you don't want to change the "C" drive letter to be for the System Reserved partition. "C" is reserved for the drive Windows is installed on.
It's normal and fine to have a System Reserved partition created like this on the Windows disk without a drive letter.
-
New #8
Brink,
I appreciate your help very much. I won't worry about this if you think it's fine.
We will be adding another SATA storage device that will possibly move the "C" drive again to maybe what, Disk 2?
I'm retiring for the night, so if you reply I won't answer until tomorrow.
Is there a way to move the System Reserved partition after the second or third partition in drive "C" so the partition identified as "C" is listed first? This would have Windows assign drive "C" to disk "0"; do you think?
Mark
-
-
New #9
The "C" drive should still be referenced as Disk 1.
Changing the partition location on the disk wouldn't change its disk number.
You could try swapping the "E" and "C" disk SATA connections, or connecting the "E" drive to a different SATA number higher than the Windows disk is connected to.
Remove Drive Letter in Windows 10
How to Remove a Drive Letter in Windows 10Published by Shawn BrinkCategory: Hardware & Drivers
11 Nov 2022


 Quote
Quote interesting, not very wide used command. Comes handy.

Tutorial Categories

Related Discussions
