

How to Remove a Printer in Windows 10
If you have a printer in Windows 10 that you no longer want added, then you can remove the printer.
This tutorial will show you different ways on how to remove a printer in Windows 10.
You must be signed in as an administrator to remove a printer.
Removing a printer does not uninstall its driver. You would need to manually uninstall the printer driver if wanted.
Contents
- Option One: Remove a Printer in Settings
- Option Two: Remove a Printer in Control Panel
- Option Three: Remove a Printer in Print Management
- Option Four: Remove a Printer in Printers folder
- Option Five:Remove a Printer in Device Manager
- Option Six: Remove a Printer in PowerShell
- Option Seven: Remove a Printer in Command Prompt
1 Open Settings, and click/tap on the Devices icon.
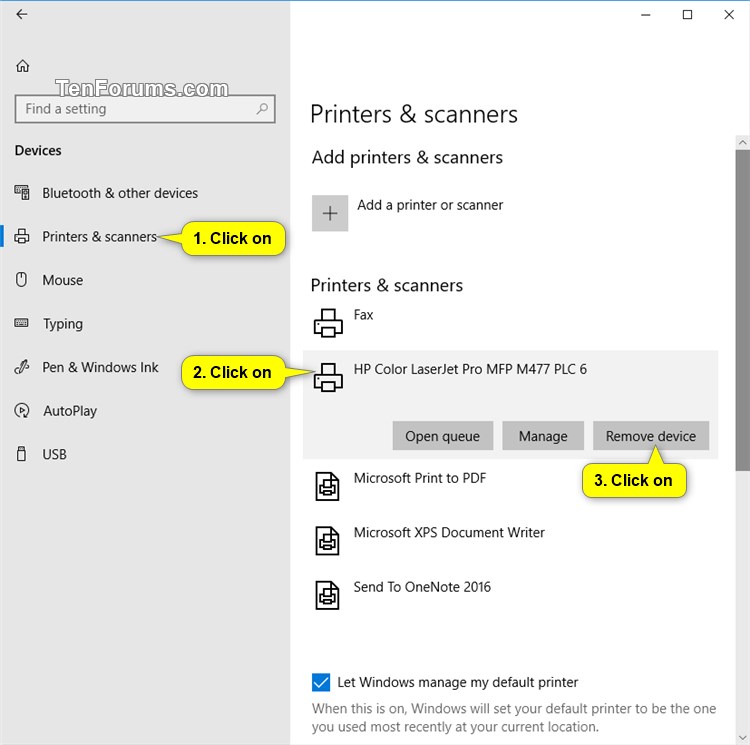
2 Click/tap on Printers & scanners on the left side, click/tap on printer (ex: "HP Color LaserJet Pro MFP M477 PCL 6") you want to remove on the right side, and click/tap on Remove device. (see screenshot below)
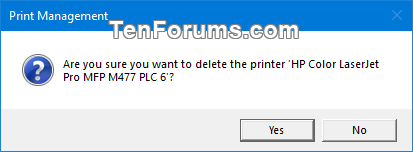
3 Click/tap on Yes to confirm. (see screenshot below)
4 You can now close Settings if you like.
1 Open the Control Panel (icons view), and click/tap on the Devices and Printers icon.
2 Right click or press and hold on the printer (ex: "HP Color LaserJet Pro MFP M477 PCL 6") you want to remove, and click/tap on Remove device. (see screenshot below)
3 Click/tap on Yes to confirm. (see screenshot below)
4 You can now close Devices and Printers if you like.
This option is not available in the Windows 10 Home edition.
1 Press the Win + R keys to open Run, type printmanagement.msc into Run, and click/tap on OK to open Print Management.
2 Expand open Print Servers, expand open your local print server (ex: "Brink-Desktop") for this PC, and open Printers in the left pane of Print Management. (see screenshot below)
3 Right click or press and hold on the printer (ex: "HP Color LaserJet Pro MFP M477 PCL 6") you want to remove in the middle pane of Print Management, and click/tap on Delete. (see screenshot above)
4 Click/tap on Yes to confirm. (see screenshot below)
5 You can now close Print Management if you like.
1 Press the Win + R keys to open Run, type explorer shell:::{2227A280-3AEA-1069-A2DE-08002B30309D} into Run, and click/tap on OK to open the Printers folder.
2 Right click or press and hold on the printer (ex: "HP Color LaserJet Pro MFP M477 PCL 6") you want to remove, and click/tap on Delete. (see screenshot below)
3 Click/tap on Yes to confirm. (see screenshot below)
4 You can now close the Printers folder if you like.
1 Open the Win+X menu, and click/tap on Device Manager.
2 Expand open Print queues or Printers, right click or press and hold on the printer (ex: "HP Color LaserJet Pro MFP M477 PCL 6") you want to remove, and click/tap on Uninstall device. (see screenshots below)

3 Click/tap on Uninstall to confirm. (see screenshot below)
4 You can now close Device Manager if you like.
To see more usage options for the Remove-Printer command, see: Remove-Printer | Microsoft Docs
1 Open an elevated PowerShell.
2 Copy and paste theGet-Printer | Format-List Namecommand into the elevated PowerShell, and press Enter to see a list of all your printers. Make note of the name (ex: "HP Color LaserJet Pro MFP M477 PCL 6") of the printer you want to remove. (see screenshot below)
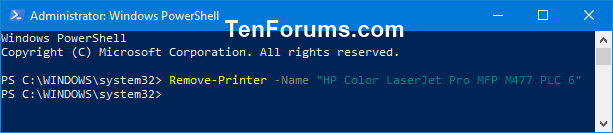
3 Type the command below into the elevated PowerShell, and press Enter. (see screenshot below)
Remove-Printer -Name "Printer name"
Substitute Printer name in the command above with the actual name (ex: "HP Color LaserJet Pro MFP M477 PCL 6") of the printer from step 2 you want to remove.
For example:Remove-Printer -Name "HP Color LaserJet Pro MFP M477 PLC 6"
4 You can now close the elevated PowerShell if you like.
1 Open an elevated command prompt.
2 Copy and paste thewmic printer get namecommand into the elevated command prompt, and press Enter to see a list of all your printers. Make note of the name (ex: "HP Color LaserJet Pro MFP M477 PCL 6") of the printer you want to remove. (see screenshot below)
3 Type the command below into the elevated command prompt, and press Enter. (see screenshot below)
printui.exe /dl /n "Printer name"
Substitute Printer name in the command above with the actual name (ex: "HP Color LaserJet Pro MFP M477 PCL 6") of the printer from step 2 you want to remove.
For example:printui.exe /dl /n "HP Color LaserJet Pro MFP M477 PLC 6"
4 You can now close the elevated command prompt if you like.
That's it,
Shawn Brink
Related Tutorials
- How to Backup and Restore Printers in Windows
- How to Add or Remove Microsoft Print to PDF Printer in Windows 10
- How to Add or Remove Microsoft XPS Document Writer Printer in Windows 10
- How to Rename a Printer in Windows 10
- How to Share a Printer in Windows 10
- How to Add a Shared Printer in Windows 10
- How to Uninstall a Printer Driver in Windows 10
- How to List All Installed Printers in Windows 10
Remove Printer in Windows 10
Remove Printer in Windows 10
How to Remove a Printer in Windows 10Published by Shawn BrinkCategory: Hardware & Drivers
15 Apr 2022


Tutorial Categories

Related Discussions
