

How to Add or Remove Microsoft Print to PDF Printer in Windows 10
Windows 10 allows you to Print to PDF natively using the Microsoft Print to PDF feature. Microsoft Print to PDF lets you create a PDF file of the contents of any web page or file without the need to use third-party software.
The .pdf file created by Microsoft Print to PDF can be opened by any app that supports this format. For example, Adobe Reader, Foxit Reader, etc...
Microsoft Edge is the default app used to open .pdf files with in Windows 10.
This tutorial will show you different ways on how to add or remove the Microsoft Print to PDF printer for all users in Windows 10.
Contents
- Option One: To Remove "Microsoft Print to PDF" Printer in Settings
- Option Two: To Remove "Microsoft Print to PDF" Printer in Devices and Printers
- Option Three: To Remove "Microsoft Print to PDF" Printer in PowerShell
- Option Four: To Remove "Microsoft Print to PDF" Printer in Command Prompt
- Option Five: To Enable or Disable "Microsoft Print to PDF" Feature in Windows Features
- Option Six: To Enable or Disable "Microsoft Print to PDF" Feature in PowerShell
- Option Seven: To Enable or Disable "Microsoft Print to PDF" Feature in Command Prompt
EXAMPLE: "Microsoft Print to PDF" printer
If you want to restore the "Microsoft Print to PDF" printer again after using this option, you will need to disable and then enable the "Microsoft Print to PDF" feature.
1 Open Settings, and click/tap on the Devices icon.
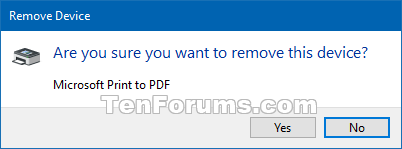
2 Click/tap on Printers & scanners on the left side, click/tap on Microsoft Print to PDF under Printers & scanners on the right side, and click/tap on Remove device. (see screenshot below)
3 Click/tap on Yes to confirm. (see screenshot below)
4 You can now close Settings if you like.
If you want to restore the "Microsoft Print to PDF" printer again after using this option, you will need to disable and then enable the "Microsoft Print to PDF" feature.
1 Open the Control Panel (icons view), and click/tap on the Devices and Printers icon.
2 Right click or press and hold on the Microsoft Print to PDF printer, and click/tap on Remove device. (see screenshot below)
3 Click/tap on Yes to confirm. (see screenshot below)
4 You can now close Devices and Printers if you like.
If you want to restore the "Microsoft Print to PDF" printer again after using this option, you will need to disable and then enable the "Microsoft Print to PDF" feature.
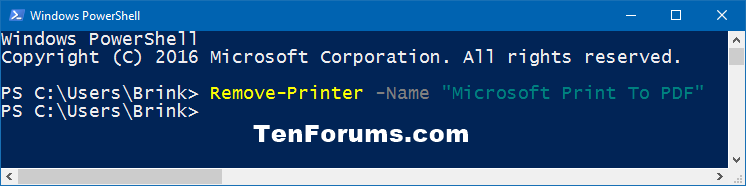
1 Open PowerShell.
2 Copy and paste the command below into PowerShell, and press Enter. (see screenshot below)
Remove-Printer -Name "Microsoft Print to PDF"
3 You can now close PowerShell if you like.
If you want to restore the "Microsoft Print to PDF" printer again after using this option, you will need to disable and then enable the "Microsoft Print to PDF" feature.
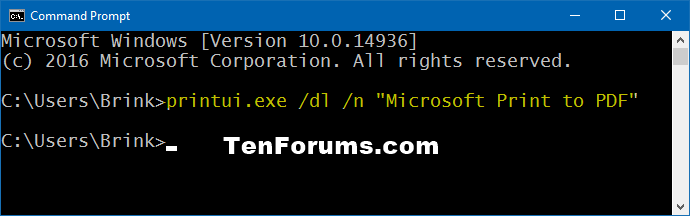
1 Open a command prompt.
2 Copy and paste the command below into the command prompt, and press Enter. (see screenshot below)
printui.exe /dl /n "Microsoft Print to PDF"
3 You can now close the command prompt if you like.
You must be signed in as an administrator to use this option.
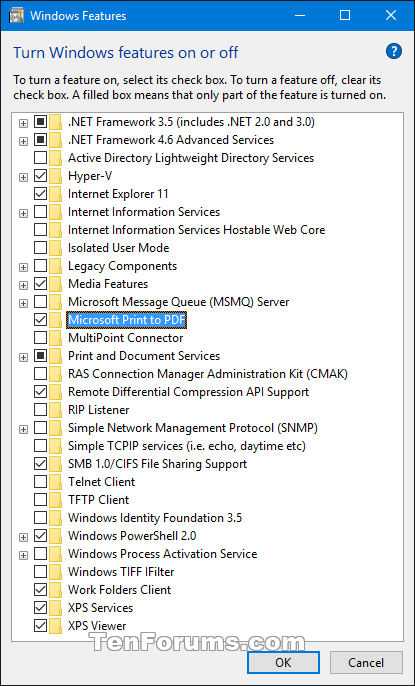
1 Open Windows Features.
2 Check (enable) or Uncheck (disable) Microsoft Print to PDF for what you want, and click/tap on OK. (see screenshot below)
If Microsoft Print to PDF is already checked and you still do not have the printer available, uncheck Microsoft Print to PDF, click/tap on OK, and repeat step 2 to check it. This will toggle Microsoft Print to PDF off and on to repair it.
3 Click/tap on Close. (see screenshot below)
4 You can now close Windows Features if you like.
You must be signed in as an administrator to use this option.
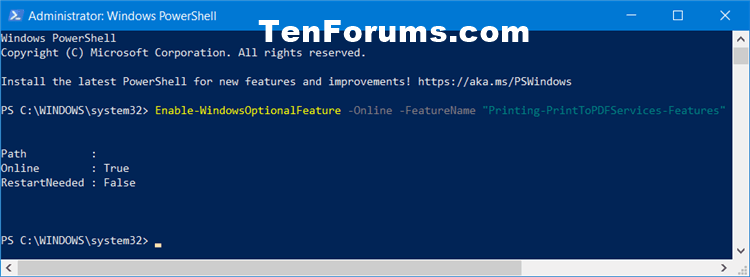
1 Open an elevated PowerShell.
2 Copy and paste the command below you want to use into the elevated PowerShell, and press Enter. (see screenshots below)
(Default - Enable "Microsoft Print to PDF" feature)
Enable-WindowsOptionalFeature -Online -FeatureName "Printing-PrintToPDFServices-Features"
OR
(Disable "Microsoft Print to PDF" feature)
Disable-WindowsOptionalFeature -Online -FeatureName "Printing-PrintToPDFServices-Features"
3 You can now close the elevated PowerShell if you like.
You must be signed in as an administrator to use this option.
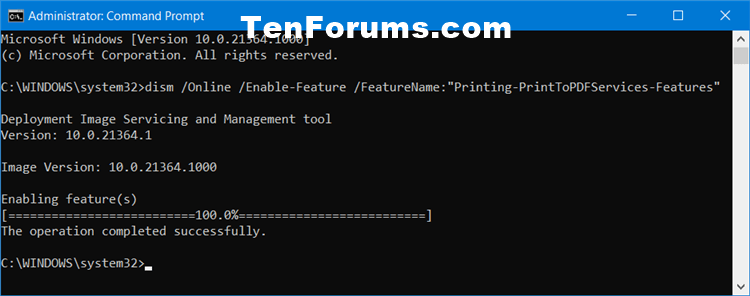
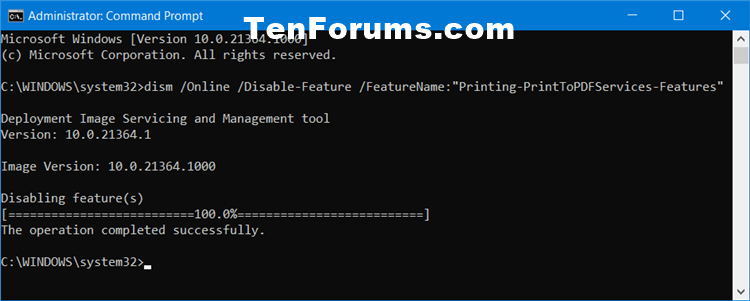
1 Open an elevated command prompt.
2 Copy and paste the command below you want to use into the elevated command prompt, and press Enter. (see screenshots below)
(Default - Enable "Microsoft Print to PDF" feature)
dism /Online /Enable-Feature /FeatureName:"Printing-PrintToPDFServices-Features"
OR
(Disable "Microsoft Print to PDF" feature)
dism /Online /Disable-Feature /FeatureName:"Printing-PrintToPDFServices-Features"
3 You can now close the elevated command prompt if you like.
That's it,
Shawn
Related Tutorials
- How to Print to PDF in Windows 10
- How to Turn On or Off Microsoft Print to PDF in Windows 10
- How to Add or Remove Microsoft XPS Document Writer Printer in Windows 10
- Create Printers Folder Shortcut in Windows
- How to Remove a Printer in Windows 10
Add or Remove Microsoft Print to PDF Printer in Windows 10
-
New #1
Is it possible to add the printer with PowerShell or Command Prompt?
-
New #2
Yep:
PS:Disable-WindowsOptionalFeature -online -FeatureName Printing-PrintToPDFServices-Feature
PS:Enable-WindowsOptionalFeature -online -FeatureName Printing-PrintToPDFServices-Features
CMD:dism /Online /Disable-Feature /FeatureName:"Printing-PrintToPDFServices-Features" /NoRestart
CMD:dism /Online /Enable-Feature /FeatureName:"Printing-PrintToPDFServices-Features" /NoRestart
Add or Remove Microsoft Print to PDF Printer in Windows 10
How to Add or Remove Microsoft Print to PDF Printer in Windows 10Published by Shawn BrinkCategory: Hardware & Drivers
27 Apr 2021


 Quote
QuoteTutorial Categories

Related Discussions
