capture WIM image of KVM W10 VM for convert to physical (V2P)

Page 1 of 2 12 LastLast

  1. Posts : 11,247
    Windows / Linux : Arch Linux
       #1

    capture WIM image of KVM W10 VM for convert to physical (V2P)


    Hi folks

    @Hopachi one for you as well to try out !!!

    I've got a great running W10 KVM virtual machine running with all the software working etc -- so I would like to capture the WIM image via DISM. Also I'd like all the software etc on a Windows ISO so I don't have to re-install again on a new machine.

    The main problem of course is that the Windows ISO (whether you create it from UUPDUMP or MCT won't have the KVM VIRTIO drivers so won't recognize the disk your VM is stored on so can't capture the image.

    Pre condition or step 0 . You should convert the Windows Virtual hard disk from QCOW2 to RAW format first if your HDD is in QCOW2 format and install the VIRTIO disk drivers if not already done. RAW always works better BTW. This is easily done via img-convert in QEMU and check that the W10 VM boots. Also ensure any data etc is solely on the Windows partition / virtual disk --same as for capturing a WIM image on a Real physical machine.

    So step 1 is to Slipstream the VIRTIO drivers into the Windows install ISO.

    That's done by following this excellent link -- just ignore all the proxmox stuff -- we only want to slipstream the drivers into the ISO so that we can capture the WIM image of the running Virtual Machine !!!!!.

    GitHub - Zer0CoolX/proxmox-windows-slipstream-virtio-drivers: Step-by-step guide to slipstream VirtIO drivers into Windows ISO's for use in Proxmox VE

    Now you can boot the ISO in your Virtual machine , get into command mode and capture the WIM via Kari's excellent tutorial.

    Have fun folks !!!

    Cheers
    jimbo
      My Computer


  2. Posts : 1,777
    Windows 11 [21H2]
       #2

    You should post this on Tutorials. You can help people for that. (just recommending)
      My Computers


  3. Posts : 11,247
    Windows / Linux : Arch Linux
    Thread Starter
       #3

    jbcarreon123 said:
    You should post this on Tutorials. You can help people for that. (just recommending)
    Hi there
    Before doing that I want to make 100% that it works !!! also without having to download the Windows deployment kit -- I need to ensure that the cmd mode of the ISO I've injected the drivers into can see the disk the current running partition of Windows is on.

    Current versions of Windows can do this via the DISM command too -- for boot one just needs to inject the disk drivers into the boot.wim which is what I'm playing with at the moment.

    Will hopefully make a decent tutorial when its all working effortlessly. !!!

    (You don't need the virtio Disk drivers once you've imaged the running system and applied to physical machine - however you do need them for running the DISM command from the install ISO so that it can see the disk you want to capture the image from.)


    Cheers
    jimbo
      My Computer


  4. Posts : 1,323
    Windows 11 Pro 64-bit
       #4

    @jimbo45
    Sounds interesting.
    Thanks for mentioning this.
    I'll give it a try this week once I get more time on the laptop. I do have a W10 install I can use this for.

    Will need to convert from QCOW2. Noted.

    I see no second link there so just in case, is it this tutorial from Kari you mention?
    DISM - Clone and Deploy using FFU Image

    Cheers!
    H
      My Computers


  5. Posts : 34
    Linux
       #5

    You can also turn the image into a backing store, and create a new image based on that backing store:

    qemu-img create -f qcow2 -F qcow2 -b current_image.qcow2 new_image.qcow2

    Then all changes are done on the new image, and these changes can be undone by re-running the above command. You also have the option to later on merge the new image into the backing store.
      My Computer


  6. Posts : 11,247
    Windows / Linux : Arch Linux
    Thread Starter
       #6

    siepo said:
    You can also turn the image into a backing store, and create a new image based on that backing store:

    qemu-img create -f qcow2 -F qcow2 -b current_image.qcow2 new_image.qcow2

    Then all changes are done on the new image, and these changes can be undone by re-running the above command. You also have the option to later on merge the new image into the backing store.
    Hi there

    @siepo
    That's fine and a good idea but the point of this project is to inject the VIRTIO disk drivers into the WIM.BOOT so when you boot the Windows ISO in command mode on the VM the system can see the old Windows system on its VIRTIO HDD.

    The end point of the project is to perform a Virtual->Physical conversion (V2P) by being able to via DISM apply the captured image from the Windows KVM VM to a physical HDD and boot that up on a Real (Physical) machine with all my software installed plus email accounts etc etc.

    I can also make a Windows to Go of this too -- once you've got a working captured image you can then apply it to an external SSD for example and apply the boot as per this thread.

    Create Free Windows to Go system on ext USB/SSD disks (UEFI system)

    Windows will have automatically installed SATA drivers and relevent Video and Network NIC's but you need the initial VIRTIO disk drivers so that the initial Windows Disk (on the VM) can be recognized and read. !!!!!

    Cheers
    jimbo
      My Computer


  7. Posts : 1,323
    Windows 11 Pro 64-bit
       #7

    jimbo45 said:
    ...we only want to slipstream the drivers into the ISO so that we can capture the WIM image of the running Virtual Machine !!!!!.
    If capturing the WIM is the main purpose, why not capturing directly without slipstream drivers on iso?
    I know is a nice-to-have a virtio iso built in Windows image but you can skip the slipstream process if the end goal is capturing the WIM of an installed VM on virtio disk.

    It's a combo you need to do but works like this:
    Use two (SATA) virtual DVD drives in the VM, one for W10 ISO and one for Virtio ISO.
    You boot regular Windows ISO, go to 'Windows install' and add the virtio drivers there. Via 'Load driver' option since virtio disk won't be visible by default. You browse for the virtio drivers in second DVD...

    capture WIM image of KVM W10  VM for convert to physical (V2P)-image.png
    If you see your (virtio) disk appear: great, close setup.
    Don't mind the disk in screenshot, as example I used an empty one in a fresh VM.

    capture WIM image of KVM W10  VM for convert to physical (V2P)-image.png
    Don't power off the VM. From here we're in business.
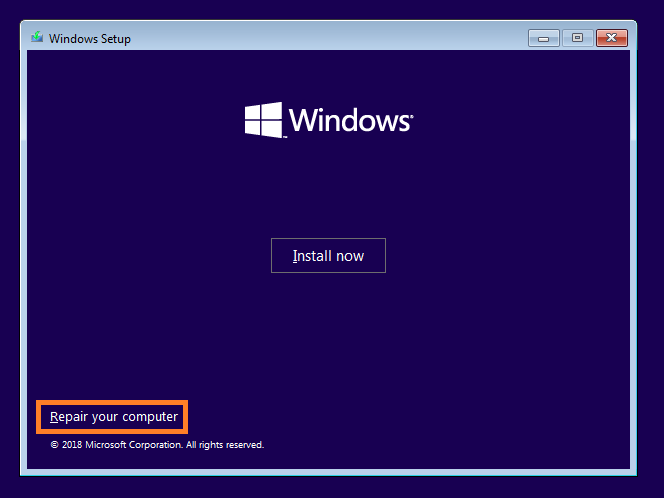
    Go to 'repair your computer' --> command prompt.
    The virtio driver you've added to setup still applies here so you can input the commands as your disk is already available.
      My Computers


  8. Posts : 11,247
    Windows / Linux : Arch Linux
    Thread Starter
       #8

    Hopachi said:
    If capturing the WIM is the main purpose, why not capturing directly without slipstream drivers on iso?
    I know is a nice-to-have a virtio iso built in Windows image but you can skip the slipstream process if the end goal is capturing the WIM of an installed VM on virtio disk.

    It's a combo you need to do but works like this:
    Use two (SATA) virtual DVD drives in the VM, one for W10 ISO and one for Virtio ISO.
    You boot regular Windows ISO, go to 'Windows install' and add the virtio drivers there. Via 'Load driver' option since virtio disk won't be visible by default. You browse for the virtio drivers in second DVD...

    capture WIM image of KVM W10  VM for convert to physical (V2P)-image.png
    If you see your (virtio) disk appear: great, close setup.
    Don't mind the disk in screenshot, as example I used an empty one in a fresh VM.

    capture WIM image of KVM W10  VM for convert to physical (V2P)-image.png
    Don't power off the VM. From here we're in business.
    Go to 'repair your computer' --> command prompt.
    The virtio driver you've added to setup still applies here so you can input the commands as your disk is already available.
    Hi there
    Good idea too -- I need to test whether the "repair computer" option still has the disk visible as I believe it does a re-boot rather than just switch into command mode - and hence won't have the VIRTIO drivers. I'm sure I tried something like that at first but can't remember.

    I'd still also like a Windows install ISO with the slipstreamed drivers so I can use as generalised ISO for Windows install on other machines too. !!

    Cheers
    jimbo
      My Computer


  9. Posts : 1,323
    Windows 11 Pro 64-bit
       #9

    jimbo45 said:
    Hi there
    Good idea too -- I need to test whether the "repair computer" option still has the disk visible as I believe it does a re-boot rather than just switch into command mode - and hence won't have the VIRTIO drivers. I'm sure I tried something like that at first but can't remember.
    I've tried it recently and worked.
    The blue background with options is not a reboot, I've done that while a Macrium Reflect was visible in front of it too.

    jimbo45 said:
    I'd still also like a Windows install ISO with the slipstreamed drivers so I can use as generalised ISO for Windows install on other machines too. !!
    I've figured. It's indeed a useful one to have.
    Avoids the mess process I've described.
      My Computers


  10. Posts : 11,247
    Windows / Linux : Arch Linux
    Thread Starter
       #10

    Hopachi said:
    I've tried it recently and worked.
    The blue background with options is not a reboot, I've done that while a Macrium Reflect was visible in front of it too.


    I've figured. It's indeed a useful one to have.
    Avoids the mess process I've described.
    Thanks

    Can't award you another rep unfortunately as Forum says "Must spread some around before giving this user ..."

    However consider youself "Rewarded" anyway.

    Cheers
    jimbo
      My Computer


  Related Discussions
Our Sites
Site Links
About Us
Windows 10 Forums is an independent web site and has not been authorized, sponsored, or otherwise approved by Microsoft Corporation. "Windows 10" and related materials are trademarks of Microsoft Corp.

© Designer Media Ltd
All times are GMT -5. The time now is 05:09.
Find Us


Windows 10 Forums