Windows 10 autounattend xml installation problem


  1. Posts : 5
    windows 10 pro
       #1

    Windows 10 autounattend xml installation problem


    Hi guys, I have a problem with autounattend XML install. Basically, I have a Windows image that is downloaded from MS and edited to skip all steps for setup. The windows boots and wipe the hard drive created partitions, select language, and created one admin account with the password. The image work when I test it on a laptop and everything seems fine. The image is not working on Virtual box or Hyper- V, when it's, starts on the parts that create partitions I received that error:
    windows could not create a partition on disk 0 the error occurred while applaying the auto unnatednd asnwer file's < DiskConffiguration>Setting. Error code: 0x80042565 . The main issue is that I set up a TFTP server and crated WinPE to boot from the samba server where the image is so that I can boot it from the network. When I tested the image from the server it's finding the image and start the setup but I receive the same error with the creation of the partitions like on a virtual machine. With a flash drive, it works I don't know what might be the problem if someone has an idea?
      My Computer


  2. Posts : 4,163
    Windows 11 Pro, 22H2
       #2

    First, regarding the problem on on Virtual box and Hyper-V. Is you answer file created to configure partitions for a UEFI/GPT based system or for a BIOS/MBR based system? Are you sure that Virtual box and HyperV are likewise configured the same?

    I'm not familiar with Virtual box, but in Hyper-V a generation 1 VM would be BIOS/MBR and a generation 2 VM would be UEFI/GPT.

    Something else to check: When you get the error message, press SHIFT + F10 to open a command prompt and then run the following commands:

    diskpart (after this command wait for the "diskpart>" prompt before issuing the next command).
    list disk
    exit

    Can you verify that the disk to which Windows should be installed is really showing up as disk 0?

    With the TFPT server installation I'm even less certain, but since the error is the same I would still try the same thing as noted above.

    If that does not help, is there any chance that you could post a copy of the autounattend.xml answer file here?
      My Computers


  3. Posts : 5
    windows 10 pro
    Thread Starter
       #3

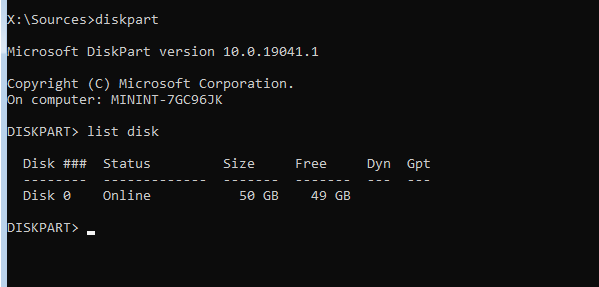
    Hi, In Hyper-V Gen 2 the windows is not booting(it say that is not finding the boot file ) only in Gen 1 and then I see the error: When I check the diskpart i see disk 0 with status onlineWindows 10 autounattend xml installation problem-disk.png

    And this is the answer :
    Code:
    <?xml version="1.0" encoding="UTF-8"?>
    
    -<unattend xmlns="urn:schemas-microsoft-com:unattend">
    
    
    -<settings pass="windowsPE">
    
    
    -<component language="neutral" xmlns:xsi="http://www.w3.org/2001/XMLSchema-instance" xmlns:wcm="http://schemas.microsoft.com/WMIConfig/2002/State" versionScope="nonSxS" publicKeyToken="31bf3856ad364e35" processorArchitecture="amd64" name="Microsoft-Windows-International-Core-WinPE">
    
    
    -<SetupUILanguage>
    
    <WillShowUI>OnError</WillShowUI>
    
    </SetupUILanguage>
    
    <InputLocale>en-US</InputLocale>
    
    <SystemLocale>en-US</SystemLocale>
    
    <UILanguage>en-US</UILanguage>
    
    <UserLocale>en-US</UserLocale>
    
    </component>
    
    
    -<component language="neutral" xmlns:xsi="http://www.w3.org/2001/XMLSchema-instance" xmlns:wcm="http://schemas.microsoft.com/WMIConfig/2002/State" versionScope="nonSxS" publicKeyToken="31bf3856ad364e35" processorArchitecture="amd64" name="Microsoft-Windows-Setup">
    
    
    -<DiskConfiguration>
    
    
    -<Disk wcm:action="add">
    
    
    -<CreatePartitions>
    
    
    -<CreatePartition wcm:action="add">
    
    <Order>1</Order>
    
    <Size>500</Size>
    
    <Type>Primary</Type>
    
    </CreatePartition>
    
    
    -<CreatePartition wcm:action="add">
    
    <Extend>true</Extend>
    
    <Order>4</Order>
    
    <Type>Primary</Type>
    
    </CreatePartition>
    
    
    -<CreatePartition wcm:action="add">
    
    <Order>3</Order>
    
    <Size>16</Size>
    
    <Type>MSR</Type>
    
    </CreatePartition>
    
    
    -<CreatePartition wcm:action="add">
    
    <Order>2</Order>
    
    <Size>100</Size>
    
    <Type>EFI</Type>
    
    </CreatePartition>
    
    </CreatePartitions>
    
    
    -<ModifyPartitions>
    
    
    -<ModifyPartition wcm:action="add">
    
    <Format>NTFS</Format>
    
    <Label>WinRE</Label>
    
    <Order>1</Order>
    
    <PartitionID>1</PartitionID>
    
    <TypeID>DE94BBA4-06D1-4D40-A16A-BFD50179D6AC</TypeID>
    
    </ModifyPartition>
    
    
    -<ModifyPartition wcm:action="add">
    
    <Format>NTFS</Format>
    
    <Order>4</Order>
    
    <PartitionID>4</PartitionID>
    
    <Letter>C</Letter>
    
    <Label>Windows</Label>
    
    </ModifyPartition>
    
    
    -<ModifyPartition wcm:action="add">
    
    <Order>3</Order>
    
    <PartitionID>3</PartitionID>
    
    </ModifyPartition>
    
    
    -<ModifyPartition wcm:action="add">
    
    <Format>FAT32</Format>
    
    <Order>2</Order>
    
    <PartitionID>2</PartitionID>
    
    <Label>System</Label>
    
    </ModifyPartition>
    
    </ModifyPartitions>
    
    <DiskID>0</DiskID>
    
    <WillWipeDisk>true</WillWipeDisk>
    
    </Disk>
    
    </DiskConfiguration>
    
    
    -<ImageInstall>
    
    
    -<OSImage>
    
    
    -<InstallTo>
    
    <DiskID>0</DiskID>
    
    <PartitionID>4</PartitionID>
    
    </InstallTo>
    
    </OSImage>
    
    </ImageInstall>
    
    
    -<UserData>
    
    
    -<ProductKey>
    
    <Key>VK7JG-NPHTM-C97JM-9MPGT-3V66T</Key>
    
    </ProductKey>
    
    <AcceptEula>true</AcceptEula>
    
    <Organization>TitanGate</Organization>
    
    </UserData>
    
    </component>
    
    </settings>
    
    
    -<settings pass="specialize">
    
    
    -<component language="neutral" xmlns:xsi="http://www.w3.org/2001/XMLSchema-instance" xmlns:wcm="http://schemas.microsoft.com/WMIConfig/2002/State" versionScope="nonSxS" publicKeyToken="31bf3856ad364e35" processorArchitecture="amd64" name="Microsoft-Windows-Shell-Setup">
    
    
    -<OEMInformation>
    
    <Manufacturer>DELL</Manufacturer>
    
    <Model>Latitude</Model>
    
    </OEMInformation>
    
    <CopyProfile>true</CopyProfile>
    
    <RegisteredOwner>TitanGate</RegisteredOwner>
    
    <TimeZone>FLE Standard Time</TimeZone>
    
    <ComputerName>WorkStation</ComputerName>
    
    </component>
    
    </settings>
    
    
    -<settings pass="oobeSystem">
    
    
    -<component language="neutral" xmlns:xsi="http://www.w3.org/2001/XMLSchema-instance" xmlns:wcm="http://schemas.microsoft.com/WMIConfig/2002/State" versionScope="nonSxS" publicKeyToken="31bf3856ad364e35" processorArchitecture="amd64" name="Microsoft-Windows-International-Core">
    
    <InputLocale>en-US</InputLocale>
    
    <SystemLocale>en-US</SystemLocale>
    
    <UILanguage>en-US</UILanguage>
    
    <UserLocale>en-US</UserLocale>
    
    </component>
    
    
    -<component language="neutral" xmlns:xsi="http://www.w3.org/2001/XMLSchema-instance" xmlns:wcm="http://schemas.microsoft.com/WMIConfig/2002/State" versionScope="nonSxS" publicKeyToken="31bf3856ad364e35" processorArchitecture="amd64" name="Microsoft-Windows-Shell-Setup">
    
    
    -<OOBE>
    
    <HideEULAPage>true</HideEULAPage>
    
    <HideOEMRegistrationScreen>true</HideOEMRegistrationScreen>
    
    <HideOnlineAccountScreens>true</HideOnlineAccountScreens>
    
    <HideWirelessSetupInOOBE>true</HideWirelessSetupInOOBE>
    
    <ProtectYourPC>1</ProtectYourPC>
    
    </OOBE>
    
    
    -<UserAccounts>
    
    
    -<LocalAccounts>
    
    
    -<LocalAccount wcm:action="add">
    
    
    -<Password>
    
    <Value>IQA2ADcAbQAqAHgAXwA4ADAAMABzAGQAUABhAHMAcwB3AG8AcgBkAA==</Value>
    
    <PlainText>false</PlainText>
    
    </Password>
    
    <Description>Administrator</Description>
    
    <DisplayName>Admin</DisplayName>
    
    <Group>Administrators</Group>
    
    <Name>Admin</Name>
    
    </LocalAccount>
    
    </LocalAccounts>
    
    </UserAccounts>
    
    </component>
    
    </settings>
      My Computer


  4. Posts : 4,163
    Windows 11 Pro, 22H2
       #4

    Ok, that's a good start.

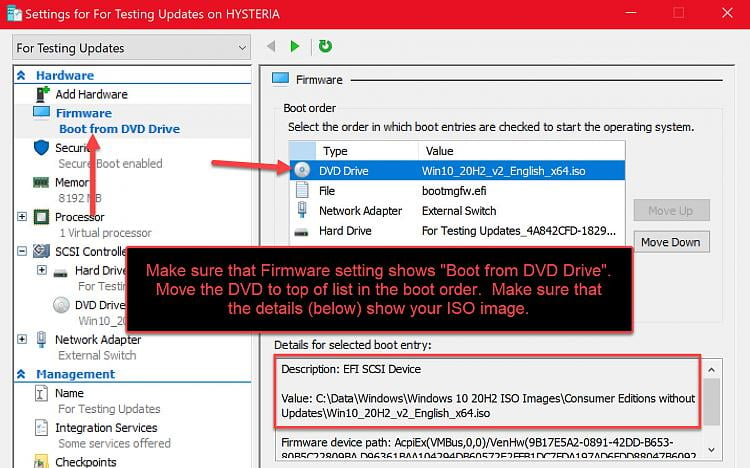
    Your answer file is made for a Gen 2 Hyper-V. It won't work on Gen 1.

    Verify the settings I have outlined in the image below:

    Windows 10 autounattend xml installation problem-image1.jpg

    NOTE: I have not looked at the answer file in detail. If you are still having difficulty, I'll look closer, but for now, time for sleep. It's 0500 here
      My Computers


  5. Posts : 4,163
    Windows 11 Pro, 22H2
       #5

    Let me ask for one more detail in case the above does not work. How was your ISO image made? Did you make any other modifications to your ISO image other than to add the answer file to it?

    How did you make it back into an ISO image file then?
      My Computers


  6. Posts : 5
    windows 10 pro
    Thread Starter
       #6

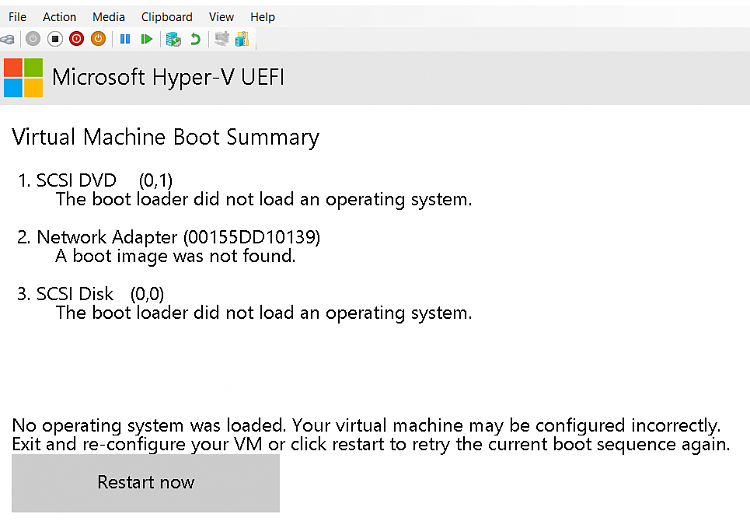
    Hyper V gen2 configurations are like yours but when I start the VM I get that error:Windows 10 autounattend xml installation problem-fail.png
    I have done one more thing to the image, I loaded the image with NTLITE and there is an option explore mount directory basically there you can add a folder with files so when the image is installed for example you can have it in C:\CustomFolder with files and after that, with the program, you created the ISO file.
      My Computer


  7. Posts : 4,163
    Windows 11 Pro, 22H2
       #7

    When you boot the VM, do you even see the message that says to press any key to boot from the DVD? If you don't see that then there must be something wrong with how the image was created.

    My suggestion is to use the Microsoft OSCDIMG utility which is installed when you install the ADK. Since you are working with unattended install just assuming you have the ADK installed.

    Enter the following command. Note that this is a single long command. Be careful – there are no spaces in some of the places you might expect a space to be present. I suggest performing a copy / paste from here and then change those parameters that need to be altered:

    Code:
    oscdimg.exe -m -o -u2 -udfver102 -bootdata:2#p0,e,bc:\iso_files\boot\etfsboot.com#pEF,e,bc:\iso_files\efi\microsoft\boot\efisys.bin c:\iso_files c:\Win10PROx64.iso
    Replace the 3 occurrences of c:\iso_files with the correct path to where your files are located. Also, replace the c:\Win10PROx64.iso at the end of command with the correct path and name for the output file that you want to save. If that path contains spaces, enclose it in double quotes.
      My Computers


  8. Posts : 5
    windows 10 pro
    Thread Starter
       #8

    Thank you! I was able to boot the ISo when crated as you said. Currently, I don't see the error of disk 0 I assume that it will work on my TFTP server but now I can't test it because I'm not it the office. Thank you again.
      My Computer


  9. Posts : 4,163
    Windows 11 Pro, 22H2
       #9

    That's good news! Let me know how it goes with the TFTP server.
      My Computers


  Related Discussions
Our Sites
Site Links
About Us
Windows 10 Forums is an independent web site and has not been authorized, sponsored, or otherwise approved by Microsoft Corporation. "Windows 10" and related materials are trademarks of Microsoft Corp.

© Designer Media Ltd
All times are GMT -5. The time now is 11:45.
Find Us


Windows 10 Forums