Personalization possible pre-activation in VMware, not Hyper-V. Why?

Page 1 of 2 12 LastLast

  1. Posts : 4,187
    Windows 11 Pro, 22H2
       #1

    Personalization possible pre-activation in VMware, not Hyper-V. Why?


    I have an observation that has led me to a question...

    Normally, when Windows 10 is installed, changes to the personalization settings are not possible until you activate Windows. However, I have noticed that both on a physical machine and when Windows is installed in VMware Workstation, so long as the network adapter is disabled, you can successfully change personalization settings. Once you enable the network adapter and Windows communicates with the activation servers this capability is lost, even if you disable the network adapter again.

    In Hyper-V this is not true. Even with networking disabled, personalization is not possible until Windows is activated.

    I'm just curious to know if anyone has any idea on what the underlying cause for the difference in behavior might be.

    Note that this is not any attempt to bypass activation. It's just that I sometimes configure a VM just to perform a couple of quick tests, then I destroy that VM. Along the way I simply noticed this behavior.

    I believe that I may have previously asked this question in the context of another issue quite some time ago, but thought that I would just give this one more try to see if anyone had any ideas.
      My Computers


  2. Posts : 17,661
    Windows 10 Pro
       #2

    Type 1 Hypervisors like Hyper-V must be started before operating system is loaded. Even the host OS runs then on top of the Hypervisor, using physical hardware devices. Virtual machines run then on top of the OS using emulated, virtual hardware devices.

    Type 2 Hypervisors like VMware Workstation and Oracle VirtualBox do not need an underlying hardware Hypervisor. Hypervisor runs on top of OS, and virtual machines on top of OS.

    Personalization possible pre-activation in VMware, not Hyper-V. Why?-hypervisor.png
    (Image from Wikipedia article Hypervisor.)

    This allows Type 2 Hypervisors more direct contact to physical hardware.

    Windows works slightly differently on emulated hardware in Hyper-V, most notable difference being what you've noticed: even when installed without network connection, Windows will be not activated by default until the virtual machine has a network connection and has been properly activated. This prevents personalization.

    Virtual machines on Type 2 Hypervisors, as well as physical machines act in an exact opposite way: They are kind of "pseudo-activated" until the machine has a network connection, at which point if no digital license is found their status will change to not activated.

    This allows physical Windows installations, and those on Type 2 Hypervisor virtual machines to be personalized as long as Windows has been installed without network connection, and machines remain without connection.

    A simple workaround I often use when creating new Generation 2 Hyper-V VM is to first deploy Windows to a virtual hard disk, then boot natively to it. This way, the VHD acts like a physical Windows installation, directly using host's physical hardware devices. You can personalize it, even in Audit Mode, then restart the host, and use the VHD as existing disk when setting up a new VM in Hyper-V.

    Quoting instructions from Ten Forums video thread:

    Kari said:
    New video: Dual Boot - The Easy Way


    The easiest possible method to dual boot. No partitioning, no virtualization required. Deploy Windows 10 on a virtual hard disk VHD or VHDX file, add it to boot menu. When done, when you no longer want to dual boot, just delete the VHD file.
    Note   Note
    When creating VHD file to be used in native boot, always use MBR partitioning! To upgrade Windows on native boot VHD, it must be temporarily attached to a virtual machine. An MBR partitioned VHD is easy to attach to VM, it only needs Windows partition to be marked active, whereas a GPT partitioned VHD with only a single partition for Windows requires manually creating system partitions before it can be used on VM.

    If you for any reason want to use a GPT partitioned VHD in native boot (can't think any valid reason!), it is better and recommended that you first create a Generation 2 VM in Hyper-V, installing Windows 10 on it. This takes care of the partitioning, doing it correctly. The VHD can then be used as native boot VHD, or on a VM.

    See this tutorial for more information: Native boot Virtual Hard Disk - How to upgrade Windows

    The DISKPART script and deployment batch from video:

    DISKPART scripts are normal text files with extension .txt. To run a DISKPART script, enter following command:

    diskpart /s DRIVE:\FOLDER\SCRIPT.TXT

    Here's the script used in video:
    Code:
    create vdisk file=F:\W10PRO.vhdx maximum=51200 type=expandable
    attach vdisk
    create part primary
    format quick label="Windows"
    assign letter=W
    exit
    Save script as VHDConfig.txt

    Above script creates a dynamically expanding MBR partitioned 50 GB (51,200 MB) VHDX file (you can use .vhd or .vhdx) named W10PRO.vhdx in root of drive F:, labels it Windows and assigns it a temporary drive letter W:. Edit script to meet your needs, be sure the drive you create VHD has double the free storage than the size of VHD; if you will create a 100 GB VHD file to be used in dual boot, the drive where it will be created needs 200 GB free.

    Also, be sure to assign an unused drive letter! I always use W: which I have reserved for this purpose, never assigning it to anything else. In any case the drive letter will only be needed for deployment, it will be freed when VHD will be unmounted.

    The deployment batch is really simple, too. It just runs DISKPART script to set up VHD, deploys Windows on it with DISM, adds it to host boot menu and finally changes the boot menu entry to something more descriptive:
    Code:
    start /wait diskpart /s E:\Users\Kari\Scripts\VHDConfig.txt
    start /wait dism /apply-image /imagefile:I:\sources\install.wim /index:8 /applydir:W:\
    start /wait bcdboot W:\Windows
    start /wait bcdedit /set {default} description "W10 PRO EN-GB (VHD)"
    cls
    @echo off
    echo. 
    echo Windows deployed to VHD file
    echo and added to host boot menu.
    echo.
    pause
    exit
    Save batch file as VHDBoot.bat

    Again, edit the batch to meet your needs. Be sure path to DISKPART script is correct, and that path to install.wim (or in case of MCT ISO install.esd) is correct in DISM command. Select correct index value. Check that BCDBOOT will add Windows to boot menu from correct disk, the drive letter here must be the same DISKPART script assigned to VHD.

    Notice that the above quote shows Windows deployment to an MBR VHD, which can only be used on Hyper-V Generation 1 virtual machines.

    Below the VHDConfig.txt DISKPART script to create a GPT VHD, which can be used on Hyper-V Generation 2 virtual machines. It creates UEFI system partitions and Windows partition:

    Code:
    create vdisk file=F:\W10PRO.vhdx maximum=51200 type=expandable
    attach vdisk
    convert gpt
    create partition efi size=100
    format quick fs=fat32 label="System"
    create partition msr size=128
    create partition primary
    shrink minimum=500
    format quick fs=ntfs label="Windows"
    assign letter="W"
    create partition primary
    format quick fs=ntfs label="WinRE"
    set id="de94bba4-06d1-4d40-a16a-bfd50179d6ac"
    exit

    Kari
    Last edited by Kari; 12 Oct 2019 at 10:44. Reason: Some typos fixed.
      My Computer


  3. Posts : 4,187
    Windows 11 Pro, 22H2
    Thread Starter
       #3

    Wow, what a fantastically detailed response. Kari, as always, I very much appreciate the extremely detailed answer.

    This one has been a mystery to me for quite a while, so it's great to finally understand this.
      My Computers


  4. Posts : 17,661
    Windows 10 Pro
       #4

    hsehestedt said:
    This one has been a mystery to me for quite a while, so it's great to finally understand this.
    It is a not too well documented fact, that even the host OS when Hypervisor is enabled (requirement for Hyper-V to function) is kind of virtual, running on top of the Hypervisor.

    This is not an issue, though. Host OS running on top of the Hypervisor does not cause any delays or lack in its functionality. However, it causes some minor issues like the one you've noticed, when a guest OS on a VM is run.

    Kari
      My Computer


  5. Posts : 17,661
    Windows 10 Pro
       #5

    In addition to what has been said:

    Let's see Device Manager on a host OS when Hypervisor is enabled. In this example, here are the network devices:

    Personalization possible pre-activation in VMware, not Hyper-V. Why?-image.png

    Then, a typical Hyper-V VM on that host:

    Personalization possible pre-activation in VMware, not Hyper-V. Why?-image.png

    And last, when the VHD of the same VM is used as native boot VHD, or on Type 2 Hypervisor:

    Personalization possible pre-activation in VMware, not Hyper-V. Why?-image.png

    Looking at these screenshots, it is obvious that having Hypervisor enabled makes a big difference. The difference in how a a VM sees the hardware, depending on if Type 1 or Type 2 Hypervisor is used, is the culprit for different functionality.

    Really short: Virtual machines running on Type 1 Hypervisor behave slightly differently than those running on Type 2 Hypervisors, only because they see the hardware setup differently.

    Kari
      My Computer


  6. Posts : 4,187
    Windows 11 Pro, 22H2
    Thread Starter
       #6

    Beautiful. That also helps a lot.

    Thank you again.

    - - - Updated - - -

    Kari, I have one question regarding the process of making a VHD bootable like this.

    Let's say that my Windows partition is encrypted with bitlocker. Will this still be able to add a menu option to allow booting from a VHD or will bitlocker present a problem?
      My Computers


  7. Posts : 17,661
    Windows 10 Pro
       #7

    hsehestedt said:
    Let's say that my Windows partition is encrypted with bitlocker. Will this still be able to add a menu option to allow booting from a VHD or will bitlocker present a problem?
    No, no problem at all. Windows installation on a VHD is a totally different entity, it does not inherit BitLocker or any other behaviour from the host OS.

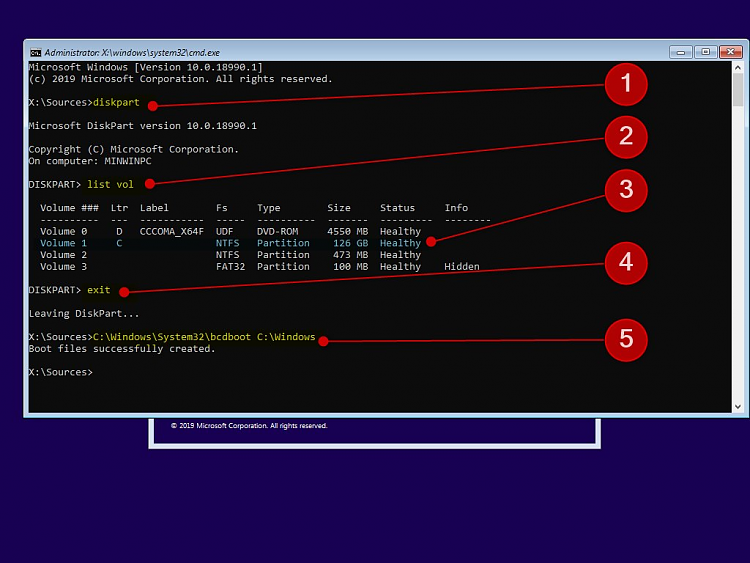
    Just one note: If you use a native boot VHD to setup Windows on a virtual hard disk, then use the said VHD on a new Hyper-V VM, it does not boot because the VM has no boot records.

    To resolve this, boot the new VM first from Windows install media (ISO), press SHIFT + F10 on region selection screen to open Command Prompt, run DISKPART to check the drive letter of Windows partition (#1 & #2 in screenshot), confirm the Windows partition letter (#3), exit DISKPART (#4), and use BCDBOOT command to create boot records (#5) for the VM:

    Personalization possible pre-activation in VMware, not Hyper-V. Why?-image.png

    Kari
      My Computer


  8. Posts : 4,187
    Windows 11 Pro, 22H2
    Thread Starter
       #8

    Thanks, Kari. I'm going to test this all to make sure that I can properly follow your instructions . I'll let you know how it goes.

    - - - Updated - - -

    Progress report:

    Kari, I wanted to update you on my testing which has also led to a couple more questions. NOTE: My questions are at the end of this post.

    First, I found that if bitlocker is enabled on the C: drive, then the bcdboot / bcdedit will trigger bitlocker to ask for the bitlocker recovery keys. This is easy to address by either manually suspending bitlocker before running the batch file, or adding a simple command to the batch file to do it automatically just before running the bcdboot and bcdedit commands.

    Second, if Bitlocker is enabled on C:, you must create the VHD on a drive other than C:. You cannot create it on C:. More accurately, you can create it on C:, but you simply won't be able to boot without providing a recovery key every single time.

    I've gotten to the point in my testing where I can successfully boot the second instance of Windows from the VHD and can confirm that personalization works perfectly. I have not yet tried to follow the instructions to attach the VHD to a VM. That may have to wait since I use VMware workstation and I'm simply not feeling like reconfiguring for Hyper-V at the moment and since I have complete faith in your instructions

    Finally, in case you are interested, here is a tweaked version of the batch file.

    I've made the following changes to the batch file:

    I set variables near the start for all parameters that might potentially change such as paths, name of VHD to create, etc. I also added a variable that can be set to create either a Gen 1 or Gen 2 VHD. I did not get so fancy as to prompt the user for all the information and to incorporate error checking because I just intended this to be a rough framework. I'm going to rewrite in a higher level language tomorrow.

    The batch file alone handles the running of all diskpart commands without the need for an external script file so the diskpart scripts are completely unnecessary when using this batch file.

    If the C: drive is bitlocker encrypted, then the bcdboot and bcdedit commands will trigger bitlocker to ask for the bitlocker recovery key. I've added a fix for this. The batch file will simply suspend bitlocker until the next reboot.

    There is no need to mount the ISO image manually. The program will mount it, determine the drive letter it was mounted to, and unmount it.


    Code:
    @echo off
    setlocal enabledelayedexpansion
    setlocal enableextensions
    cd /d %~dp0
    
    REM Check to see if this batch file is being run as Administrator
    
    openfiles > NUL 2>&1 
    if NOT %ERRORLEVEL% EQU 0 goto NotAdmin 
    goto IsAdmin
    
       :NotAdmin
    
       cls
       echo You have not run this file as Administrator. Please
       echo re-run it as an Administrator.
       echo.
       pause
    
       goto END
    
       :IsAdmin
    
    REM End Routine to check if being run as Admin
    
    REM Before running this batch file, please set the following variables to appropriate values
    REM gen > Set this to "1" to create a Gen 1 VHD (BIOS Based) or set to "2" to create a Gen 2 VHD (UEFI Based)
    REM CurrentSourceFile > Full path to the ISO image to be mounted including the filename and extension
    REM imagepath > The path to the install.wim WITHOUT a drive letter or colon. The program will mount the ISO image specified and determine the drive letter so you don't
    REM need to specify it. For a single architecture ISO image, specify "sources\install.wim". For a multiarchitecture image, use either "x64\sources\install.wim" or "x86\sources\install.wim" (omit the quotes in all of these).
    REM index > Provide the index number of the Windows edition to use within the install.wim
    REM destination > Full path, with filename, to the VHD to be created. Must be on a HD, not removable media
    REM VHDsize > The size of the VHD file to be created in MB. Make sure destination has twice this amount of space available.
    REM DriveLetter > Drive letter (without a colon) to be assigned to the VHD
    REM description > Provide a description here. This is what will be displayed in the selection menu when system is booted
    REM
    
    set gen=2
    set CurrentSourceFile=Z:\Data\Windows\Windows 10 Version 1903 ISO Images\Updated and Customized Images\Customized Multiboot Image.ISO
    set imagepath=x64\sources\install.wim
    set index=6
    set destination=D:\Win10.vhdx
    set VHDsize=51200
    set DriveLetter=W
    set description=Win 10 Pro (VHD)
    
    cls
    echo Creating the VHD
    
    if %gen%==1 goto CreateGen1VHD
    if %gen%==2 goto CreateGen2VHD
    cls
    echo No valid entry for GEN variable was set
    pause
    goto end


    :CreateGen1VHD
    
    (echo create vdisk file="%destination%" maximum=%VHDsize% type=expandable
    echo attach vdisk
    echo create part primary
    echo format quick label="Windows"
    echo assign letter=%DriveLetter%
    echo exit
    ) | diskpart > NUL
    goto VHDCreated
    
    
    :CreateGen2VHD
    
    (echo create vdisk file="%destination%" maximum=%VHDsize% type=expandable
    echo attach vdisk
    echo convert gpt
    echo create partition efi size=100
    echo format quick fs=fat32 label="System"
    echo create partition msr size=128
    echo create partition primary
    echo shrink minimum=500
    echo format quick fs=ntfs label="Windows"
    echo assign letter=%DriveLetter%
    echo create partition primary
    echo format quick fs=ntfs label="WinRE"
    echo set id="de94bba4-06d1-4d40-a16a-bfd50179d6ac"
    echo exit
    ) | diskpart > NUL
    goto VHDCreated


    :VHDCreated
    
    echo Mounting the ISO image file
    
    call :MountAnISOImage "%CurrentSourceFile%"
    
    echo Applying the image to the VHD. You can view progress below.
    
    dism /apply-image /imagefile:%MountedImageDriveLetter%\%imagepath% /index:%index% /applydir:%DriveLetter%:\
    
    echo Dismounting the image file
    
    powershell.exe -command "Dismount-DiskImage "'%CurrentSourceFile%'"" > NUL
    
    REM If Bitlocker is enabled on C:, it needs to be temporarily suspended until the next reboot
    REM to prevent the following changes bcdboot bcdedit commands from causing the system
    REM to ask for the recovery key
    
    echo.
    Echo If Bitlocker is enabled we are suspending temporarily (until the next boot into this instace of Windows)
    
    manage-bde -protectors -disable C: > NUL
    
    Echo Updating boot information
    
    bcdboot %DriveLetter%:\Windows > NUL
    bcdedit /set {default} description "%description%" > NUL
    echo. 
    echo ***********************************************
    echo * Done. Windows has been deployed to VHD file *
    echo * and the host boot menu has been updated.    *
    echo ***********************************************
    echo.
    pause
    
    :end
    
    exit


    REM -----------------------------------
    
    :MountAnISOImage
    
    REM This routine should be called by passing the full path to the ISO image to it.
    REM It will mount the ISO image and then determine what drive letter it is mounted to and also
    REM CDROM ID associated with it. While some programs, such as robocopy, can reference the
    REM mounted image via this ID, we are only using the drive letter in this program.
    REM The drive letter with a colon will be saved in the variable called MountedImageDriveLetter.
    REM Example: F:
    REM The CDROM ID will be saved in MountedImageCDROMID. Example: \\.\CDROM0.
    
    REM Grab the path to the image to be mounted, assign it to SubImagePath, and strip quotes from the path.
    
    set SubImagePath=%1
    set SubImagePath=%SubImagePath:"=%
    
    REM Mount the image.
    
    powershell.exe -command "Mount-DiskImage "'%SubImagePath%'"" > MountInfo1.txt
    powershell.exe -command "Get-DiskImage -ImagePath '%SubImagePath%' | Get-Volume" > MountInfo2.txt
    
    REM Get drive letter (includes the colon).
    REM We need to skip 3 lines in order to read the 4th line of text in the MountInfo2.txt file.
    
    for /F "skip=3 delims=" %%a in (MountInfo2.txt) do (
       set LineContents=%%a
       goto Evaluate-PartA
    )
    
    :Evaluate-PartA
    
    REM We are done with MountInfo2.txt. Delete it.
    
    del MountInfo2.txt
    set LineContents=%LineContents:~0,1%
    set MountedImageDriveLetter=%LineContents%:
    
    REM Get CDROM ID. Example: \\.\CDROM0
    
    for /F "skip=4 delims=" %%a in (MountInfo1.txt) do (
       set LineContents=%%a
       goto Evaluate-PartB
    )
    
    :Evaluate-PartB
    
    REM Done with MountInfo1.txt. Delete it.
    
    del MountInfo1.txt
    set LineContents=%LineContents:~20,10%
    set MountedImageCDROMID=%LineContents%
    
    goto :eof
    Now, my questions:

    Question 1: There was one point in your instructions that I am not fully understaning. You note that the preference is to create a VHD with an MBR disk. If I'm going to boot this VHD not from a physical machine that is UEFI based, wouldn't I want to create this as a GPT disk instead? On my system, which is UEFI based, I'm finding that creating the VHD as GPT is working fine, but creating it as MBR causes Windows setup on the VHD to hang.

    Question 2: I know that I'm pushing my luck here, but is there any way that I can safely deploy an unattended installation to that VHD? I know that if I simply take an autounattend.xml that wipes disk 0 it's going to wipe my physical disk 0. I'm curious if there is some way to determine in advance what disk number the VHD is going to be.
      My Computers


  9. Posts : 11,247
    Windows / Linux : Arch Linux
       #9

    Hi folks
    @Kari

    Thanks for a beautifully clear explanation in what's taking place.

    If only others could present technical features in such a clear manner.

    Thanks for all the good work you do around here !!!!

    Cheers
    jimbo
      My Computer


  10. Posts : 17,661
    Windows 10 Pro
       #10

    hsehestedt said:
    I have not yet tried to follow the instructions to attach the VHD to a VM. That may have to wait since I use VMware workstation and I'm simply not feeling like reconfiguring for Hyper-V at the moment and since I have complete faith in your instructions
    I am running Hyper-V, VMware and VirtualBox on the same machine without any issues. See this tutorial: Run Hyper-V, VirtualBox and VMware on same Computer


    hsehestedt said:
    Finally, in case you are interested, here is a tweaked version of the batch file.
    The idea when making a tutorial or a video is to make it so simple that any newbie can follow the given instructions. That's why scripts and batches are simplified, only the basics. As such, they'll do what they are supposed to do. A fact is that some users not too familiar with a method told in a tut or video will lose interest if it looks too complicated.

    In my own use, I then use more complicated versions of the same scripts and batches. What in a script in a tutorial or a video takes just a few lines of code, might (and often do) take in my own version 100+ lines.

    Your code is nice, I will for sure check it, and after my edits, use it. Thanks.


    hsehestedt said:
    Question 1: There was one point in your instructions that I am not fully understaning. You note that the preference is to create a VHD with an MBR disk. If I'm going to boot this VHD not from a physical machine that is UEFI based, wouldn't I want to create this as a GPT disk instead? On my system, which is UEFI based, I'm finding that creating the VHD as GPT is working fine, but creating it as MBR causes Windows setup on the VHD to hang.
    The only benefit of using GPT on native boot VHD is to be able to use a VHD larger than 2 TB, the MBR size limit. As no sane person will need a VHD bigger than that, the VHD can be MBR. That is my recommendation.

    The situation changes only if the VHD is planned to be used on Generation 2 Hyper-V VM, then the VHD must be GPT.

    You can run MBR native boot VHDs on a GPT system, as well as GPT native boot VHDs on an MBR system. Nothing prevents that. Why your MBR VHD hangs is a mystery to me. I have EN-GB Windows 10 on all my machines, all UEFI / GPT, running other language versions (FIN, SWE and GER) from MBR native boot VHDs without any issues.


    hsehestedt said:
    Question 2: I know that I'm pushing my luck here, but is there any way that I can safely deploy an unattended installation to that VHD? I know that if I simply take an autounattend.xml that wipes disk 0 it's going to wipe my physical disk 0. I'm curious if there is some way to determine in advance what disk number the VHD is going to be.
    Short: not possible.

    A bit longer: DISM requires an existing volume to apply Windows image. There's no way to integrate partitioning in an answer file to that process.

    However, what I always do when setting up Windows on native boot VHD is to mount the image I will be deploying and apply an unattend.xml answer file to it for my customizations. See the tutorial: Apply unattended answer file to Windows 10 install media


    jimbo45 said:
    Thanks for all the good work you do around here !!!!
    Thanks for really nice feedback, Jimbo!

    Kari
      My Computer


  Related Discussions
Our Sites
Site Links
About Us
Windows 10 Forums is an independent web site and has not been authorized, sponsored, or otherwise approved by Microsoft Corporation. "Windows 10" and related materials are trademarks of Microsoft Corp.

© Designer Media Ltd
All times are GMT -5. The time now is 01:20.
Find Us


Windows 10 Forums