Questions about wanting to run Win7 WMC in VM under Win10

Page 3 of 6 FirstFirst 12345 ... LastLast

  1. Posts : 11,247
    Windows / Linux : Arch Linux
       #21

    Hi folks

    update to previous post

    Yes you do get little ! mark at bottom right with message VMware toos service is running -- just click it and the vmtools will update -- you probably won't see it for a while - so do something else. When updated just re-boot the VM.

    You will also see after latest W7 updates a splash screen saying support stops in Jan 2020.

    Another surprise -- did Office 2016 update from the VM -- it seems to have updated OK to Office 2019 !! not sure why but that's what it is telling me.

    Cheers
    jimbo
      My Computer


  2. Posts : 54
    Windows 10
    Thread Starter
       #22

    jimbo45 said:
    Yes you do get little ! mark at bottom right with message VMware tools service is running -- just click it and the vmtools will update -- you probably won't see it for a while - so do something else. When updated just re-boot the VM.
    I still have no idea what you're looking at, or asking me to do.

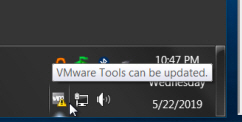
    Here is the VMWare Tools icon in the system tray. Hovering the mouse over it does not produce a flyout with the "VMWare Tools service is running" text you mention. Instead the flyout text says "VMWare Tools can be updated".

    Questions about wanting to run Win7 WMC in VM under Win10-vmware-tools-can-updated.jpg

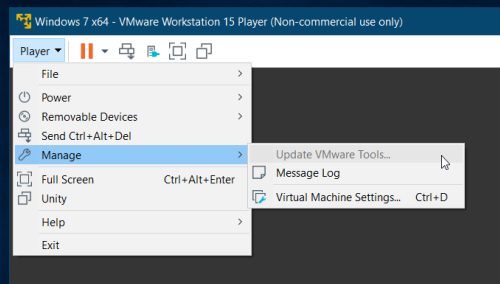
    Also, the only "menu" I can imagine you're referring to is in the upper-left corner, i.e. the Player menu dropdown. There is a "Manage" item with a right-arrow on that dropdown menu, and clicking on that right-arrow presents a flyout sub-menu that shows "update VMWare tools" at the top... except that it is grayed out!!! So it cannot be selected. This suggests there really isn't any appropriate new version of VMWare Tools to upgrade to, or maybe something is wrong in my setup.

    Questions about wanting to run Win7 WMC in VM under Win10-manage-tools.jpg

    So I ask again for help. Assuming the yellow exclamation mark over the VMWare Tools icon in the system tray is legitimate, what is it asking me to do? Why is it displayed? And then why is the "Upgrade VMWare tools" menu item grayed out and unavailable for selection?
      My Computer


  3. Posts : 11,247
    Windows / Linux : Arch Linux
       #23

    Hi there
    Try uninstalling VMWare tools (from the VM itself via Programs and features in W7 panel), re-boot and then see if you can then install it.

    What are you using as a HOST machine BTW -- I've tested my W7 on both Linux and 19H1 W10 (build 116) and VMWare tools installs perfectly without fuss.

    Ensure in the VM though you aren't running any .iso or DVD mounting software such as DAEMON tools (of course W8/W8.1/W10 these are unnecessary as Windows now can mount iso's etc) and have a virtual drive defined as an image iso -- doesn't matter if it can't find the iso on boot just define one.

    Cheers
    jimbo
      My Computer


  4. Posts : 54
    Windows 10
    Thread Starter
       #24

    As I had said earlier, I DID try uninstalling VMWare Tools through Control Panel, re-starting Win7 VM, and then reinstalling the identical 10.3.5 version installer I had used originally. Not surprisingly the same yellow exclamation mark is still there over the icon, with the flyout text showing "VMWare Tools can be updated". Since the version installed is 10.3.5 this implies a newer version is available. But I haven't found any evidence that this is true.

    In fact I find the VMWare web site so unfriendly and unhelpful (at least to a novice such as myself) and so difficult to navigate that I haven't even been able to re-find where I got the 10.3.5 installer file from in the first place! I'm sure it must have come from some download link on some page, but I simply cannot re-find that page and that download link.

    And again, the drop down Player -> Manage flyout sub-menu provides a grayed-out link with the words "update VMWare Tools". It's grayed out, so it is non-functional. If this is supposed to be the way an automatic update of VMWare Tools is supposed to be initiated, it doesn't work. Or, for some reason, it is grayed out... even though the yellow exclamation mark claims "VMWare Tools can be updated".

    Do you understand how confused and frustrated I am? What is the version of VMWare Tools you have installed in your own system? Is it 10.3.5, or older, or newer?

    As I explained originally, my Win10 system is a brand new freshly installed 1809 (i.e. the installer was on USB built from Microsoft tool), new retail license key. Both VMWare itself as well as the creation of my Win7 VM as well as the install of VMWare Tools 10.3.5 inside of that Win7 VM all went flawlessly. Nothing is malfunctioning.

    The only issue is what the meaning of this yellow exclamation mark is telling me "VMWare Tools can be updated" and what I am supposed to do to eliminate it. How am I supposed to update VMWare Tools? Where on the VMWare web site is the download link for some version of VMWare Tools installer file that is newer than the 10.3.5 I currently have installed?

    As far as DVD goes, I followed all instructions pertaining to what I needed to do in order to be able to install VMWare Tools in the first place. Yes, I did originally have my "removable devices" for DVD pointing to the ISO file for the Win7 installer. But I then changed it as per the written instructions I stumbled upon for how to manually install VMWare Tools. It said to instead check the "use physical device" box and select "auto detect" option. To be honest I understand nothing that I was doing here, I was just blindly following instructions.

    I don't know what this could possibly have to do with the install of VMWare Tools, and I was never able to find any ISO version of the installation media for VMWare Tools. I was only lucky enough to somehow stumble into some link somewhere that provided me with a downloadable EXE installation file, which is what I simply RAN to install VMWare Tools. I did not use any ISO.

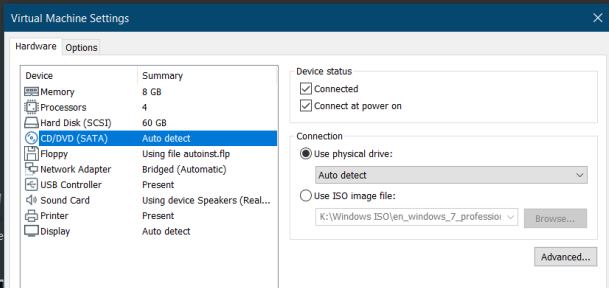
    This is what my removable devices settings looks like at the moment. If this is right or wrong, I haven't a clue.

    Questions about wanting to run Win7 WMC in VM under Win10-removable-devices.jpg

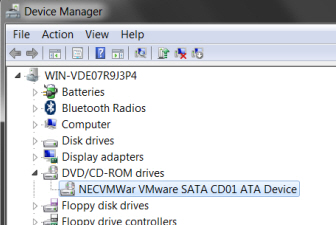
    Furthermore, Device Manager in Win7 VM doesn't show my real physical CD/DVD drive if it was supposed to with this setting. Instead, it shows a VMWare simulated drive. Again, if this is right or wrong, I haven't a clue.

    Questions about wanting to run Win7 WMC in VM under Win10-device-manager-dvd.jpg

    Is this right or wrong? How does this impact whether or not "Update VMWare Tools" is grayed out or not in the menu on that item which presumably is supposed to facilitate doing the update?

    Am I supposed to have some ISO file that I don't have? If so, what is it and where do I get it?

    This is really all too complex for what should be a very simple update, that all should happen pretty much automatically. I was prompted for an update of VMWare Workstation Player itself from 15.0.4 to 15.1.0, and it all happened automatically once I accepted the offer. So why isn't VMWare Tools getting updated (if it needs to be) similarly automatically?


    Again, I find this product and the entire VMWare web site very unfriendly for a novice such as myself. I have simple questions, but can't get answers. I'm not entitled to official support since I'm using the free version.

    And I find the English writing supposedly describing how-to instructions for doing things to be very off-putting and confusing. Terminology is used that isn't clear to me, and chains of instructions and links to additional documentation peppers everything, making it very difficult to get a single simple set of steps that WILL REALLY WORK. Everything I do that I believe is following the instructions to a T is unsuccessful.

    Why isn't there some place on the VMWare site that explains what this yellow exclamation mark is, and how to properly address whatever situation is causing it so that it disappears? All of the instructional pages dealing with manual installation or upgrade of VMWare Tools provide details that either don't seem to apply, or don't seem to work.

    Very very frustrating to me, I must confess. VMWare and Win7 VM and running WMC with Ceton ETH inside of Win7 VM is working perfectly. But this silly yellow exclamation mark over the VMWare Tools icon and the inability to eliminate it per expected vendor documentation is just ridiculous.

    - - - Updated - - -

    Ok. Not being entitled to phone support from VMWare because I'm using the free version of Workstation Player, when I phoned them requesting support I was told to "send an email to desktop-devices @ vmware.com" and they should get back to you within 24 hours.

    So I sent an email to them and shockingly within an hour I had a response from a tech support person. And from the reply I learned that there absolutely IS an updated version of VMWare Tools (10.3.10, replacing 10.3.5) which is supposed to be installed along with the 15.1.0 update to VMWare Workstation Pro itself.

    This was about the only thing accurate and helpful in the reply. Just about everything else was either worded poorly or provided incorrect or misleading information. Nevertheless, prompted with the information that I really am looking for VMWare Tools 10.3.10 I was now finally able to make progress on my own.

    The tech support email reply stated that VMWare Tools is usually installed from an ISO, although there was no provided URL link to where I might download that ISO. Great! I also still don't know how I every found an EXE version of the VMWare Tools 10.3.5 installer several weeks ago, which I obviously did. I can't find it now.

    Anyway, for the record, here is a VERY SIMPLE roadmap for how all of this sorts out. I had hoped to learn this type of info from others, on this forum as well as the VMWare forum for sure, but that's not how it played out. In any case I have now got it all figured out, and VMWare Tools 10.3.10 is now installed in my WIn7 VM, and the yellow exclamation mark is gone.

    So here is the roadmap:

    (1) Log into your My VMWare account home page using your userid/password for your VMWare account (which was created even if you are only using free products as I am, in order to do the download).

    (2) On the right side of the home page there is a short list of "quick links", the second of which is "All Downloads". Click on this All Downloads link to get the page providing download links for all VMWare products grouped into categories.

    (3) When you land on the All Downloads page, down almost at the bottom of the page is a category named "Deskop and End-user Computing". Down toward the bottom of that categroup is a line item for "VMWare Workstation Player", with a URL link off to the right that says "View Download Components". Click on this View Download Components link to get the page providing download links for VMWare Workstation Player for Windows as an EXE installer file, the latest version being 15.1.0.

    (4) What I didn't know but finally figured out, it turns out that VMWare Tools is distributed as part of the "VMWare vSphere" product!!! Why nobody ever told me that before, I don't know. But that's where it is buried!

    So up at the top of the All Downloads page the first category is "Datacenter & Cloud Infrastructure", and a few items down in the list is a line item titled "VMWare vSphere". Can you understand how I just maybe might have missed being able to locate VMWare Tools, since it is part of VMWare vSphere which is considered part of Datacenter & Cloud Infrastructure", and I'm just trying to figure out Workstation Player for personal use???

    Anyway, on the right side of the VMWare vSphere line item there is a URL link for "View Download Components | Drivers & Tools | Try | Get Training". Click on the "Drivers & Tools" link to get a page titled "Download VMware vSphere".

    (5) Down a bit on the Download VMWare vSphere page is an item named "VMWare Tools", preceded by a right-arrow control. Click on that right-arrow to change it into a down-arrow and expand the line item to show all available versions of VMWare Tools that you can download. On the top line is the latest version (10.3.10 in this case), and off on the right side of the line is a URL link for "Go to downloads".

    Click on that Go to downloads link to get a page titled "Download Product", which finally contains the actual URL download link which will allow you to get VMWare Tools. We're getting close.

    (6) On the "Download Product" page , below the general descriptive text at the top, there is a "Product downloads" tab, with a list below it of various versions of VMWare Tools ZIP or TAR.GZ files suitable for various environments. I clicked on the "Download now" URL link on the right side of the line providing the installer ZIP file for Windows and Linux, which finally finally finally launches the download/save dialog for the ZIP file for VMWare Tools.

    Took a while to get here, but we finally have the ZIP file for installing the latest version of VMWare Tools for Windows.

    (7) Unzipping the downloaded ZIP file produces a folder with two sub-folders (named "floppies" and "vmtools"). And looking inside the "vmtools" sub-folder, sure enough there is among all the various files contained there a file named "WINDOWS.ISO"... which surely must be what I have been looking for.

    (8) Now I go into my Win7 VM, and go to Control Panel, to uninstall the current VMWare Tools 10.3.5. This will trigger a re-boot of WinVM which will thus start without any VMWare Tools installed.

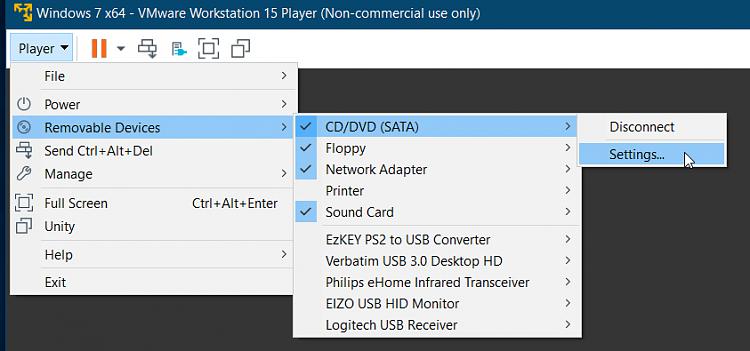
    Now go to the Player menu (upper-left corner of the Win7 VM window) and select Player -> Removable devices -> CD/DVD (SATA) -> Settings

    Questions about wanting to run Win7 WMC in VM under Win10-player-dvd-settings.jpg

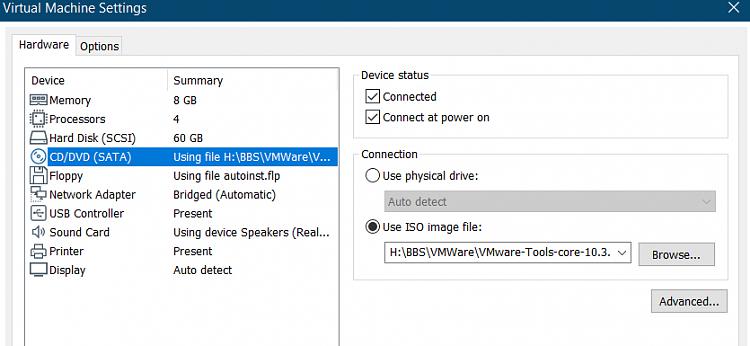
    to get the following window that allows conceptually "inserting" the ISO into the CD/DVD tray, in order to "mount the ISO" containing all of the installation files for VMWare Tools:

    Questions about wanting to run Win7 WMC in VM under Win10-dvd-iso.jpg

    I then checked the "use ISO image file" radio button, and also the "connected" device status box, navigated to the sub-folder where WINDOWS.ISO (for VMWare Tools) was unzipped to and selected that ISO file, and then finally pushed the OK button to trigger the "reading of the ISO file" and beginning of the install wizard for VMWare Tools. I specified "custom" (so that I could see what's happening) but otherwise just left all options pre-checked in their default state, and let it proceed automatically until it completed.

    After the VMWare Tools install completes a re-boot is again performed. And then when Win7 VM comes back up, sure enough I have 10.3.10 VMWare Tools installed and there is NO yellow exclamation mark over the icon in the system tray.

    Furthermore, the Player -> Manage flyout sub-menu now shows "Reinstall VMWare tools" (grayed-out) which I assumed is coming from the fact that I still have CD/DVD set to use that WINDOWS.ISO file named in the file name box. I then went back to "use physical drive" CD/DVD instead of "use ISO image file". However the "reinstall VMWare tools" grayed-out item is still on the Player -> Manage flyout sub-menu. But all is fine now, so I don't care.


    Case closed.
      My Computer


  5. Posts : 54
    Windows 10
    Thread Starter
       #25

    Need to add a post-script to this story... although there is still a happy ending!

    Turns out there is no way to map host local drives into the guest VM. This is a problem, because I wanted "recorder storage" to go on my 6TB host local drive F but WMC won't allow recording to a mapped network drive that has a letter of F, which is how I was configured and as it turns out is the only way to do it. So being unable to use this virtual F mapped network drive, and also being unable to map host local drives into the VM, I clearly had a dilemma.

    The solution turns out to be reasonably simple. All I had to do was "ADD a second hard disk (SATA)", which for my proof-of-concept I set as 500GB (in "slices", so the whole 500GB is not required to be allocated to start buty rather just grows over time as required by usage). By default, this second virtual disk gets allocated on the same host C drive (in \Documents) as the primary virtual C gets allocated, which is in C:\Users\...]Documents, at least to start.

    After the set of VMDK "starter slices" corresponding to this second hard disk get allocated, I copied them over to a folder of my own creation on real local host F. And then I deleted the second disk, and re-added it but this time as an "existing" drive which I pointed to by navigating to that folder I'd just created on F, pointing to the primary "slice" file there.

    In other words, the virtual second drive in Wn7 VM is actually set of VMDK files but now living on host F (where it's got 6TB in space, like I want) rather than on host C (where I couldn't fit even the 500GB I was trying out). That's it!

    I then got into DISKMGMT in Win7 VM and initialized that second disk as GPT, and created a simple volume formatted as NTFS, with a sensible label and a drive letter of Z (not F). This allowed me to keep my mapped network drive of F (which corresponded to real local host F), as well as creating this 500GB partition which appears as a "local drive: and therefore lets me use it for "recorder storage". Perfect.

    I then ran the copy-protected recording test using the Ceton ETH tuner, and sure enough it was successful. And it could also be played back. Excellent.

    Now, one final experiment to do. What if I now "cloned" (i.e. simply COPY'd the folders corresponding to the first Win7 VM into a second set of folders), also allocating a second version of that second 500GB hard disk on F. Then the copied VMX file was File -> Open'ed, to launch it and add it to the library "table of contents" of available VM's I can choose to run. Would I be able to play the test copy-protected recording produced by the first Win7 VM, using this second cloned Win7 VM? And the answer is YES.

    This tells us that the cloned VM appears to be the identical hardware as the primary VM, thus satisfying that requirement for PlayReady. Also, since MSPR.HDS is obviously duplicated in the second VM, that provides the correct encryption key which then allows the copy-protected recording to truly be played. In other words, as long as you're careful about managing MSPR.HDR in each VM you actually can play the same copy-protected recording in any of the cloned VM's.

    Excellent news.
      My Computer


  6. Posts : 1,020
    Windows 10 Pro 20H2 19042.572
       #26

    @DSperber - Great solution and well documented.
      My Computers


  7. Posts : 54
    Windows 10
    Thread Starter
       #27

    One more "final" insight... regarding secondary virtual disks.

    Turns out this family set of VMDK files (corresponding to a single allocated "hard disk") is really identical in concept to any removable physical disk, like an external USB 3.0 disk you might use for your backups. With a real physical removable disk you just unplug the USB cable from one machine and plug it into another machine, and voila you can now use that very same physical disk (with all of its existing contents) on the second machine.

    Well, the set of VMDK files is identical in functionality. So you can create it (as "new") using one VM, and then "remove from library" and MOVE the folder/files from its initial default C:\Documents location to a second physical host drive location (as I said previously, to get the advantage of larger physical capacity on your other non-C partitions), and then re-add it in that VM but this time as "existing", navigating to where you've placed it on whatever other host drive you relocated it to. And then... in the second "cloned" VM you can simply add it as well, also as "existing" and navigating to the very set of VMDK files you created with the first VM.

    Now BOTH of the VM's are using the exact same "virtual secondary disk", same as if you'd plugged an external USB drive into one real PC or another. And of course all content created by one VM is therefore also visible by the other VM.

    So it's not necessary to create TWO SEPARATE 500GB secondary virtual drives for "recorder storage" of WMC in each of the two VM's. The one single 500GB virtual drive can be used as "recorder storage" for BOTH WMC's in each of the two VM's.

    Naturally the only issue is for copy-protected content, where MSPR.HDS will be updated on the recording Win7 VM WMC. So if you want to play that copy-protected content recording in the second Win7 VM WMC you must of course copy the MSPR.HDS from the first VM to the second VM, but that stands to reason. Other than this very specific WMC consideration, from a VM standpoint the real breakthrough here is that "secondary virtual disks" are just like regular "removable physical external drives", and can be "shared" between multiple VM's simply by pointing to the same VMDK set when adding a second hard disk as "existing" in any of these multiple VM's.
      My Computer


  8. Posts : 12
    Windows 10 Pro NVMe m.2 1 TB RAID 0 (2 x 500 GB)
       #28

    Hello... New to tenforums.com... Long time user Ceton InfiniTv ETH6... Brand new to Virtual Machine (VM) environment.

    Great discussion on installing WMC on Win 10 using VM on Win 7. I was inspired and tried to follow the path, but used Hyper-V (included in Win 10 Pro). I ALMOST made it. Highlights and ultimate roadblock below.

    - Enabled Hyper-V in Win 10 Pro v2004 (latest with all updates as of 8-29-2020)
    - Installed Win 7 Pro 64bit as VM
    (see YouTube: Install Windows 7 in Windows 10 on Hyper-V step by step)
    NOTE: FIRST must enable VD-T and CPU Virtualization options in my ASUS motherboard BIOS
    - Activate Windows 7 (can't do on-line activation but can still be activated using Microsoft Phone Activation option)
    - Installed Win7 SP1 update (no longer available from Microsoft but available from 3rd party torrent - specify 64bit)
    - Check Windows Update from Control Panel> System and Security> Windows Update> Check for Updates
    (Update process took about 5 hours and required MULTIPLE Win 7 VM reboots to solve "failed" item installs)
    - Downloaded and installed Digital Cable Advisor (DCA)
    - Installed Ceton InfiniTv ETH6 utility/driver complete pkg. all options (ceton_infinitv_setup_w7_sp1_13_06_03_1088)
    - Downloaded and ran the DCA Override utility
    - Launch WMC, Express Setup, go to Extras Library, run DCA - result = PASSED
    - Go to WMC Tasks> Settings> TV> TV Signal> Set Up TV Signal...
    - Use all default PROMPTS... Successfully updated Activation Serial Number and Play Ready. Excellent!
    - Return to WMC Extras Library and run the Ceton InfiniTv Network Tuners and select tuners to use.

    Here's where everything goes wrong.

    Attempt to select a channel in WMC Guide... WMC FAILS and gives error: Video Error - Files needed to display video are not working correctly. Restart Windows Media Center or restart the computer.

    This appears to be a limitation of Win 10 Hyper-V Manager. It doesn't have enhanced video GPU display function available. Microsoft removed RemoteFX vGPU from Hyper-V Manager starting with the July 14, 2020 Security Update for Win 10. Also Hyper-V cannot play audio in the Win 7 VM. Audio is only available by using a Remote Desk Top Connection protocol from my Host Win 10 machine. This also crashes Win 7 WMC.

    QUESTION: Is it possible to EXPORT and save the Win 7 VM I have created and then use (import) it to another VM software that CAN support the audio and video requirements needed to run WMC?

    If so, what is the recommended VM software/version to use?

    Any insight, help, and ideally, step by step instruction would be appreciated. Thanks in advance.
    Last edited by AFelectrngineer; 30 Aug 2020 at 15:19.
      My Computer


  9. Posts : 54
    Windows 10
    Thread Starter
       #29

    Welcome to this thread. I will reply to the separate parts of your comments and questions (as well as adding additional notes and experiences from the past year) in separate posts, so that it all doesn't get lost or overwhelming.

    (1) I know absolutely ZERO about Hyper-V. I only have experience with VMWare Workstation Player (free version for personal use). I opted to use it for my experiment because I had not installed Hyper-V functionality in my Win10 and it seemed VMWare Workstation Player could simply just be installed as an ordinary standalone 3rd-party software product. Plus, it had good word-of-mouth and was supported by a genuine commercial vendor who stood to profit from good word-of-mouth and product supports.

    So if there are any issues relating to getting WMC running in Win7-VM under Hyper-V that are specifically due to something in Hyper-V, I'm afraid I can't be of any help (other than perhaps conceptually and intuitively, but certainly not from any firsthand knowledge or experience). My realworld experience with VM and Win7-VM and WMC inside of Win7-VM is 100% related to VMWare Workstation Player.

    (2) I had never dabbled with VM (on a PC) before last year, so I too had to enable the CPU virtualization option(s) in the BIOS of my ASUS Z170-Deluxe motherboard. Other than that, the entire project was implemented from scratch into an otherwise standard retail Win10 Pro x64 (with a retail Win10 license key) with NO support for Hyper-V feature.

    So that's pure free VMWare Workstation Player v15 (now up to v15.5.6), and VMWare Tools for Win7-VM (now up to v11.1.0). For conciseness I will refer to it simply as VMWP going forward.

    (3) I had an ISO of the retail Win7 Pro x64 SP1 installer, so that's what I used to install Win7 with into the Win7-VM I created with VMWP. I also had a usable retail Win7 license key, so that's what I used to activate the installed Win7 in that Win7-VM. When I did this last year I also had to run Windows Updates (which still existed back last June) to get current from the SP1 starting point, and that took some time.

    Since last year I have discovered two separate "tools" available on SevenForums in the "Installation and Setup" sub-forum, which are designed to build new fully up-to-date usable slipstreamed ISO Win7 installers that include all available Windows Updates already pre-installed. So there is no need to run Windows Updates for hours, or however long, once the Win7 install is complete. The result of using the updated ISO to do the install is that you're already up-to-ddate and do NOT need to run Windows Updates.

    I've dabbled with both of these methods that each produce an ISO that can either be (a) burned to DVD to then boot to install from, or (b) used to create a bootable USB drive to then boot to and install from, or (c) used directly into VMWP as if it were a DVD, in order to install Win7 into Win7-VM.

    (a) Update your Win7 Installation Media

    (b) Integrate7 script – automatically slipstream all drivers and updates!

    Having tried both approaches I recommend the second one.

    Both methods are designed to produce the same type of result, including producing extra folders (placed onto the created C-partition of the installed Win7 system) designed to allow you to then easily install your own 3rd-party software products (i.e. the installer files you provide to the scripts are simply placed in these folders). Both are designed to add both USB 3.0 and NVMe driver support to Win7, so that you can install Win7 onto Skylake hardware (and possibly even newer hardware). Both are designed to allow for the pre-install of additional drivers to support additional modern hardware which wasn't around when the original Win7 retail installer was released by MS.

    Again, both methods are similar. But I feel the second method (i.e. Integrate7) is the easier one to use.

    (4) I have created my own "super Win7 installer ISO" using Integrate7, which started from SP1 and is up-to-date with all Windows Updates as of last January 20, 2020 when MS theoretically stopped support for Win7. In reality they've actually pushed out additional updates since then, and are also going to continue to send out anti-virus security updates for Microsoft Security Essentials for at least the next few years.

    My own Win7 installer ISO also includes all of the additional drivers (including USB 3.0 and NVMe for MS and Samsung) involved with my ASUS Z170-Deluxe motherboard. It also includes almost all of the 3rd-party software installers I have been adding to my own Win7 machines for the past 10 years (including Ceton drivers/software, EPG123 to replace WMC Guide from MS, etc.). I didn't intend for it to be burned to DVD, because it is actually over 8GB in total size. However it does fit just fine on a bootable 16GB USB flash drive formatted as NTFS and created by RUFUS (from the ISO).

    I have actually experimented with using this 16GB NTFS bootable USB flash drive to genuinely install Win7 from scratch onto my real physical Z170-Deluxe machine. And it works perfectly.

    Furthermore, I have also used this 8GB ISO directly into VMWP to create a new Win7-VM machine, essentially duplicating my Z170-Deluxe (as far as it is supported through Win7-VM by VMWP). In other words, the very large and completely up-to-date ISO produced by Integrate7 can, itself, be used directly to install Win7 in Win7-VM.

    So, although I don't need to do it now, if I ever did need to or want to reinstall Win7 from scratch on a real physical Skylake machine (and I have two of them right now, still running real Win7 and both running as real WMC HTPC machines with Ceton and Hauppauge tuners), I would use this ISO (or bootable USB) produced by Integrate7. Well worth the effort to work through the methodology and then the several hours of machine time needed to actually produce the output ISO.


    I probably will want to add some additional comments, but for now this is kind of a background of where I was last year vs. where I am now.

    And as I mentioned above, building that Win10 "host" machine and the Win7-VM "guest" in order to run just WMC and EPG123 to support my Ceton cablecard-enabled ETH6 tuner (including digital tuning adapter from Spectrum, because they use SDV) was an experiment, mostly to see if it could be done and park away the results for possible use in the future. But for now I'm still running a genuine physical Win7 machine (Lenovo M910t, with a Ceton InfiniTV6 PCIe and Hauppauge Quad-HD) as my "production HTPC".

    The physical ASUS Z170-Deluxe machine originally was my "production HTPC" but I migrated off of it and to the M910t. However the ASUS machine is now my "backup HTPC" (with a Ceton InfinitTV6 ETH and Hauppague Quad-HD). It is a dual-boot machine, with Win7 being the way I still use it normally. But Win10 and VMWP and Win7-VM is also available to boot to when I want to experiment. And presumably Win10 would become the real environment should I ever actually make the decision to pull the physical Win7 plug for real.

    Note that another WMC user discovered this discussion late last year, and contacted me (as you've done). He wanted to do the exact same thing I was describing. And over the past ten months he has actually completed his own version of my experiment, but actually made it "production". In other words he's using a Dell 8900 (also a Skylake machine which was purchased with Win7 pre-installed) on which he installed Win10, and then added VMWP as I prescribed.

    He then installed Win7-VM inside of VMWP, and installed WMC and EPG123. He had several InfiniTV6 USB tuners but decided to buy an ETH. As it turns out I believe the USB tuner could probably have worked compatibly with VMWP, but we didn't want to chance it. So he just got an ETH and had success with it.

    He is on FIOS which doesn't use SDV, and also doesn't copy-protect its non-premium content (unlike Spectrum which took over for Time Warner Cable and thus uses SDV and also copy-protects everything). So he has no DTA (since no SDV), whereas my setups do have a DTA (since SDV).

    But otherwise, he copied my "recipe" precisely. He, too, learned about VMWare from scratch for the first time. But doing everything I had done he is now happily running his "production Win10 HTPC" as WMC and EPG123 inside of Win7-VM "guest" with VMWP as "host". He's actually "pulled the plug on physical Win7", whereas I myself have not yet done it... but at least know that I can if I really want to.

    I will address your actual problem issues in my next replies.

    - - - Updated - - -

    Regarding actual WMC issues:

    Here's where everything goes wrong.

    Attempt to select a channel in WMC Guide... WMC FAILS and gives error: Video Error - Files needed to display video are not working correctly. Restart Windows Media Center or restart the computer.

    This appears to be a limitation of Win 10 Hyper-V Manager. It doesn't have enhanced video GPU display function available. Microsoft removed RemoteFX vGPU from Hyper-V Manager starting with the July 14, 2020 Security Update for Win 10.
    You haven't provided additional details on your environment. Who is your cable provider? SDV (and DTA) or not? Copy-protected content or not? What (if anything) do you use for "extenders" around the house? Do you only have Ceton InfiniTV ETH tuner for cablecard-enabled source, or do you also have OTA/ATSC tuner as I do (Hauppauge QuadHD)? Are you using EPG123 as the replacement for MS Guide for WMC, or some other method?

    NOTE: the VMWP technology doesn't support the Hauppauge QuadHD driver inside of Win7-VM (as it is a PCIe card). That is why my implementation included installing NEXTPVR in native Win10, because NEXTPVR actually does run in native Win10. So the QuadHD driver from Hauppauge for Win10 is used (because Hauppauge supports its own WinTV running in native Win10), and the NEXTPVR application makes use of it.

    Furthermore, the GUIDE functionality for NEXTPVR is supported by a feed from Schedules Direct (aka SD), same as EPG123 is supported from SD as the GUIDE data source for WMC since MS no longer feeds EPG data from either ROVI or ZAP2IT. So I have EPG123 installed in Win7-VM, to support EPG123 which is also installed in Win7-VM to support WMC running inside Win7-VM. EPG123 uses my SD subscription but only for its channel lineup for Spectrum cable for its nightly Guide updates, running in Win7-VM. And I've also configured NEXTPVR's GUIDE functionality to make use of the same existing SD subscription but only for its OTA channel lineup (to support the Hauppauge QuadHD). You may not have this complexity to deal with, but for sure EPG123 and SD subscription for Guide data is the way to go for WMC, as well as for NEXTPVR (if you need it).

    As far as graphics go and playing live or recorded content on a locally attached monitor from WMC running inside Win7-VM, I have simply written off that objective as unachievable. Can't be done. The graphics display driver support for the "virtual display" seen within Win7-VM is simply not the real physical nVidia GPU I have in my machine. It's a "virtual display" with limited capability, and absolutely not usable for playing my Spectrum copy-protected content... which is every channel since Spectrum copy-protects everything.

    But this isn't an issue, really, because there is no such problem displaying ALL content through a remote extender/HDTV connected to WMC. I have four extender/HDTV pods around my house, all connected to both HTPC's through my router. And that's how I watch TV 99.9% of the time (including in my office where the Z170 lives and in my bedroom where the M910t lives, both of which have TWO monitors on which I normally can use one for watching TV locally while I work, along with an extender/HDTV as well.

    In other words, with a real physical Win7 HTPC that has access to nVidia GPU and HDCP-compliant drivers and HDMI/DVI connections, copy-protected content can be played on the local monitor (although it cannot be played on a local monitor connected via DP, since DP is not HDCP-compliant). However there are NO RESTRICTIONS OF ANY KIND to play ALL content (including copy-protected content) through an extender/HDTV. So is you have an extender/HDTV available, just use it for this new Win10-HTPC world. Don't bother fretting or fighting that you can't use your local monitor. That's just the price to be paid. But you can simply use an extender/HDTV and there's no longer a problem!

    So that's what I accepted. No hacks, no complaints, no fighting to get it to work. It just isn't needed. The extender/HDTV alternative solution is 100% acceptable for me.


    Also Hyper-V cannot play audio in the Win 7 VM. Audio is only available by using a Remote Desk Top Connection protocol from my Host Win 10 machine. This also crashes Win 7 WMC.
    I'm not sure I follow.

    what are you actually trying to do, as far as "play audio" in the Win7 VM? Must you use WMC to do it? Why can't you do this in native Win10 using some other media player that runs native Win10?

    Please clarify.
      My Computer


  10. Posts : 12
    Windows 10 Pro NVMe m.2 1 TB RAID 0 (2 x 500 GB)
       #30

    You haven't provided additional details on your environment. Who is your cable provider? SDV (and DTA) or not? Copy-protected content or not? What (if anything) do you use for "extenders" around the house? Do you only have Ceton InfiniTV ETH tuner for cablecard-enabled source, or do you also have OTA/ATSC tuner as I do (Hauppauge QuadHD)? Are you using EPG123 as the replacement for MS Guide for WMC, or some other method?
    My additional details:

    Cable provider - Brighthouse/Spectrum (Encrypted but not SDV also Clear QAM on "basic" channels)
    Copy Protected (DRM) content via cable using CableCard on Ceton InfiniTV ETH6 network type tuner

    Hardware:
    - HAUPPAUGE WinTV-quadHD PCI Express TV Tuner Card 1609 - Native on Win 10 using WinTV 10, NextPVR and WMC
    - AverMedia AverTV Hybrid Ultra USB (Win 7 driver: InstalDrv_M039R_Drv_1.3.64.83_W7_x64_100317) - Native on Win 10
    - Ceton InfiniTV ETH6 currently used on a separate Windows 8.1 Pro with WMC machine (for DRM live and recorded TV)

    HAUPPAUGE handles Clear QAM cable channels signal (on Win 10)
    AverMedia handles OTA ATSC channels signal as well as FM radio in WMC (on Win 10)
    I use EPG123 with a linked Schedules Direct account for WMC Guide, also Titan TV Guide (web based) is available
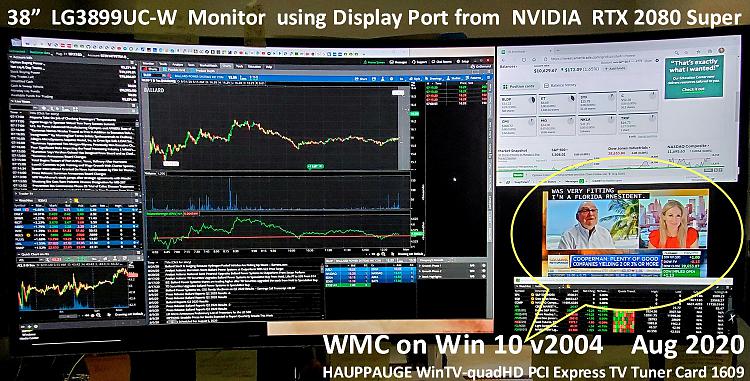
    See photo below...
    Questions about wanting to run Win7 WMC in VM under Win10-wmc-win-10-monitor-ws-20200831-annotated.jpg

    As you can see from the picture, I do investing and real time info is critical. So in my "perfect HTPC world," I would be able to have ALL available channels live (DRM, ATSC, Clear QAM) content available on my Windows 10 workstation. This capability is available on my Win 8.1 w/WMC machine, however, my other interests - audio engineering, architectural engineering, electronic engineering, are moving software platforms to Windows 10. Thus... there's the "rub." It seems I am forced to go all in on Win 10.

    Ultimate goal is to get everything available on my new Win 10 machine to include fully live DRM cable TV content. As you can see from my picture (above) I have successfully implemented WMC on Win 10. Unfortunately it seems impossible to get CableCard DRM live TV on Win 10 with WMC. At this time, WMC on Win 10 seems limited to ATSC OTA and Clear QAM cable.

    - - - Updated - - -

    Back to Win 7 VM...
    Again in my "perfect world," Win 10 work station could run with the Win 7 VM with WMC fully functional with Ceton Tuner/CableCard AND be able to watch live TV DRM copy protected broadcast with just the Win 10 machine and its attached monitor.

    As far as graphics go and playing live or recorded content on a locally attached monitor from WMC running inside Win7-VM, I have simply written off that objective as unachievable. Can't be done.
    It's not looking good, as you say above, for reaching my goal of live DRM TV content on Win 10 via Win 7 VM. However, when it comes to recorded DRM TV, it works perfectly for me on Win 10 WMC ("hacked" install using WMC v13 installer from the fine folks over on theGreenButton forum) so long as content is played from the "source computer." My Win 8.1 Pro with WMC machine handles all my DRM Copy Protected CableCard recorded TV. It resides on my local network via Netgear C7000 cable modem/WiFi/router. My 38" LG monitor uses Display Port to connect to NVIDIA GeForce RTX 2080. It seems as long as the recorded DRM content is being played back from the "source computer" over my local private network, it works. The Win 8.1 machine is also used as "source" to supply my actual Home Theater with 11 foot projection screen in the living room.

    Other thoughts...
    I also think it is easier to start a Win 7 VM (or physical PC on Win 7), using a fully updated SP1 ISO. I found that an updated download is available directly from Microsoft using my valid Product Key from here.

    Until I can get a better VM software (Microsoft Hyper-V is apparently a "lite" limited VM manager), I am apparently not going to be able to get my Win 7 VM with WMC working on Win 10. If you have any other insights to share, I welcome your guidance.

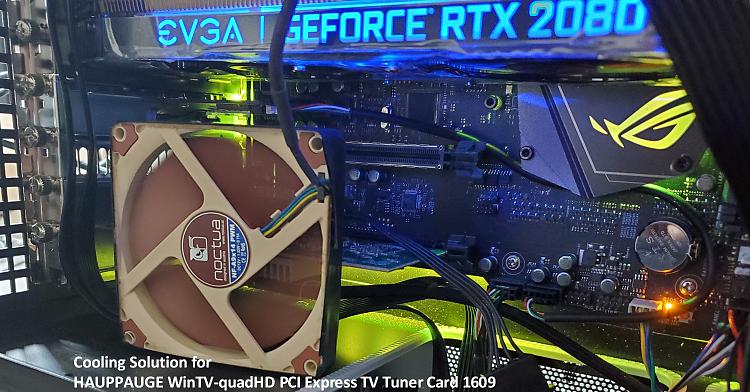
    FYI... HAUPPAUGE WinTV-quadHD PCI Express TV Tuner Card 1609 runs very HOT and I've seen a number of reports of a high failure rate. I solved this with a simple fan installed in PC over the Tuner Card. See picture below...
    Questions about wanting to run Win7 WMC in VM under Win10-cooling-hauppauge-wintv-quadhd-pci-express-tv-tuner-card-1609.jpg
    Last edited by AFelectrngineer; 31 Aug 2020 at 12:11.
      My Computer


  Related Discussions
Our Sites
Site Links
About Us
Windows 10 Forums is an independent web site and has not been authorized, sponsored, or otherwise approved by Microsoft Corporation. "Windows 10" and related materials are trademarks of Microsoft Corp.

© Designer Media Ltd
All times are GMT -5. The time now is 11:37.
Find Us


Windows 10 Forums