Information
Disk quotas track and control disk space usage for NTFS file system volumes, allowing administrators to control the amount of data that each user can store on a specific NTFS volume. Administrators can optionally configure the system to log an event when users are near their quota, and to deny further disk space to users who exceed their quota. Administrators can also generate reports, and use the event monitor to track quota issues.
Enforcing disk quota limits is optional. When users reach an enforced disk quota limit, the system responds as though the physical space on the volume were exhausted. When users reach an unenforced limit, their status in the Quota Entries window changes, but they can continue to write to the volume as long as physical space is available.
This tutorial will show you how to set a default disk quota limit and warning level for new users in Windows 7, Windows 8, Windows 10, and Windows 11.
You must be signed in as an administrator to set disk quota limits.
CONTENTS:
- Option One: Set Default Disk Quota Limit and Warning Level for News Users on Specific NTFS Drive in Drive Properties
- Option Two: Set Default Disk Quota Limit and Warning Level for News Users on All NTFS Drives in Local Group Policy Editor
- Option Three: Set Default Disk Quota Limit and Warning Level for News Users on All NTFS Drives in Registry Editor
1. If you haven't already, you will need to first enable disk quotas for the NTFS drive (ex: "G") you want to set a default disk quota limit and warning level on.
2. Open This PC in File Explorer (Win+E).
3. Right click or press and hold on the NTFS drive (ex: "G") you want to set disk quota limits and warning levels for, and click/tap on Properties. (see screenshot below)
4. Click/tap on the Quota tab, and click/tap on the Show Quota Settings button. (see screenshot below)
5. Do step 6 (set limit/level) or step 7 (no limit) below for what you want to do.
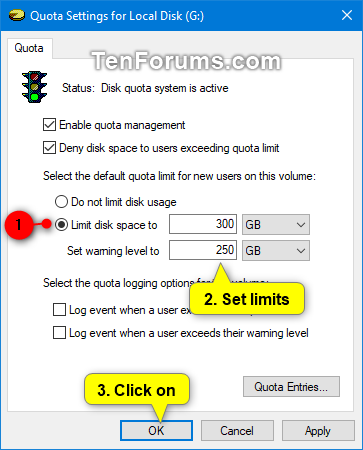
A) Select (dot) Limit disk space to. (see screenshot below)
B) Set the quota limit (ex: 300 GB) and warning level (ex: 250 GB) to what you want on this drive, click/tap on OK, and go to step 8 below.
NOTE: This is the default setting.
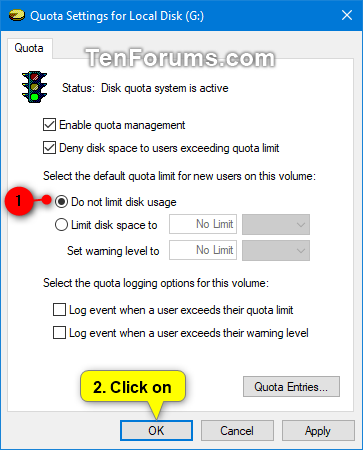
A) Select (dot) Do not limit disk usage, click/tap on OK, and go to step 8 below. (see screenshot below)
8. Click/tap on OK. (see screenshot below step 4)
9. You may also want to:
Note
In Windows 7, the Local Group Policy Editor will only be available in the Professional, Ultimate, and Enterprise editions.
In Windows 8, the Local Group Policy Editor will only be available in the Pro and Enterprise editions.
In Windows 10, the Local Group Policy Editor will only be available in the Pro, Enterprise, and Education editions.
All editions can also use Option Three below to set this same policy.
1. If you haven't already, you will need to first enable disk quotas for all NTFS drives you want to set a default disk quota limit and warning level on.
2. Open the Local Group Policy Editor.
3. In the left pane of Local Group Policy Editor, navigate to the location below. (see screenshot below)
Computer Configuration\Administrative Templates\System\Disk Quotas
4. In the right pane of Disk Quotas in Local Group Policy Editor, double click/tap on the Specify default quota limit and warning level policy to edit it. (see screenshot above)
5. Do step 6 (set limit/level) or step 7 (no limit) below for what you would like to do.
Note
This will override Option One above.
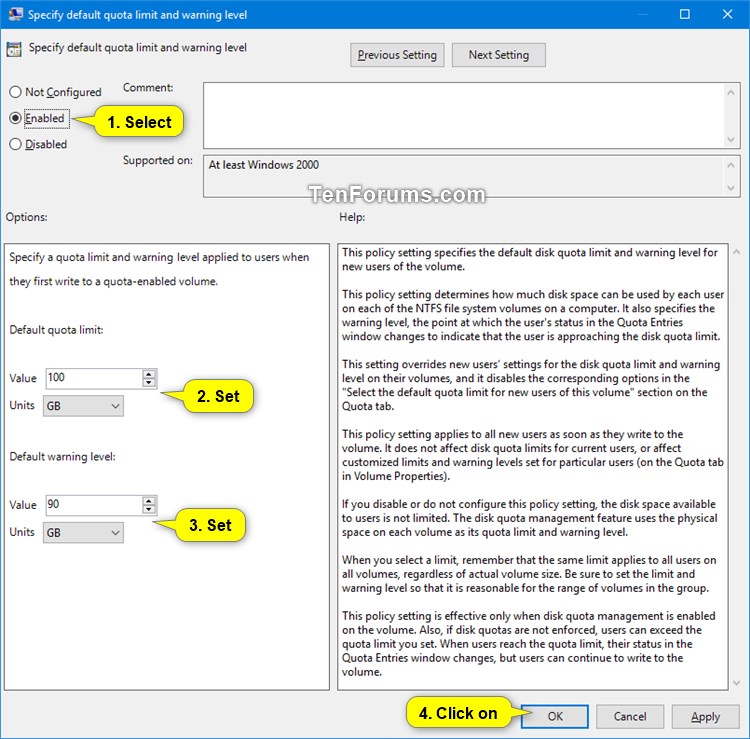
A) Select (dot) Enabled. (see screenshot below)
B) Under Options, set the Default quota limit value (ex: 100 GB) and units (ex: GB) to what you want.
C) Under Options, set the Default warning level value (ex: 90 GB) and units (ex: GB) to what you want.
D) Click/tap on OK, and go to step 8 below.
A) Select (dot) Not Conigured or Disabled, click/tap on OK, and go to step 8 below. (see screenshot above)
NOTE: Not Conigured is the default setting.
8. When finished, you can close the Local Group Policy Editor if you like.
9. You may also want to:
1. Press the Win+R keys to open Run, type regedit into Run, and click/tap on OK to open Registry Editor.
2. Navigate to the registry key below in the left pane of Registry Editor. (see screenshot below)
HKEY_LOCAL_MACHINE\SOFTWARE\Policies\Microsoft\Windows NT\DiskQuota
Note
If you don't have the DiskQuota key, then right click or press and hold on the Windows NT key, click/tap on New, click/tap on Key, type DiskQuota for the name, and press Enter.
3. Do step 4 (set limit/level) or step 5 (no limit) below for what you would like to do.
Note
This will override Option One above.
A) In the right pane of the DiskQuota key, double click/tap on the Limit DWORD to modify it. (see screenshot below step 2)
Note
If you don't have a Limit DWORD value, then right click or press and hold on an empty space in the right pane of the DiskQuota key, click/tap on New, click/tap on DWORD (32-bit) Value, type Limit for the name, and press Enter.
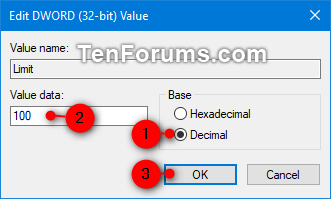
B) Select (dot) Decimal, type a number (ex: "100") for how many KB, MB, GB, TB, or EB you want to set for a default quota limit, and click/tap on OK. (see screenshot below)
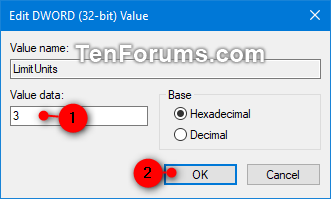
C) In the right pane of the DiskQuota key, double click/tap on the LimitUnits DWORD to modify it. (see screenshot below step 2)
Note
If you don't have a LimitUnits DWORD value, then right click or press and hold on an empty space in the right pane of the DiskQuota key, click/tap on New, click/tap on DWORD (32-bit) Value, type LimitUnits for the name, and press Enter.
D) Type a value (ex: "3") from the table below to have the default quota limit you set in step 4B above as KB, MB, GB, TB, PB, or EB, and click/tap on OK. (see screenshot below)
Value Unit 1 Kilobyte (KB) 2 Megabyte (MB) 3 Gigabyte (GB) 4 Terabyte (TB) 5 Petabytes (PB) 6 Exabytes (EB)
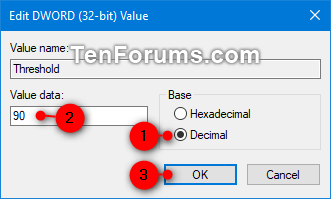
E) In the right pane of the DiskQuota key, double click/tap on the Threshold DWORD to modify it. (see screenshot below step 2)
Note
If you don't have a Threshold DWORD value, then right click or press and hold on an empty space in the right pane of the DiskQuota key, click/tap on New, click/tap on DWORD (32-bit) Value, type Threshold for the name, and press Enter.
F) Select (dot) Decimal, type a number (ex: "90") for how many KB, MB, GB, TB, or EB you want to set for a default warning level, and click/tap on OK. (see screenshot below)
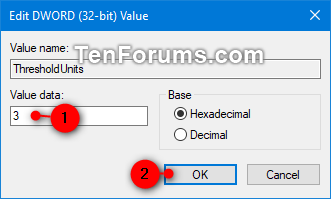
G) In the right pane of the DiskQuota key, double click/tap on the ThresholdUnits DWORD to modify it. (see screenshot below step 2)
Note
If you don't have a ThresholdUnits DWORD value, then right click or press and hold on an empty space in the right pane of the DiskQuota key, click/tap on New, click/tap on DWORD (32-bit) Value, type ThresholdUnits for the name, and press Enter.
H) Type a value (ex: "3") from the table below to have the default warning level you set in step 4F above as KB, MB, GB, TB, PB, or EB, click/tap on OK, and go to step 6 below. (see screenshot below)
Value Unit 1 Kilobyte (KB) 2 Megabyte (MB) 3 Gigabyte (GB) 4 Terabyte (TB) 5 Petabytes (PB) 6 Exabytes (EB)
A) In the right pane of the DiskQuota key, select the Limit, LimitUnits, Threshold, and ThresholdUnits DWORDs, right click on the selected DWORDs, and click/tap on Delete. (see screenshot below)
B) Click/tap on Yes to confirm, and go to step 6 below. (see screenshot below)
6. You can now close Registry Editor if you like.
7. Open an elevated command prompt.
8. Type thegpupdate /forcecommand into the elevated command prompt, and press Enter to apply your settings. (see screenshot below)
9. When finished, you can close the elevated command prompt if you like.
10. You may also want to:
That's it,
Shawn Brink
Related Tutorials
- How to Add or Remove Quota tab in Drive Properties in Windows 10
- How to Enable or Disable Disk Quotas in Windows
- How to Enable or Disable to Enforce Disk Quota Limits in Windows
- How to Set Disk Quota Limit and Warning Level for Specific Users in Windows
- How to Enable or Disable Log Event when Disk Quota Limit Exceeded in Windows
- How to Enable or Disable Log Event when Disk Quota Warning Level Exceeded in Windows
Set Disk Quota Limit and Warning Level for New Users in Windows

Set Disk Quota Limit and Warning Level for New Users in Windows
How to Set Default Disk Quota Limit and Warning Level for New Users in WindowsPublished by Shawn BrinkCategory: Hardware & Drivers
23 Dec 2022
Tutorial Categories


Related Discussions


