Information
Disk quotas track and control disk space usage for NTFS file system volumes, allowing administrators to control the amount of data that each user can store on a specific NTFS volume. Administrators can optionally configure the system to log an event when users are near their quota, and to deny further disk space to users who exceed their quota. Administrators can also generate reports, and use the event monitor to track quota issues.
Enforcing disk quota limits is optional. When users reach an enforced disk quota limit, the system responds as though the physical space on the volume were exhausted. When users reach an unenforced limit, their status in the Quota Entries window changes, but they can continue to write to the volume as long as physical space is available.
This tutorial will show you how to set a disk quota limit and warning level for specific users in Windows 7, Windows 8, and Windows 10.
You must be signed in as an administrator to set disk quota limits.
CONTENTS:
- Option One: Set Disk Quota Limit and Warning Level for Specific Users in Drive Properties
- Option Two: Set Disk Quota Limit and Warning Level for Specific Users in Command Prompt
1. If you haven't already, you will need to first enable disk quotas for the NTFS drive (ex: "G") you want to set disk quota limits and warning levels on.
2. Open This PC in File Explorer (Win+E).
3. Right click or press and hold on the NTFS drive (ex: "G") you want to set disk quota limits and warning levels for, and click/tap on Properties. (see screenshot below)
4. Click/tap on the Quota tab, and click/tap on the Show Quota Settings button. (see screenshot below)
5. Click/tap on the Quota Entries button. (see screenshot below)
6. Do step 7 (set limit/level) or step 8 (no limit) below for what you want to do.
A) Double click/tap on the user (ex: "Brink") you want to set or change a disk quota limit and warning level for on this drive (ex: "G"). (see screenshot below)
B) Select (dot) Limit disk space to, set the quota limit (ex: 300 GB) and warning level (ex: 250 GB) to what you want for this user on this drive, and click/tap on OK. (see screenshot below)
C) When finished setting quota limits and warning levels for users, close the Quota Entries window, and go to step 9 below.
NOTE: This is the default setting.
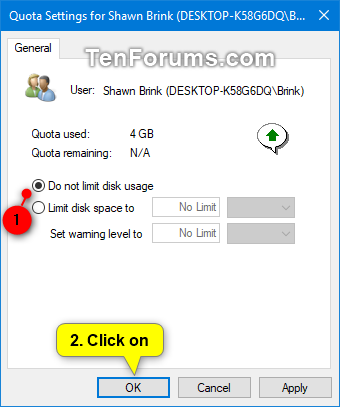
A) Double click/tap on the user (ex: "Brink") you do not want to have a disk quota limit and warning level for on this drive (ex: "G"). (see screenshot below)
B) Select (dot) Do not limit disk usage, and click/tap on OK. (see screenshot below)
C) When finished for users, close the Quota Entries window, and go to step 9 below.
9. Click/tap on OK. (see screenshot below step 5)
10. Click/tap on OK. (see screenshot below step 4)
11. You may also want to:
1. If you haven't already, you will need to first enable disk quotas for the drive (ex: "G") you want to set disk quota limits and warning levels on.
2. Open an elevated command prompt.
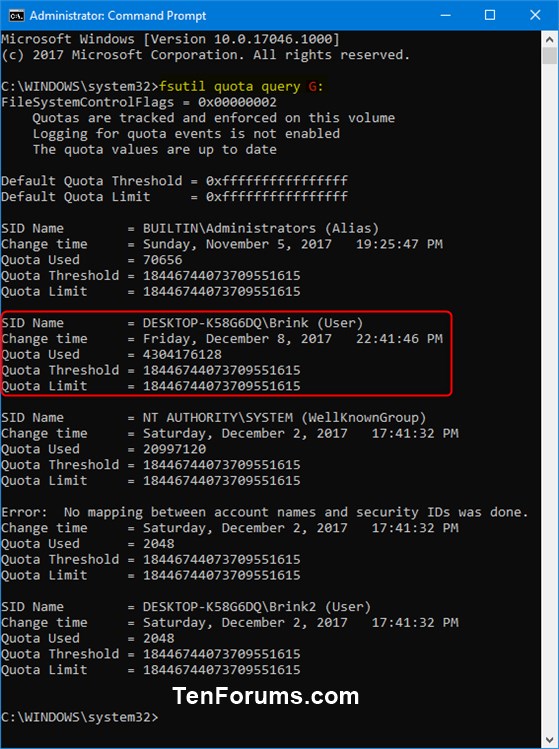
3. Type the command below into the elevated command prompt, and press Enter. This will show you the current quota limits and warning levels (quota threshold) of all users for this NTFS drive. (see screenshot below)

fsutil quota query <drive letter>:
Note
Substitute <drive letter> in the command above for the the actual drive letter (ex: "G") of the NTFS volume you want to see its currently disk quota limits and warning levels set for users.
For example:fsutil quota query G:
4. Type the command below into the elevated command prompt, and press Enter. (see screenshot below)

fsutil quota modify <drive letter>: <warning level in bytes> <quota limit in bytes> <user name>
Note
Substitute <drive letter> in the command above for the the actual drive letter (ex: "G") of the NTFS volume you want to set a disk quota limit and warning level for this user.
Substitute <warning level in bytes> in the command above with what you want to set the warning level to in bytes (ex: "268435456000" for 250 GB) for this user on this NTFS volume. To set No Limit, enter 0xffffffffffffffff for the warning level.
Substitute <quota limit in bytes> in the command above with what you want to set the quota limit to in bytes (ex: "322122547200" for 300 GB) for this user on this NTFS volume. To set No Limit, enter 0xffffffffffffffff for the quota limit.
1 Kilobyte (KB) = 1,024 Bytes (B)
1 Megabyte (MB) = 1,048,576 Bytes (B)
1 Gigabyte (GB) = 1,073,741,824 Bytes (B)
1 Terabyte (TB) = 1,099,511,627,776 Bytes (B)
Substitute <user name> in the command above with the actual name (ex: "Brink") of the user account you want to set a quota limit and warning level for on this NTFS volume.
For example:fsutil quota modify G: 268435456000 322122547200 Brink
5. You can now close the elevated command prompt.
6. You may also want to:
That's it,
Shawn
Related Tutorials
- How to Add or Remove Quota tab in Drive Properties in Windows 10
- How to Enable or Disable Disk Quotas in Windows
- How to Enable or Disable to Enforce Disk Quota Limits in Windows
- How to Set Default Disk Quota Limit and Warning Level for New Users in Windows
- How to Enable or Disable Log Event when Disk Quota Limit Exceeded in Windows
- How to Enable or Disable Log Event when Disk Quota Warning Level Exceeded in Windows
Set Disk Quota Limit and Warning Level for Specific Users in Windows

Set Disk Quota Limit and Warning Level for Specific Users in Windows
How to Set Disk Quota Limit and Warning Level for Specific Users in WindowsPublished by Shawn BrinkCategory: Hardware & Drivers
22 Aug 2020
Tutorial Categories


Related Discussions


