Information
Disk quotas track and control disk space usage for NTFS file system volumes, allowing administrators to control the amount of data that each user can store on a specific NTFS volume. Administrators can optionally configure the system to log an event when users are near their quota, and to deny further disk space to users who exceed their quota. Administrators can also generate reports, and use the event monitor to track quota issues.
This tutorial will show you how to enable or disable disk quotas for specific or all NTFS volumes in Windows 7, Windows 8, and Windows 10.
You must be signed in as an administrator to enable or disable disk quotas.
CONTENTS:
- Option One: Enable or Disable Disk Quotas for Specific NTFS Drive in Drive Properties
- Option Two: Enable or Disable Disk Quotas for Specific NTFS Drive in Command Prompt
- Option Three: Enable or Disable Disk Quotas for All NTFS Drives in Local Group Policy Editor
- Option Four: Enable or Disable Disk Quotas for All NTFS Drives using a BAT file
1. Open This PC in File Explorer (Win+E).
2. Right click or press and hold on the NTFS drive (ex: "G") you want to enable or disable disk quotas for, and click/tap on Properties. (see screenshot below)
3. Click/tap on the Quota tab, and click/tap on the Show Quota Settings button. (see screenshot below)
4. Do step 5 (enable) or step 6 (disable) below for what you want to do.
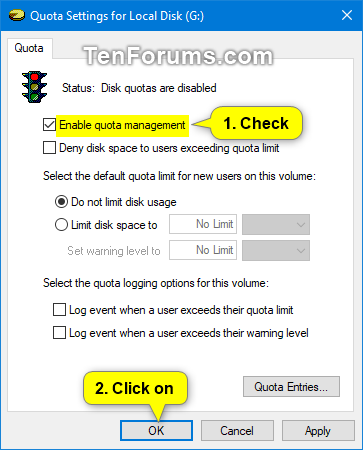
A) Check the Enable disk quota management box, and click/tap on OK. (see screenshot below)
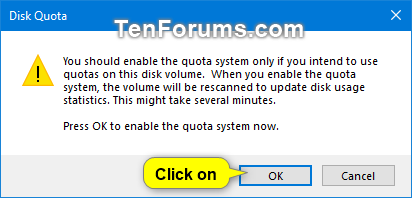
B) Click/tap on OK to confirm. (see screenshot below)
C) You may also want to:
- Enforce disk quota limit
- Specify default disk quota limit for new users
- Specify disk quota limit for specific users
- Turn on/off to log event when a user exceeds their quota limit
- Turn on/off to log event when a user exceeds their warning limit
D) Click/tap on OK. (see screenshot below step 3)
NOTE: This is the default setting.
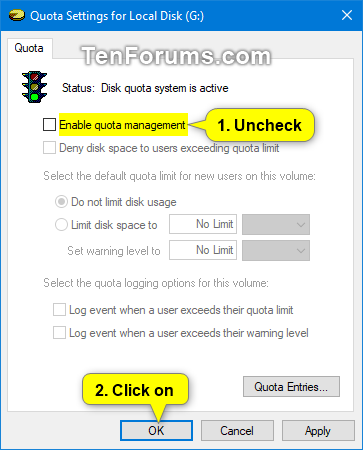
A) Uncheck the Enable disk quota management box, and click/tap on OK. (see screenshot below)
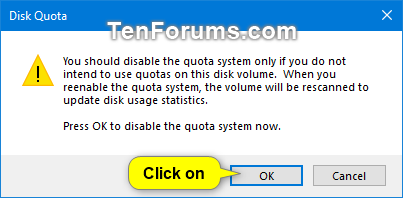
B) Click/tap on OK to confirm. (see screenshot below)
C) Click/tap on OK. (see screenshot below step 3)
1. Open an elevated command prompt.
2. Do step 3 (enable) or step 4 (disable) below for what you want to do.
A) Type the command below into the elevated command prompt, press Enter, and go to step 5 below. (see screenshots below)

fsutil quota track <drive letter>:
Note
Substitute <drive letter> in the command above for the the actual drive letter (ex: "G") of the NTFS volume you want to enable disk quotas for.
For example:fsutil quota track G:
NOTE: This is the default setting.
A) Type the command below into the elevated command prompt, press Enter, and go to step 5 below. (see screenshots below)

fsutil quota disable <drive letter>:
Note
Substitute <drive letter> in the command above for the the actual drive letter (ex: "G") of the NTFS volume you want to disable disk quotas for.
For example:fsutil quota disable G:
5. You can now close the elevated command prompt.
6. If you enabled disk quotas, then you may also want to:
Note
In Windows 7, the Local Group Policy Editor will only be available in the Professional, Ultimate, and Enterprise editions.
In Windows 8, the Local Group Policy Editor will only be available in the Pro and Enterprise editions.
In Windows 10, the Local Group Policy Editor will only be available in the Pro, Enterprise, and Education editions.
All editions can use Option Four below to set this same policy.
1. Open the Local Group Policy Editor.
2. In the left pane of Local Group Policy Editor, navigate to the location below. (see screenshot below)
Computer Configuration\Administrative Templates\System\Disk Quotas
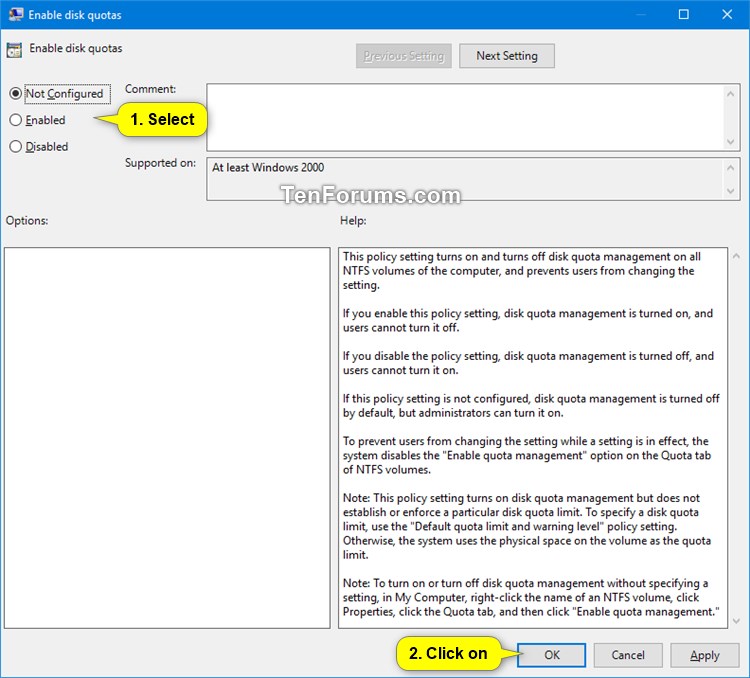
3. In the right pane of Disk Quotas in Local Group Policy Editor, double click/tap on the Enable disk quotas policy to edit it. (see screenshot above)
4. Do step 5 (enable), step 6 (disable), or step 7 (not configured) below for what you would like to do.
Note
If you enable this policy setting, disk quota management is turned on, and users cannot turn it off using Option One or Option Two.
A) Select (dot) Enabled, and click/tap on OK. (see screenshot below step 7)
B) You may also want to:
- Enforce disk quota limit
- Specify default disk quota limit for new users
- Specify disk quota limit for specific users
- Turn on/off to log event when a user exceeds their quota limit
- Turn on/off to log event when a user exceeds their warning limit
C) Go to step 8 below.
Note
If you disable the policy setting, disk quota management is turned off, and users cannot turn it on using Option One or Option Two.
Note
This is the default setting.
If this policy setting is not configured, disk quota management is turned off by default, but administrators can turn it on using Option One or Option Two.
A) Select (dot) Not Configured, click/tap on OK, and go to step 8 below. (see screenshot below step 7)
8. When finished, you can close the Local Group Policy Editor if you like.
Note
The downloadable .bat files below will change the registry key and value below.
HKEY_LOCAL_MACHINE\SOFTWARE\Policies\Microsoft\Windows NT\DiskQuota
Enable DWORD
(delete) = Not Configured (Default)
0 = Disabled
1 = Enabled
1. Do step 2 (enable), step 3 (disable), or step 4 (not configured) below for what you would like to do.
Note
If you enable this policy setting, disk quota management is turned on, and users cannot turn it off using Option One or Option Two.
A) Click/tap on the Download button below to download the BAT file below.
B) You may also want to:
- Enforce disk quota limit
- Specify default disk quota limit for new users
- Specify disk quota limit for specific users
- Turn on/off to log event when a user exceeds their quota limit
- Turn on/off to log event when a user exceeds their warning limit
C) Go to step 5 below.
Note
If you disable the policy setting, disk quota management is turned off, and users cannot turn it on using Option One or Option Two.
A) Click/tap on the Download button below to download the BAT file below, and go to step 5 below.
Disable_Disk_Quota_for_all_NTFS_volumes.bat
Download
Note
This is the default setting.
If this policy setting is not configured, disk quota management is turned off by default, but administrators can turn it on using Option One or Option Two.
A) Click/tap on the Download button below to download the BAT file below, and go to step 5 below.
Not_Configured_Disk_Quota_for_all_NTFS_volumes.bat
Download
5. Save the .bat file to your desktop.
6. Unblock the .bat file.
7. Right click or press and hold on the downloaded .bat file, and click/tap on Run as administrator.
8. You will now see a command prompt open, apply the registry changes, update group policy, and automatically close.
That's it,
Shawn
Related Tutorials
- How to Add or Remove Quota tab in Drive Properties in Windows 10
- How to Enable or Disable to Enforce Disk Quota Limits in Windows
- How to Set Disk Quota Limit and Warning Level for Specific Users in Windows
- How to Set Default Disk Quota Limit and Warning Level for New Users in Windows
- How to Enable or Disable Log Event when Disk Quota Limit Exceeded in Windows
- How to Enable or Disable Log Event when Disk Quota Warning Level Exceeded in Windows
Enable or Disable Disk Quotas in Windows

Enable or Disable Disk Quotas in Windows
How to Enable or Disable Disk Quotas in WindowsPublished by Shawn BrinkCategory: Hardware & Drivers
22 Aug 2020
Tutorial Categories


Related Discussions


