

How to Enable or Disable SuperFetch (SysMain) in Windows
SuperFetch (aka: Memory Prefetcher) is a service that was introduced with Vista.
SuperFetch is an enhancement of the Prefetcher from previous versions of Windows. The Prefetcher is in charge of storing program information so that often-used programs and processes can run faster.
SuperFetch keeps track of which applications you use most and loads this information from the hard drive into RAM so that programs load faster than they would if the hard disk had to be accessed every time. Windows SuperFetch prioritizes the programs youre currently using over background tasks and adapts to the way you work by tracking the programs you use most often and pre-loading these into memory. With SuperFetch, background tasks still run when the computer is idle. However, when the background task is finished, SuperFetch repopulates system memory with the data you were working with before the background task ran. Now, when you return to your desk, your programs will continue to run as efficiently as they did before you left. It is even smart enough to know what day it is in the event you use different applications more often on certain days. Basically, SuperFetch attempts to predict which applications you will launch next and preloads all of the necessary data into memory.
Sometimes SuperFetch may cause high disk usage.
If you run Windows from a SSD or M.2 instead of a slow spinner hard drive, then you may not see any performance gain from SuperFetch to justify the drive usage from it.
If you like, you could disable SuperFetch to see if you have any performance gains with it enabled or disabled.
This tutorial will show you how to enable or disable SuperFetch (SysMain) in Windows 7, Windows 8, and Windows 10.
You must be signed in as an administrator to enable or disable SuperFetch.
This will affect:
- Prefetch
- SuperFetch
- RAM compression
- ReadyBoost
Contents
- Option One: Enable or Disable SuperFetch in Services
- Option Two: Enable or Disable SuperFetch in Command Prompt
- Option Three: Enable or Disable SuperFetch in PowerShell
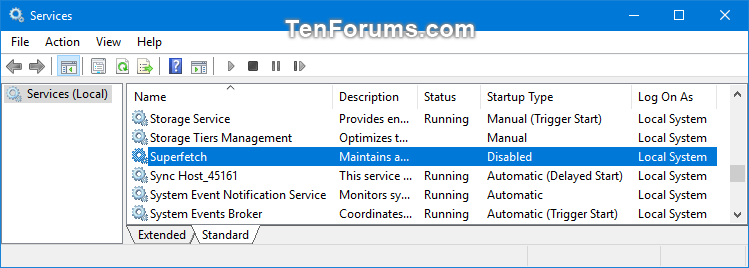
1 Press the Win + R keys to open Run, type services.msc into Run, and click/tap on OK to open Services.
2 Double click/tap on the SysMain service. (see screenshot below)
Starting with Windows 10 build 17763.1, the SuperFetch service has been renamed to SysMain.
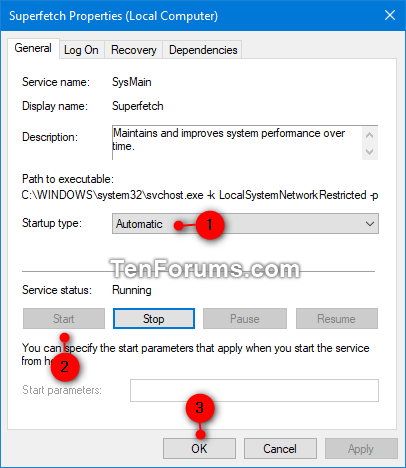
3 Do step 4 (enable) or step 5 (disable) below for what you want to do.
This is the default setting.
A) Change the Startup type to Automatic. (see screenshot below)
B) Click/tap on the Start button.
C) Click/tap on OK, and go to step 6 below.
A) Click/tap on the Stop button.
B) Change the Startup type to Disabled. (see screenshot below)
C) Click/tap on OK, and go to step 6 below.
6] You can now close Services.
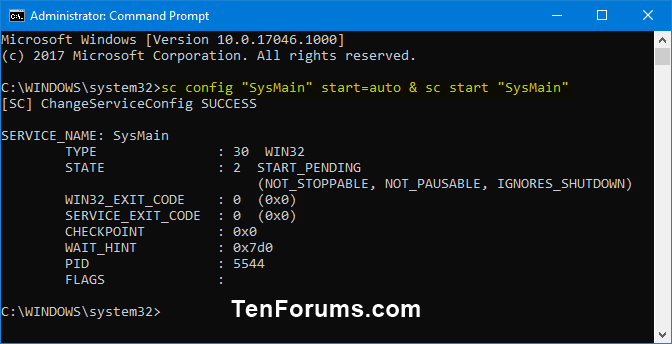
1 Open an elevated command prompt.
2 Do step 3 (enable) or step 4 (disable) below for what you want to do.
This is the default setting.
A) Copy and paste the command below into the elevated command prompt, press Enter, and go to step 5 below. (see screenshots below)
sc config "SysMain" start=auto & sc start "SysMain"
A) Copy and paste the command below into the elevated command prompt, press Enter, and go to step 5 below. (see screenshots below)
sc stop "SysMain" & sc config "SysMain" start=disabled
5 You can now close the elevated command prompt.
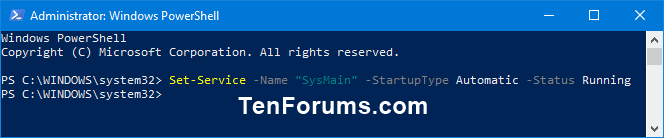
1 Open an elevated PowerShell.
2 Do step 3 (enable) or step 4 (disable) below for what you want to do.
This is the default setting.
A) Copy and paste the command below into the elevated PowerShell, press Enter, and go to step 5 below. (see screenshots below)
Set-Service -Name "SysMain" -StartupType Automatic -Status Running
A) Copy and paste the command below into the elevated PowerShell, press Enter, and go to step 5 below. (see screenshots below)
Stop-Service -Force -Name "SysMain"; Set-Service -Name "SysMain" -StartupType Disabled
5 You can now close the elevated PowerShell.
That's it,
Shawn Brink
Enable or Disable SuperFetch (SysMain) in Windows
-
New #1
If one wanted to fully disable superfetch on SSD shouldn't it also be disabled in the registry too?:
HKEY_LOCAL_MACHINE\SYSTEM\CurrentControlSet\Control\Session Manager\Memory Management\PrefetchParameters\EnableSuperfetch (DWORD value doesn't exist by default and to disable it the value must be 0)
Ever since disabling the Superfetch service all my files in C:\Windows\Prefetch haven't been added or modified, so I figured those are redundant and should be deleted as well. This leads to another point: under the registry branch is the Prefetch setting that should also be disabled:
HKEY_LOCAL_MACHINE\SYSTEM\CurrentControlSet\Control\Session Manager\Memory Management\PrefetchParameters\EnablePrefetcher (DWORD value defaults to 3, to disable = 0)
Is this correct?
-
New #2
Hello Soyabeaner, :)
There's no need to change the registry with the service disabled.
It is safe to delete the contents of the "C:\Windows\Prefetch" folder (cache) if wanted. If Windows is still prefetching anything, the folder will get repopulated with whatever it wants to prefetch.
When superfetch is disabled, there's also really no need to change the "EnablePrefetcher" DWORD.
 SuperFetch - Change Prefetch Data to be Cached - Windows 7 Help Forums
-
New #3
@Brink ... Shawn, if this rolls out "officially" in RS5, heads-up if you are not already aware.
Take a gander thru here: no superfetch service at 1809??? - Windows 10 Forums
-
-
New #5
Note that you disable a lot more that only superfetch if you disable the SYSMAIN service!!!
- prefetch
- superfetch
- RAM compression
- readyboost
- ...
But I disable it too. Don't need these fancy optimizations.
-
New #6
I can no longer even find the Superfetch service. Have they changed it in an update or something since this article was written?
Never mind, read closer in the first post.
It can still be disabled with this regedit change though:
Edit: And as noted above, disabling it in regedit only disables Superfetch. Disabling it in other ways also disables a lot of other stuff you may want to keep.Code:Windows Registry Editor Version 5.00 [HKEY_LOCAL_MACHINE\SYSTEM\CurrentControlSet\Control\Session Manager\Memory Management\PrefetchParameters] "EnableSuperfetcher"=dword:00000000
-
New #7
Edit: It would seem that Windows deletes the EnableSuperfetcher regfile on reboot, meaning it doesn't work. Weird.
-
-
-

Enable or Disable SuperFetch (SysMain) in Windows
How to Enable or Disable SuperFetch in WindowsPublished by Shawn BrinkCategory: Performance & Maintenance
02 Jul 2022


 Quote
Quote
Tutorial Categories

Related Discussions
