

Allow or Deny Write Access to Removable Drives not Protected by BitLocker in Windows
You can use BitLocker Drive Encryption to help protect your files on an entire drive. BitLocker can help block hackers from accessing the system files they rely on to discover your password, or from accessing your drive by physically removing it from your PC and installing it in a different one. You can still sign in to Windows and use your files as you normally would.
If you like, you can set a policy that configures whether BitLocker protection is required for a computer to be able to write data to a removable data drive (ex: USB flash drive). All removable data drives that are not BitLocker-protected will be mounted as read-only. If the drive is protected by BitLocker, it will be mounted with read and write access.
This tutorial will show you how to allow or deny write access to removable drives not protected by BitLocker for all users in Windows 7, Windows 8, Windows 10, and Windows 11.
You must be signed in as an administrator to allow or deny write access to removable drives not protected by BitLocker.
For Windows 7, BitLocker Drive Encryption is only available in the Windows 7 Professional and Windows 7 Enterprise editions.
For Windows 8/8.1, BitLocker Drive Encryption is only available in the Windows 8 Pro and Windows 8 Enterprise editions.
For Windows 10/11, BitLocker Drive Encryption is only available in the Windows 10 Pro, Enterprise, and Education editions.
Contents
- Option One: Allow or Deny Write Access to Removable Drives not Protected by BitLocker in Local Group Policy Editor
- Option Two: Allow or Deny Write Access to Removable Drives not Protected by BitLocker using a REG file
EXAMPLE: Deny write access to removable drives not protected by BitLocker

1 Open the Local Group Policy Editor.
2 Navigate to the policy location below in the left pane of Local Group Policy Editor. (see screenshot below)
Computer Configuration\Administrative Templates\Windows Components\BitLocker Drive Encryption\Removable Data Drives
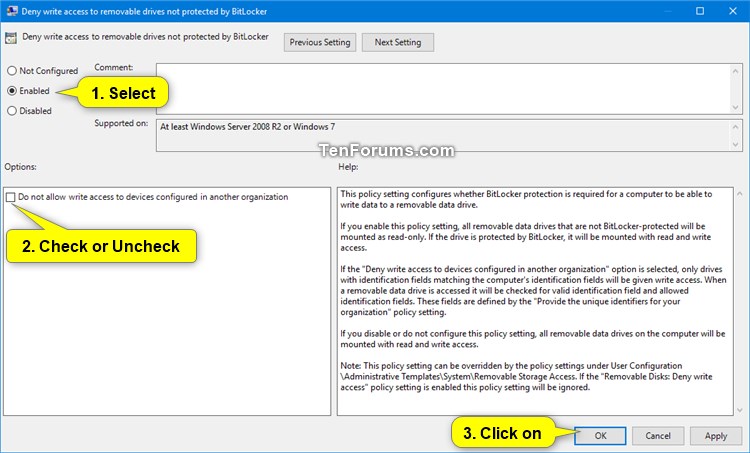
3 In the right pane of Removable Data Drives in Local Group Policy Editor, double click/tap on the Deny write access to removable drives not protected by BitLocker policy to edit it. (see screenshot above)
4 Do step 5 (allow) or step 6 (deny) below for what you would like to do.
A) Select (dot) Not Configured or Disabled, click/tap on OK, and go to step 7 below. (see screenshot below)
Not Configured is the default setting.
A) Select (dot) Enabled, click/tap on OK, and go to step 7 below. (see screenshot below)
If the Deny write access to devices configured in another organization option is checked, only drives with identification fields matching the computer's identification fields will be given write access. When a removable data drive is accessed it will be checked for valid identification field and allowed identification fields. These fields are defined by the Provide the unique identifiers for your organization policy setting located at Computer Configuration\Administrative Templates\Windows Components\BitLocker Drive Encryption in the Local Group Policy Editor.
7 When finished, you can close the Local Group Policy Editor if you like.
The downloadable .reg files below will add and modify the DWORD values in the registry keys below.
(Deny write access to removable drives not protected by BitLocker)
HKEY_LOCAL_MACHINE\SYSTEM\CurrentControlSet\Policies\Microsoft\FVE
RDVDenyWriteAccess DWORD
(delete) = Allow (default)
1 = Deny
(Deny write access to devices configured in another organization)
HKEY_LOCAL_MACHINE\SOFTWARE\Policies\Microsoft\FVE
RDVDenyCrossOrg DWORD
(delete) = default
0 = Allow
1 = Deny
1 Do step 2 (allow), step 3 (deny), step 4 (deny also from another organization) below for what you would like to do.
This is the default setting.
A) Click/tap on the Download button below to download the file below, and go to step 5 below.
Allow_write_access_to_removable_drives_not_protected_by_BitLocker.reg
Download
A) Click/tap on the Download button below to download the file below, and go to step 5 below.
Deny_write_access_to_removable_drives_not_protected_by_BitLocker.reg
Download
This is for the Deny write access to devices configured in another organization option that only drives with identification fields matching the computer's identification fields will be given write access. When a removable data drive is accessed it will be checked for valid identification field and allowed identification fields. These fields are defined by the Provide the unique identifiers for your organization policy setting located at Computer Configuration\Administrative Templates\Windows Components\BitLocker Drive Encryption in the Local Group Policy Editor.
A) Click/tap on the Download button below to download the file below, and go to step 5 below.
Deny_write_access_to_removable_drives_not_protected_by_BitLocker_and_from_another_organization.reg
Download
5 Save the .reg file to your desktop.
6 Double click/tap on the downloaded .reg file to merge it.
7 When prompted, click/tap on Run, Yes (UAC), Yes, and OK to approve the merge.
8 You can now delete the downloaded .reg file if you like.
That's it,
Shawn Brink
Related Tutorials
- How to Check Status of BitLocker Drive Encryption for Drive in Windows 10
- Allow or Deny Write Access to Fixed Data Drives not Protected by BitLocker in Windows
- How to Turn On or Off BitLocker for Removable Data Drives in Windows 10
- How to Enable or Disable Use of BitLocker on Removable Data Drives in Windows
- How to Enable or Disable Write Protection for a Disk Drive in Windows
- How to Enable or Disable Installation of Removable Devices in Windows
- How to Enable or Disable Access to All Removable Storage Devices in Windows
- How to Enable or Disable Write Access to Removable Disks in Windows
- How to Enable or Disable Remote Desktop (RDP) Access to Removable Storage Devices in Windows
Deny Write Access to Removable Drives not Protected by BitLocker
Deny Write Access to Removable Drives not Protected by BitLocker
Allow or Deny Write Access to Removable Drives not Protected by BitLocker in WindowsPublished by Shawn BrinkCategory: Security System
18 Mar 2022


Tutorial Categories

Related Discussions
