Create media for automated unattended install of Windows 10  

Page 80 of 99 FirstFirst ... 3070787980818290 ... LastLast

  1. Posts : 9
    Win10
       #790

    @hsehestedt - yup, I can manually select my country. @johngalt - it doesn't automatically failback per se; I presume when you say failback you're asking if the install continues without stopping? the answer is no, I get the Windows Setup - Time and Currency screen each time.

    I've committed the changes and confirmed they're part of the ISO by mounting it and checking the autounattend.xml via notepad before I attach it to my reference VM. It's definitely correct.

    Note: If I reverse the Input/Language order (i.e. choose 0409:00000409/en-US, and use a fallback of en-NZ) I still get the same issue.
    If I use Kari's autounattend.xml the same thing happens.

    Maybe I will start from scratch again, at this juncture I can only presume the ISO is somehow the cause/problem; I used MediaCreationTool21H1 to create the ISO. Is there any reason why 21H1 would have a hiccup on the first screen of the Windows Setup?

    I was so happy when I found this thread, I spent a whole week trying to do this myself and I couldn't get my head around the partition stuff, so was happy when I went through the tutorial and both the autounattend.xml and unattend.xml played nicely, EXCEPT for the first Windows Setup Input/Language (Time and Currency screen) prompt.

    I'm going to blow everything away and start from scratch and see how I get on. If anyone here has any ideas or thoughts of what to try please let me know.
      My Computer


  2. Posts : 4,187
    Windows 11 Pro, 22H2
       #791

    I'm going to try your answer file and see what result I get. Bear with me, it may take me a little time as I have to complete some other stuff first, but I'm committed to figuring this out .
      My Computers


  3. Posts : 9
    Win10
       #792

    hsehestedt said:
    I'm going to try your answer file and see what result I get. Bear with me, it may take me a little time as I have to complete some other stuff first, but I'm committed to figuring this out .
    autounattend.zip

    Thanks! I've zipped and attached my autounattend.xml (the code example in my first post doesn't include the Input being set to en-NZ)
      My Computer


  4. Posts : 4,187
    Windows 11 Pro, 22H2
       #793

    Ran into a problem already. The ISO images that I have, have a time and currency format for New Zealand but nothing specific to New Zealand for "Language to install" or "Input method".

    If you were installing manually, what settings would you select for these fields and do you know where one could obtain an ISO image that supports those?
      My Computers


  5. Posts : 9
    Win10
       #794

    Oh, maybe that is where I am wrong.
    In New Zealand we always select United States for Language to Install and also for Keyboard or Input Method.

    The only thing we ever change (for literally the last 20 years) is the Time and Currency format: - to English (New Zealand).

    Perhaps I need to tweak the autounattend.xml to only modify the Time and Currency field and that has been the issue all along.

    Don't suppose anyone knows which part of the autounttend.xml (well; amd64_Microsoft-Windows-International-Core-WinPE__neutral ) to select/modify for the Time and Currency field?)

    edit: During the OOBE part of the Install is where we define what Country we live in which then amends all the Language/Keyboard settings in Windows itself.. (note: my OOBE is fine, and it doesn't matter if I select New Zealand in the Time and Currency field or leave it as it and continue the (then) zero touch installation -- when I log on with my local admin account(defined in the unattend.xml) the installation is correct and I don't actually have to modify anything (it's all new zealand keyboard / time zone / currency etc).. the only thing I am trying to solve right now is having the ISO be 100% zero touch and aside from that very first prompt for Input/Time and Currency/Language it's working flawlessly!!!
      My Computer


  6. Posts : 4,187
    Windows 11 Pro, 22H2
       #795

    Ok, that makes sense. In that case, I have an answer for you. Standby a few minutes - just making sure that my installation finishes to completion and that it works when done. If all looks good, you will have your answer in a few minutes!
      My Computers


  7. Posts : 4,187
    Windows 11 Pro, 22H2
       #796

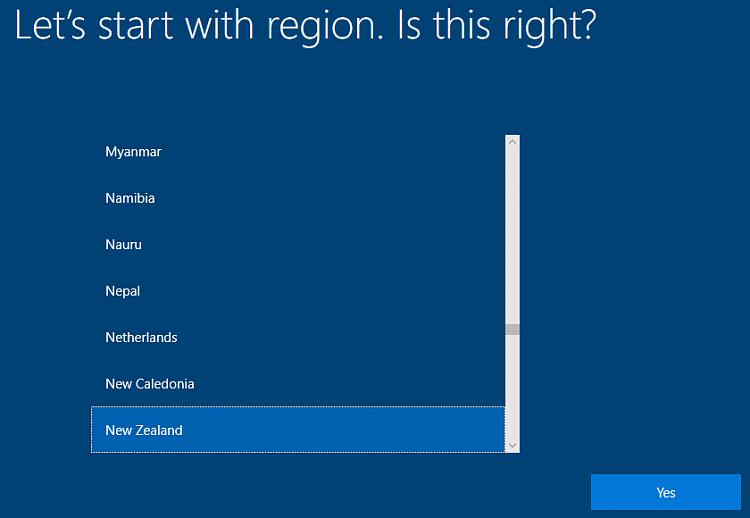
    Okay, good thing I waited to see what would happen. I got past the screen where you were stuck, but now I get prompted for the region information later during the installation like this:

    Create media for automated unattended install of Windows 10-image1.jpg

    But not to worry. I will figure it out.

    Currently, this is what I am using:
    Code:
                <SetupUILanguage>
                    <UILanguage>en-US</UILanguage>
                </SetupUILanguage>
                <InputLocale>en-US</InputLocale>
                <SystemLocale>en-US</SystemLocale>
                <UILanguage>en-US</UILanguage>
                <UILanguageFallback>en-US</UILanguageFallback>
                <UserLocale>en-NZ</UserLocale>
    I now just need to figure out what else needs to be changed to "en-NZ". I'll have it soon. I have my rapid deployment test bed all ready to go .
      My Computers


  8. Posts : 4,187
    Windows 11 Pro, 22H2
       #797

    Okay, there's a little bit more going on.

    You have entire sections missing from your answer file. For example, the entire <OOBE> section is missing and I think that I know why.

    I added those sections in and got setup to finish completely unattended, but when I was done the formatting was still off. For example, you folks insist on displaying the day of the month before the month instead of doing correctly with the month before the day of the month as we do in the US .

    Bear with me. It may take me a while to get this 100% completed. Rather than spamming this thread with continuous small updates I'm going to wait until I have it all written up and sorted out. If I need any more info from you I may just PM you if that is okay.
      My Computers


  9. Posts : 9
    Win10
       #798

    Hey mate,
    My OOBE(unattend.xml) was sysprep'd into the WIM

    Here is my unattend.xml - which will complete your install. Thanks for your help.

    Code:
    <?xml version="1.0" encoding="utf-8"?>
    <unattend xmlns="urn:schemas-microsoft-com:unattend">
        <settings pass="oobeSystem">
            <component name="Microsoft-Windows-International-Core" processorArchitecture="amd64" publicKeyToken="31bf3856ad364e35" language="neutral" versionScope="nonSxS" xmlns:wcm="http://schemas.microsoft.com/WMIConfig/2002/State" xmlns:xsi="http://www.w3.org/2001/XMLSchema-instance">
                <InputLocale>1409:00000409</InputLocale>
                <SystemLocale>en-NZ</SystemLocale>
                <UILanguage>en-NZ</UILanguage>
                <UserLocale>en-NZ</UserLocale>
                <UILanguageFallback>en-US</UILanguageFallback>
            </component>
            <component name="Microsoft-Windows-Shell-Setup" processorArchitecture="amd64" publicKeyToken="31bf3856ad364e35" language="neutral" versionScope="nonSxS" xmlns:wcm="http://schemas.microsoft.com/WMIConfig/2002/State" xmlns:xsi="http://www.w3.org/2001/XMLSchema-instance">
                <OOBE>
                    <HideEULAPage>true</HideEULAPage>
                    <HideOEMRegistrationScreen>true</HideOEMRegistrationScreen>
                    <HideOnlineAccountScreens>true</HideOnlineAccountScreens>
                    <HideWirelessSetupInOOBE>true</HideWirelessSetupInOOBE>
                    <ProtectYourPC>3</ProtectYourPC>
                    <UnattendEnableRetailDemo>false</UnattendEnableRetailDemo>
                </OOBE>
                <UserAccounts>
                    <LocalAccounts>
                        <LocalAccount wcm:action="add">
                            <Password>
                                <Value>UAAzAHIAcABsADMAeAAzAGQAUABhAHMAcwB3AG8AcgBkAA==</Value>
                                <PlainText>false</PlainText>
                            </Password>
                            <Description>Main local admin account</Description>
                            <DisplayName>Temp Admin</DisplayName>
                            <Group>Administrators</Group>
                            <Name>temp.admin</Name>
                        </LocalAccount>
                    </LocalAccounts>
                </UserAccounts>
            </component>
        </settings>
        <settings pass="specialize">
            <component name="Microsoft-Windows-Shell-Setup" processorArchitecture="amd64" publicKeyToken="31bf3856ad364e35" language="neutral" versionScope="nonSxS" xmlns:wcm="http://schemas.microsoft.com/WMIConfig/2002/State" xmlns:xsi="http://www.w3.org/2001/XMLSchema-instance">
                <OEMInformation>
                    <Manufacturer>REMOVED</Manufacturer>
                    <SupportPhone>REMOVED</SupportPhone>
                    <SupportHours>REMOVED</SupportHours>
                </OEMInformation>
                <CopyProfile>true</CopyProfile>
                <OEMName>REMOVED</OEMName>
                <RegisteredOrganization>REMOVED</RegisteredOrganization>
                <TimeZone>New Zealand Standard Time</TimeZone>
            </component>
        </settings>
        <cpi:offlineImage cpi:source="wim:c:/temp/iso_files/sources/install.wim#Windows 10 Pro" xmlns:cpi="urn:schemas-microsoft-com:cpi" />
    </unattend>
    edit: obviously you will need to change up the local administrator account / password

    - - - Updated - - -

    - - - Updated - - -
    @hsehestedt

    My Host is NVME and I have quite a rapid set up myself.
    I implemented your settings and my ISO is now Zero Touch

    Thanks a lot for your help, you're a legend.
      My Computer


  10. Posts : 17,661
    Windows 10 Pro
    Thread Starter
       #799

    nzwazza said:
    Thanks! I've zipped and attached my autounattend.xml (the code example in my first post doesn't include the Input being set to en-NZ)
    This answer file can never work, simply because Microsoft has not released Windows install media in New Zealand English (EN-NZ). Using English install media, you must choose either British English, also know as English International (EN-GB), or US English (EN-US) as install language.

    When Windows Setup is trying to find EN-NZ OS to install from EN-GB or EN-US install media, it of course fails.

    Change the highlighted, invalid UI language values to match the language of your install media (either EN-GB or EN-US):
    Create media for automated unattended install of Windows 10-image.png

    The answer file should now work.

    Kari
      My Computer


Tutorial Categories

Create media for automated unattended install of Windows 10 Tutorial Index Network & Sharing Instalation and Upgrade Browsers and Email General Tips Gaming Customization Apps and Features Virtualization BSOD System Security User Accounts Hardware and Drivers Updates and Activation Backup and Restore Performance and Maintenance Mixed Reality Phone


  Related Discussions
Our Sites
Site Links
About Us
Windows 10 Forums is an independent web site and has not been authorized, sponsored, or otherwise approved by Microsoft Corporation. "Windows 10" and related materials are trademarks of Microsoft Corp.

© Designer Media Ltd
All times are GMT -5. The time now is 03:12.
Find Us


Windows 10 Forums