Create media for automated unattended install of Windows 10  

Page 43 of 99 FirstFirst ... 3341424344455393 ... LastLast

  1. Posts : 2,667
    Windows 11 21H2 (22000.593)
       #420

    As a person who has lived with constant Tinnitus all my life, but almost never experienced anything else wrt vertigo / balance loss, or hearing loss, my sympathies, Kari. Stay safe and well. And stay seated longer - we want to have associations with and advice from our Kari for many, many more years to come.
      My Computers


  2. Posts : 14,046
    Windows 11 Pro X64 22H2 22621.1848
       #421

    getting hot beverage on my shirt
    Sounds like an excellent reason to stay away from the hot stuf and focus on the cold, malt beverages

    Seriously though, I've had vertigo problems off and on for about 10 years now but nothing as severe as what you have experienced. I'm usually able to correct mine with home physical therapy.

    Get well my friend, you've been missed.
      My Computers


  3. Posts : 3
    Windows 10 1809
       #422

    Hey Guys, been a long time since visited this forum. Been looking for some help with an unattend file for windows 10. I am using the built-in administrator account with autologon and it doesnt seem to be working. THe computer will reboot to login screen with the administrator account and then a password prompt. If i enter the credentials i supplied in the unattend file, it log me in, but never automatically. I am using a Hyper-V VM to test deployments, but for some reason, it seems to autologon when i use a physical machine. I did use Windows SIM to create the file. Here is my file contents:

    Code:
    <?xml version="1.0" encoding="utf-8"?>
    <unattend xmlns="urn:schemas-microsoft-com:unattend">
        <settings pass="auditSystem">
            <component name="Microsoft-Windows-PnpCustomizationsNonWinPE" processorArchitecture="amd64" publicKeyToken="31bf3856ad364e35" language="neutral" versionScope="nonSxS" xmlns:wcm="http://schemas.microsoft.com/WMIConfig/2002/State" xmlns:xsi="http://www.w3.org/2001/XMLSchema-instance">
                <DriverPaths>
                    <PathAndCredentials wcm:action="add" wcm:keyValue="1">
                        <Path>c:\windows\LDDriverStore</Path>
                    </PathAndCredentials>
                </DriverPaths>
            </component>
        </settings>
        <settings pass="specialize">
            <component name="Microsoft-Windows-Shell-Setup" processorArchitecture="amd64" publicKeyToken="31bf3856ad364e35" language="neutral" versionScope="nonSxS" xmlns:wcm="http://schemas.microsoft.com/WMIConfig/2002/State" xmlns:xsi="http://www.w3.org/2001/XMLSchema-instance">
                <ComputerName>TEST001</ComputerName>
                <ProductKey>XXXXX-XXXXX-XXXXX-XXXXX-XXXXX</ProductKey>
            </component>
        </settings>
        <settings pass="oobeSystem">
            <component name="Microsoft-Windows-Shell-Setup" processorArchitecture="amd64" publicKeyToken="31bf3856ad364e35" language="neutral" versionScope="nonSxS" xmlns:wcm="http://schemas.microsoft.com/WMIConfig/2002/State" xmlns:xsi="http://www.w3.org/2001/XMLSchema-instance">
                <AutoLogon>
                    <Password>
                        <Value>Password1</Value>
                        <PlainText>true</PlainText>
                    </Password>
                    <Enabled>true</Enabled>
                    <LogonCount>999</LogonCount>
                    <Username>Administrator</Username>
                </AutoLogon>
                <OOBE>
                    <HideEULAPage>true</HideEULAPage>
                    <HideLocalAccountScreen>true</HideLocalAccountScreen>
                    <HideOEMRegistrationScreen>true</HideOEMRegistrationScreen>
                    <HideOnlineAccountScreens>true</HideOnlineAccountScreens>
                    <HideWirelessSetupInOOBE>true</HideWirelessSetupInOOBE>
                    <NetworkLocation>Work</NetworkLocation>
                    <ProtectYourPC>1</ProtectYourPC>
                    <SkipMachineOOBE>true</SkipMachineOOBE>
                    <SkipUserOOBE>true</SkipUserOOBE>
                </OOBE>
                <UserAccounts>
                    <AdministratorPassword>
                        <Value>Password1</Value>
                        <PlainText>true</PlainText>
                    </AdministratorPassword>
                </UserAccounts>
            </component>
        </settings>
    </unattend>
    - - - Updated - - -

    Well, after spending a long, long time on this, i finally figured it out. Just had to turn off Enhanced Session Mode. Sometimes its the simple things...
      My Computer


  4. Posts : 2,667
    Windows 11 21H2 (22000.593)
       #423

    Lol, isn't it, though!

    Good investigation.
      My Computers


  5. Posts : 100
    Windows 10 21H2/Windows 11 21H2 (22000.100)
       #424

    excellent guide, I've been looking for it for a long time. Unfortunately, I can't do Hyper-V, little virtual memory and in VMware Workstation Pro it gets stuck with this script:
    Code:
    dism / capture-image /imagefile:C:\Image\install.wim / capturedir: C: \ / ScratchDir: C: \ Scratch / name: "Win10" / description: "My Custom Win10 Image" / compress: maximum / checkintegrity / verify

    The action cannot be completed when the file is in use by another process.

    Sorry, I'm Czech and I don't speak English well. Thank you.
      My Computer


  6. Posts : 4,187
    Windows 11 Pro, 22H2
       #425

    @RuLich, if you are really running the command exactly as you posted it here, then the syntax is incorrect. You have included spaces in many places where no space should exist.

    It's not as easy to see in the text that you posted, but if you put it in a code block you should be able to see it more clearly. Below is an exact copy and paste from your post. It may be easier to see the errors here:

    Code:
    dism / capture-image /imagefile:C:\Image\install.wim / capturedir: C: \ / ScratchDir: C: \ Scratch / name: "Win10" / description: "My Custom Win10 Image" / compress: maximum / checkintegrity / verify

    Try copying the corrected line below and see if that works:

    Code:
    dism /capture-image /imagefile:C:\Image\install.wim /capturedir:C:\ /ScratchDir:C:\Scratch /name:"Win10" /description:"My Custom Win10 Image" /compress:maximum /checkintegrity /verify

    However, there is another possible issue here. Are you booting Windows VM from a Windows ISO image and then running command from a command prompt? It is important THAT YOU ARE NOT booting the actual Reference VM that you created. The fact that you are getting a message saying that there are files in use makes me think that you may be booting that VM.

    Let me know if this helps. If you still have difficulties, do let us know. I guarantee that we can solve this!
      My Computers


  7. Posts : 100
    Windows 10 21H2/Windows 11 21H2 (22000.100)
       #426

    Thank you very much for your willingness, but you really don't know how to boot after the second boot from Windows ISO. It always takes me to the "Admin" installation instead of "Administrator"
    Thank you for your explanation and willingness.

      My Computer


  8. Posts : 4,187
    Windows 11 Pro, 22H2
       #427

    The procedure that you need to follow varies slightly depending upon whether you created your VM to use a BIOS or a UEFI firmware.

    IMPORTANT: If you have already booted the VM normally after sysprep was run, then it is too late. You cannot get a valid image now. You MUST either recreate the VM or restore a snapshot of the VM from before the boot that happened after the sysprep.

    I strongly suggest creating a snapshot as Kari's tutorial notes. That way, if you accidentally miss the boot from the ISO image, you can simply restore the snapshot and try it again.

    For both BIOS and UEFI, begin like this:

    1) Select your VM from the list of Virtual Machines.
    2) Go into the Virtual Machine Settings and make sure that the CD-ROM drive is set to point to your ISO image file like this:

    Create media for automated unattended install of Windows 10-image1.jpg

    3) On the VMware toolbar, click the arrow to the right of the power button like this:

    Create media for automated unattended install of Windows 10-image2.jpg

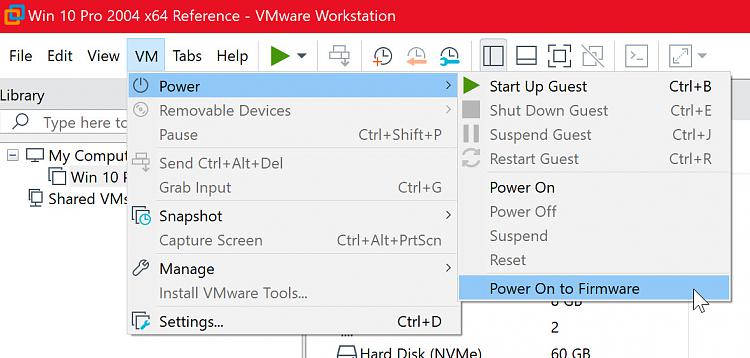
    4) Choose the option to "Power On to Firmware" like this:

    Create media for automated unattended install of Windows 10-image3.jpg


    5) What you see next will depend upon whether you created your Virtual Machine with a UEFI firmware or with BIOS firmware. If you used UEFI, then you will see the screen below. Select the CDROM as the device to boot from:

    Create media for automated unattended install of Windows 10-image4.jpg

    IMPORTANT: Once you select this and the system begins to boot make sure to click within the VM window to make it active AS SOON AS YOU CAN. Then, you should see a message to press any key to boot from the CD or DVD. Press a key. BE CAREFUL! You will not have long to press a key!

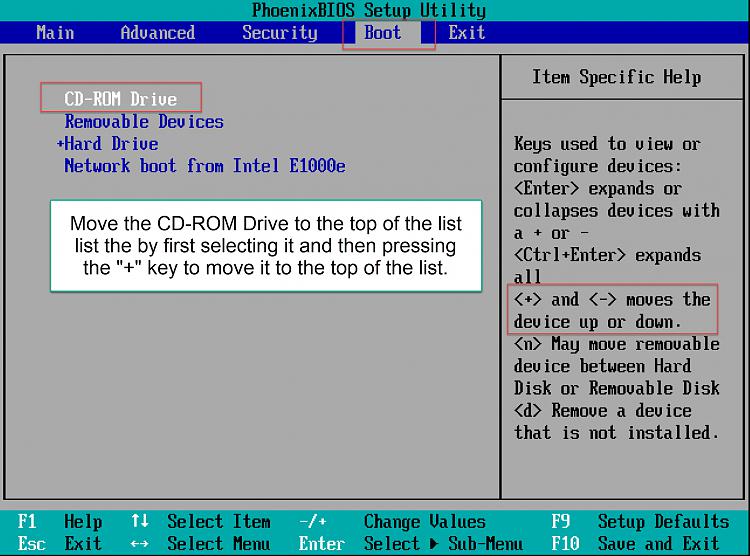
    If you created your VM with BIOS firmware, then go to the "Boot" tab as shown in the image below. Move the CD-ROM Drive to the top of the boot list as shown below. Then, go to the "Exit" tab and select "Exit Saving Changes".

    Create media for automated unattended install of Windows 10-image5.jpg

    IMPORTANT: Once you select this and the system begins to boot make sure to click within the VM window to make it active AS SOON AS YOU CAN. Then, you should see a message to press any key to boot from the CD or DVD. Press a key. BE CAREFUL! You will not have long to press a key!

    I hope that this helps. If you have any more questions, do let me know. I'm here to help!

    Let me know how it goes.
      My Computers


  9. Posts : 17,661
    Windows 10 Pro
    Thread Starter
       #428

    RuLich said:
    Your screenshot clearly shows that you are not following the instructions. You cannot capture WIM image from a running system. You must boot from either WinPE or Windows 10 install media, then capture the image,

    Instructions in tutorial steps 7.10 to 7.14.

    Kari
      My Computer


  10. Posts : 100
    Windows 10 21H2/Windows 11 21H2 (22000.100)
       #429

    Thank you very much, I am mainly interested in this:

    "I repeat: do not let reference machine boot from HDD or in case of VM, from VHD!

    7.11) When booted from install media, press SHIFT + F10 to open Command Prompt. Type diskpart and press Enter (# 1 in screenshot below), type list vol and press Enter (# 2), type exit and press Enter (# 3) "

    I boot as above and when should I press SHIFT + F10?


    Thank you for your patience. I'm 68 years old and I started to enjoy it on my old knees.

    - - - Updated - - -
    Last edited by RuLich; 09 Jul 2020 at 07:25. Reason: Translation
      My Computer


Tutorial Categories

Create media for automated unattended install of Windows 10 Tutorial Index Network & Sharing Instalation and Upgrade Browsers and Email General Tips Gaming Customization Apps and Features Virtualization BSOD System Security User Accounts Hardware and Drivers Updates and Activation Backup and Restore Performance and Maintenance Mixed Reality Phone


  Related Discussions
Our Sites
Site Links
About Us
Windows 10 Forums is an independent web site and has not been authorized, sponsored, or otherwise approved by Microsoft Corporation. "Windows 10" and related materials are trademarks of Microsoft Corp.

© Designer Media Ltd
All times are GMT -5. The time now is 17:02.
Find Us


Windows 10 Forums