Create media for automated unattended install of Windows 10  

Page 10 of 99 FirstFirst ... 891011122060 ... LastLast

  1. Posts : 2
    Win 10 x64
       #90

    falconer said:
    Is there any way to modify the unattend.xml after imaging? Or will I have to start from scratch?
    I had this exact problem. I accidentally set the keyboard language to Finnish instead of English. I did find that you can edit the unattend.xml using dism.

    • Create a directory. In this example I created CustomImage in C: (C:\CustomImage)
    • Use elevated PowerShell or CMD and use DISM to mount the image:

    Code:
    DISM /Mount-image /imagefile:C:\Users\%username%\Desktop\install.wim /MountDir:C:\CustomImage /optimize
    • Make your changes to the unattend.xml using SIM.
    • Save & Unmount image

    Code:
    Dism /Unmount-image /MountDir:C:\CustomImage /Commit
    Click here for source info
      My Computer


  2. Posts : 1
    Windows 10
       #91

    Thanks for great tutorial.
    Can You specify what to enter to disable and reject all of the Microsoft tracking, telemetry... questions on final stage of 1803 installation? I'm guessing that they are all enabled and accepted when installing by this tutorial.
    Tnx :)
      My Computer


  3. Posts : 8
    Windows 10
       #92

    ERROR WINDOWS 1803


    Hello Kari, first of all, congratulations to the tutorial.

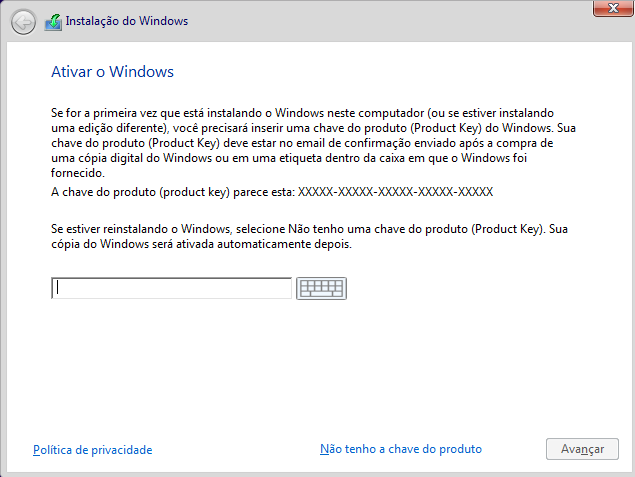
    I followed all the steps and created the autonattend and unattend response files. I downloaded the ISO from microsoft, in my case in portuguese brazil (Win10_1803_BrazilianPortuguese_x64), I created the bootable pendrive and replaced the "install.wim" with the generated one, when I start the installation "Activate Windows" already appears requesting a valid serial if I click "I do not have the product key" the installation is canceled. Would you help me?
    Attached is the autounattend and unattend file and the screens with the errors.

    Create media for automated unattended install of Windows 10-05-07-2018-10-41-36.png

    Create media for automated unattended install of Windows 10-05-07-2018-10-42-02.png
      My Computer


  4. Posts : 8
    Windows 10
       #93

    ERROR WINDOWS 1803


    I did not see the .zip file, it goes again.

    autounattend.xml
    Code:
    <?xml version="1.0" encoding="utf-8"?>
    <unattend xmlns="urn:schemas-microsoft-com:unattend">
        <settings pass="windowsPE">
            <component name="Microsoft-Windows-International-Core-WinPE" processorArchitecture="amd64" publicKeyToken="31bf3856ad364e35" language="neutral" versionScope="nonSxS" xmlns:wcm="http://schemas.microsoft.com/WMIConfig/2002/State" xmlns:xsi="http://www.w3.org/2001/XMLSchema-instance">
                <SetupUILanguage>
                    <UILanguage>pt-BR</UILanguage>
                </SetupUILanguage>
                <InputLocale>0416:00000416</InputLocale>
                <UserLocale>pt-BR</UserLocale>
                <UILanguageFallback>pt-BR</UILanguageFallback>
                <UILanguage>pt-BR</UILanguage>
                <SystemLocale>pt-BR</SystemLocale>
            </component>
            <component name="Microsoft-Windows-Setup" processorArchitecture="amd64" publicKeyToken="31bf3856ad364e35" language="neutral" versionScope="nonSxS" xmlns:wcm="http://schemas.microsoft.com/WMIConfig/2002/State" xmlns:xsi="http://www.w3.org/2001/XMLSchema-instance">
                <DiskConfiguration>
                    <Disk wcm:action="add">
                        <CreatePartitions>
                            <CreatePartition wcm:action="add">
                                <Order>1</Order>
                                <Size>450</Size>
                                <Type>Primary</Type>
                            </CreatePartition>
                            <CreatePartition wcm:action="add">
                                <Extend>true</Extend>
                                <Order>2</Order>
                                <Type>Primary</Type>
                            </CreatePartition>
                        </CreatePartitions>
                        <ModifyPartitions>
                            <ModifyPartition wcm:action="add">
                                <Active>true</Active>
                                <PartitionID>1</PartitionID>
                                <Order>1</Order>
                                <Format>NTFS</Format>
                                <Label>Sistema</Label>
                            </ModifyPartition>
                            <ModifyPartition wcm:action="add">
                                <PartitionID>2</PartitionID>
                                <Order>2</Order>
                                <Letter>C</Letter>
                                <Label>Windows</Label>
                                <Format>NTFS</Format>
                            </ModifyPartition>
                        </ModifyPartitions>
                        <DiskID>0</DiskID>
                        <WillWipeDisk>true</WillWipeDisk>
                    </Disk>
                </DiskConfiguration>
                <ImageInstall>
                    <OSImage>
                        <InstallTo>
                            <DiskID>0</DiskID>
                            <PartitionID>2</PartitionID>
                        </InstallTo>
                    </OSImage>
                </ImageInstall>
                <UserData>
                    <ProductKey>
                        <Key>VK7JG-NPHTM-C97JM-9MPGT-3V66T</Key>
                    </ProductKey>
                    <AcceptEula>true</AcceptEula>
                    <Organization>SICOOB</Organization>
                </UserData>
            </component>
        </settings>
        <cpi:offlineImage cpi:source="wim:d:/suporte/softwares/iso/win10_1803_brazilianportuguese_x64/sources/install.wim#Windows 10 Pro" xmlns:cpi="urn:schemas-microsoft-com:cpi" />
    </unattend>
    unattend.xml

    Code:
    <?xml version="1.0" encoding="utf-8"?>
    <unattend xmlns="urn:schemas-microsoft-com:unattend">
        <settings pass="oobeSystem">
            <component name="Microsoft-Windows-International-Core" processorArchitecture="amd64" publicKeyToken="31bf3856ad364e35" language="neutral" versionScope="nonSxS" xmlns:wcm="http://schemas.microsoft.com/WMIConfig/2002/State" xmlns:xsi="http://www.w3.org/2001/XMLSchema-instance">
                <InputLocale>0416:00000416</InputLocale>
                <SystemLocale>pt-BR</SystemLocale>
                <UILanguage>pt-BR</UILanguage>
                <UILanguageFallback>pt-BR</UILanguageFallback>
                <UserLocale>pt-BR</UserLocale>
            </component>
            <component name="Microsoft-Windows-Shell-Setup" processorArchitecture="amd64" publicKeyToken="31bf3856ad364e35" language="neutral" versionScope="nonSxS" xmlns:wcm="http://schemas.microsoft.com/WMIConfig/2002/State" xmlns:xsi="http://www.w3.org/2001/XMLSchema-instance">
                <UserAccounts>
                    <LocalAccounts>
                        <LocalAccount wcm:action="add">
                            <Password>
                                <Value>UwBpAGMAbwBvAGIAMQAyADMAQAAjACQAUABhAHMAcwB3AG8AcgBkAA==</Value>
                                <PlainText>false</PlainText>
                            </Password>
                            <Description>Usuário para suporte local</Description>
                            <DisplayName>suporte</DisplayName>
                            <Group>Administradores</Group>
                            <Name>suporte</Name>
                        </LocalAccount>
                        <LocalAccount wcm:action="add">
                            <Password>
                                <Value>UwBpAGMAbwBvAGIAMQAyADMAUABhAHMAcwB3AG8AcgBkAA==</Value>
                                <PlainText>false</PlainText>
                            </Password>
                            <Description>Usuário de suporte local</Description>
                            <DisplayName>laboratorio</DisplayName>
                            <Group>Administradores</Group>
                            <Name>laboratorio</Name>
                        </LocalAccount>
                    </LocalAccounts>
                </UserAccounts>
                <OOBE>
                    <HideEULAPage>true</HideEULAPage>
                    <HideOEMRegistrationScreen>true</HideOEMRegistrationScreen>
                    <HideOnlineAccountScreens>true</HideOnlineAccountScreens>
                    <HideWirelessSetupInOOBE>true</HideWirelessSetupInOOBE>
                    <ProtectYourPC>1</ProtectYourPC>
                    <UnattendEnableRetailDemo>false</UnattendEnableRetailDemo>
                </OOBE>
                <AutoLogon>
                    <Password>
                        <Value>UwBpAGMAbwBvAGIAMQAyADMAUABhAHMAcwB3AG8AcgBkAA==</Value>
                        <PlainText>false</PlainText>
                    </Password>
                    <Enabled>true</Enabled>
                    <LogonCount>1</LogonCount>
                    <Username>laboratorio</Username>
                </AutoLogon>
            </component>
        </settings>
        <settings pass="specialize">
            <component name="Microsoft-Windows-Shell-Setup" processorArchitecture="amd64" publicKeyToken="31bf3856ad364e35" language="neutral" versionScope="nonSxS" xmlns:wcm="http://schemas.microsoft.com/WMIConfig/2002/State" xmlns:xsi="http://www.w3.org/2001/XMLSchema-instance">
                <OEMInformation>
                    <Logo>C:\Windows\System32\oemlogo.bmp</Logo>
                    <Manufacturer>Empresa</Manufacturer>
                    <SupportHours>8/5</SupportHours>
                    <SupportPhone>8787</SupportPhone>
                </OEMInformation>
                <CopyProfile>true</CopyProfile>
                <OEMName>Empresa</OEMName>
                <RegisteredOrganization>Empresa</RegisteredOrganization>
                <RegisteredOwner>HELPDESK</RegisteredOwner>
                <TimeZone>E. South America Standard Time</TimeZone>
                <ComputerName>DSDF-DBDF</ComputerName>
            </component>
        </settings>
        <cpi:offlineImage cpi:source="wim:d:/suporte/softwares/iso/win10_1803_brazilianportuguese_x64/sources/install.wim#Windows 10 Pro" xmlns:cpi="urn:schemas-microsoft-com:cpi" />
    </unattend>
      My Computer


  5. Posts : 17,661
    Windows 10 Pro
    Thread Starter
       #94

    Srdan said:
    Thanks for great tutorial.
    Can You specify what to enter to disable and reject all of the Microsoft tracking, telemetry... questions on final stage of 1803 installation?
    No, I will not specify that. I will in no way participate in discussion about disabling vital Windows features.

    To be honest, I most probably wouldn't even know. In my opinion disabling Windows 10 telemetry is such a stupid act that I have never been interested even in finding out how it's done. Windows 10 works best when it can collect telemetry data (without identifying you) that helps it to offer you the best possible user experience.

    Say Yes to Win10 Telemetry | Win10.Guru

    Oh what a s***load of angry replies this post might bring to me...

    Kari
      My Computer


  6. Posts : 56,830
    Multi-boot Windows 10/11 - RTM, RP, Beta, and Insider
       #95

    Kari said:
    No, I will not specify that. I will in no way participate in discussion about disabling vital Windows features.

    To be honest, I most probably wouldn't even know. In my opinion disabling Windows 10 telemetry is such a stupid act that I have never been interested even in finding out how it's done. Windows 10 works best when it can collect telemetry data (without identifying you) that helps it to offer you the best possible user experience.

    Say Yes to Win10 Telemetry Win10.Guru

    Oh what a s***load of angry replies this post might bring to me...

    Kari
    That's the key phrase. Remind everyone that we own a license to use Win 10, we do not own Win10.
      My Computers


  7. Posts : 17,661
    Windows 10 Pro
    Thread Starter
       #96

    DuuTz said:
    I followed all the steps and created the autonattend and unattend response files. I downloaded the ISO from microsoft, in my case in portuguese brazil (Win10_1803_BrazilianPortuguese_x64), I created the bootable pendrive and replaced the "install.wim" with the generated one, when I start the installation "Activate Windows" already appears requesting a valid serial if I click "I do not have the product key" the installation is canceled. Would you help me?
    What edition of Windows 10 did you install and sysprep on reference machine?

    Kari
      My Computer


  8. Posts : 8
    Windows 10
       #97

    Kari said:
    What edition of Windows 10 did you install and sysprep on reference machine?

    Kari

    Windows 10 x 64 Professional 1803
      My Computer


  9. Posts : 17,661
    Windows 10 Pro
    Thread Starter
       #98

    DuuTz said:
    Windows 10 x 64 Professional
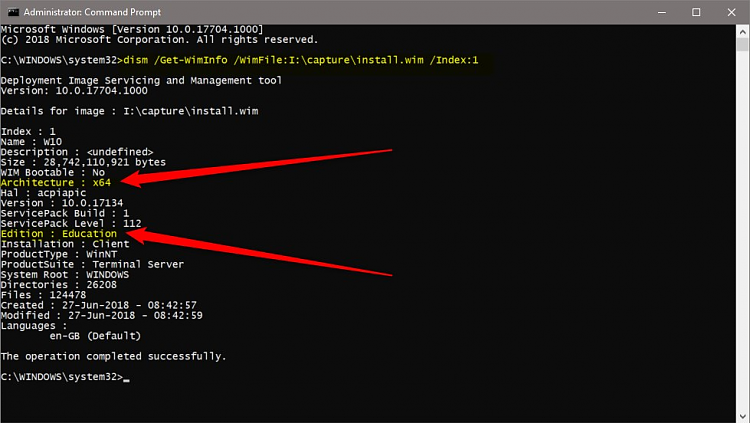
    Please don't take this wrong but as it is essential to be absolutely sure, run the following command in an elevated Command Prompt replacing X:\Capture with the actual path where your sysprepped and captured custom install.wim is stored:

    dism /Get-WimInfo /WimFile:X:\Capture\install.wim /Index:1
    Create media for automated unattended install of Windows 10-image.png
    (Click to enlarge.)

    Check the edition once more. Another thing to check is the bit architecture. In your case they should be PRO and x64.

    Kari
      My Computer


  10. Posts : 8
    Windows 10
       #99

    Kari said:
    Please don't take this wrong but as it is essential to be absolutely sure, run the following command in an elevated Command Prompt replacing X:\Capture with the actual path where your sysprepped and captured custom install.wim is stored:

    dism /Get-WimInfo /WimFile:X:\Capture\install.wim /Index:1
    Create media for automated unattended install of Windows 10-image.png
    (Click to enlarge.)

    Check the edition once more. Another thing to check is the bit architecture. In your case they should be PRO and x64.

    Kari

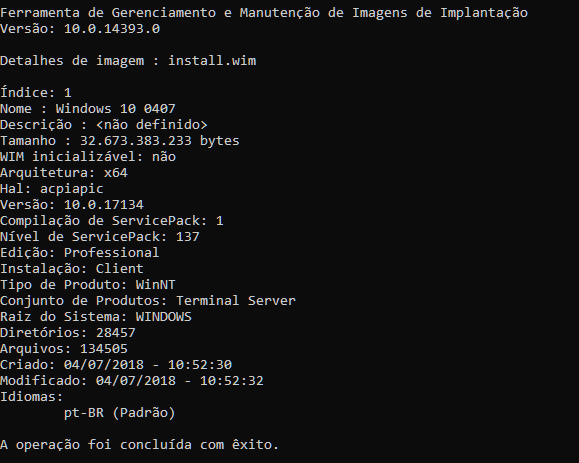
    Following information

    Create media for automated unattended install of Windows 10-05-07-2018-14-36-53.png
      My Computer


Tutorial Categories

Create media for automated unattended install of Windows 10 Tutorial Index Network & Sharing Instalation and Upgrade Browsers and Email General Tips Gaming Customization Apps and Features Virtualization BSOD System Security User Accounts Hardware and Drivers Updates and Activation Backup and Restore Performance and Maintenance Mixed Reality Phone


  Related Discussions
Our Sites
Site Links
About Us
Windows 10 Forums is an independent web site and has not been authorized, sponsored, or otherwise approved by Microsoft Corporation. "Windows 10" and related materials are trademarks of Microsoft Corp.

© Designer Media Ltd
All times are GMT -5. The time now is 18:14.
Find Us


Windows 10 Forums