

Information
A PowerShell script is a collection of commands and cmdlets to be run in logical order, previous lines in script determining values and variables in command lines thereafter. The principle is the same than in Command Prompt batch files (.bat or .cmd) but the extended versatility of PowerShell allows much more to be done.
Quite a lot of Windows 10 maintenance and tasks can be automated with PowerShell scripts. In this tutorial you will learn the basics to get started in using the advanced script editor in PowerShell ISE (Integrated Scripting Environment) to create scripts to automate various tasks.
To find out more about PowerShell, scripting and cmdlets, see this excellent Microsoft support site: PowerShell Documentation | Microsoft Docs
Remember that Bing is your friend; you can search for any PS cmdlet to find more information about it and how to use it in scripts. You can also use Get-Help <CMDLET> in PowerShell to find out more about any cmdlet, for instance following command would show you all available information about Start-VM cmdlet:
Get-Help Start-VM
Please notice that this tutorial will only cover the basics to get you started, explaining the most essential facts about scripts and use of variables and conditional statements, which if you ask me are the two most useful things in scripting. Do not hesitate to ask if you have more questions about PowerShell, scripts or individual cmdlets.
Step One: PowerShell ISE Step Two: Set Script Execution Policy Step Three: Using variables Step Four: Conditional IF - THEN - ELSE statements
1.1) Windows 10 comes with two different PowerShell versions, executables for both located in C:\Windows\System32\WindowsPowerShell\v1.0 folder:
1.2) Which version to use is totally up to you. The "normal", classic PowerShell (PowerShell.exe) and the modern version PowerShell ISE (Integrated Scripting Environment, PowerShell_ISE.exe) can do the same with two exceptions: First, the normal PowerShell can be switched to classic Command Prompt mode when a legacy command cannot be entered in PowerShell with commandcmdand later returned to PowerShell mode with commandexit, something PowerShell ISE cannot do.
An example, PowerShell can be switched to Command Prompt Mode:
In PowerShell ISE it can't be done:
Second, normal PS can be started by bypassing default script execution policy (see Step 2) simply from RUN prompt with following command and hitting Enter (user mode) or CTRL + SHIFT + ENTER (elevated admin mode):
PowerShell.exe -ExecutionPolicy Bypass
PowerShell ISE cannot be started bypassing execution policy. Other than this both PowerShell versions can be used for all actions.
1.3) PowerShell ISE (from here on PS ISE) which I will use in this tutorial can be found in Start > W > Windows PowerShell > Windows PowerShell ISE. By default it opens showing the Command Add-on list on right, and script pane collapsed. You can toggle Script pane (collapse / expand) from the small arrowhead at right:
2.1) By default PS does not allow running scripts:
2.2) To allow local scripts to be run, go to Settings > Update & Security > For developers, scroll down to PowerShell and click Apply to change execution policy to allow locally created scripts to run:
2.3) Doing as told in step 2.2 is enough for us now, to run our own locally created scripts. If you want to allow external (downloaded) scripts to run, use the following cmdlet:
Set-ExecutionPolicy Unrestricted -Scope CurrentUser
Note
Unrestricted execution policy might risk your PC by allowing accidentally downloaded malicious scripts to be run. Always be sure only change execution policy temporarily when running a third party script from reliable source, then switch back to restricted policy with following cmdlet:
Set-ExecutionPolicy Restricted -Scope CurrentUser
Read more about PowerShell execution policies: Change PowerShell Script Execution Policy in Windows 10 | Windows 10 Tutorials
3.1) A PowerShell command line contains a cmdlet which always has a verb and a noun separated with a hyphen basically telling system to Do This (verb) with That (noun), plus additional parameters.
An example: cmdlet Start-VM with parameter W10PRO would start a Hyper-V VM named W10PRO:
Start-VM "W10PRO"
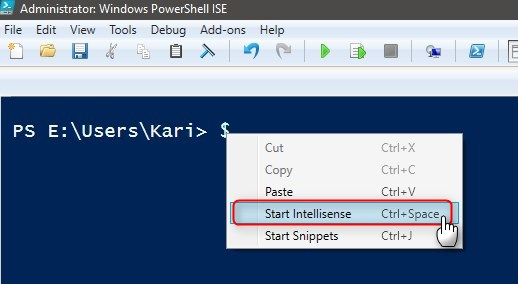
3.2) Quite a lot in in PowerShell in general and scripts in particular is and can be done using variables. A variable name always starts with a dollar sign. For your own variables you can use any name currently not in use. To see a list of all default reserved variable names and for this session by user created variables, type a dollar sign in PS ISE. This will open a drop down list showing all currently existing variables:
If PS ISE Intellisense (text predicting) does not show the drop down list, click CTRL + SPACE to open it or right click the command (dollar sign in this case) and select Start Intellisense:
3.3) You can use any not already used (reserved) variable name for your own variables.
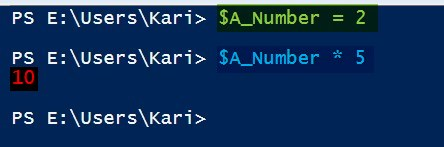
3.4) A variable can be used to store any alphanumerical value. If we tell PS that variable $A_Number = 2 (green highlight in screenshot), then ask what's $A_Number * 5 (blue highlight), PS has no difficulties to give correct answer (red highlight):
3.5) When a variable contains anything else than a numerical value, we need to put value in quotes. To output (write / show in PS) variable values we use cmdlet Write-Host, which as the cmdlet quite clearly tells in its verb-noun syntax writes (verb) the given variable value to host (noun, current PS session)
Based on the above, if we give variable $FirstName value "John" (green highlight) and variable $LastName value "Doe" (blue highlight), then tell PS to output both variables using Write-Host cmdlet (red highlight), we'll get John Doe (brown highlight):
3.6) Let's use a variable in script. In this sample we ask user which VM he / she wants to start, prompting for input and setting the given string (alphanumerical value) as value to variable $VM
First line in script would ask user which VM he / she wants to start, setting the name of the VM to a variable $VM:
$VM = Read-Host -Prompt ' Enter the name of VM, press Enter'
In command line above, first we tell PS to create a variable $VM. To get value for the variable we use cmdlet Read-Host which tells system to read everything typed until user presses Enter then store the typed string (string = a series of alphanumerical characters) as value for variable $VM. As we want to give user some instructions, we will ad switch -Prompt which allows us to show short instructions for user (prompt text must be in single or double quotes).
When run, the above command would look like this:
3.7) From here on we can use variable $VM instead of virtual machine name, at the moment $VM contains value W10PRO. With following command we could then start the virtual machine $VM:
Start-VM $VM
3.8) Now we can create a script to do the above, combine two commands to one script to ask name of VM to be started and then start it. You can use PS ISE built-in script editor (PS ISE > File > New), Notepad or any other text editor for this. Simply create following script and save it with any name you prefer, with extension .ps1 (PowerShell Script). I will save it to my OneDrive > PS Scripts folder with name StartVM.ps1:
Code:cls Write-Host $VM = Read-Host -Prompt ' Enter the name of VM, press Enter' Start-VM $VMNotice that I added two additional commands at the beginning of the script. First, when script is run I use cls (Clear Screen) command to empty PS window, clear all previous text. Thereafter I use cmdlet Write-Host to write an empty line on top of PS window, just to clarify the output. In line three the script will ask the name of the VM to be started, and line four finally starts it.
3.9) I can now run the script from PowerShell simply by entering full path preceded with an & sign. Remember, if path contains spaces it must be entered in quotes:
& "E:\Users\Kari\OneDrive\PS Scripts\StartVM.ps1"
Notice the & sign before the path, it is obligatory except when you run a script from your current PS working folder, in which case you enter the name of the script with extension with preceding .\ (.\StartVM.ps1 in this case)
4.1) When anyone on PC I am using to write this tutorial starts PS or PS ISE, a so called PS profile script will be run and user will be greeted with a time based message and the work folder is set to user profile folder:
This also in elevated (admin) mode
My PS profile script is based on IF - THEN - ELSE statement which tells PS that IF THIS condition is met, DO THAT, if condition is not met DO SOMETHING ELSE. To give an example of IF - THEN - ELSE conditional statements, let's create a PS profile script.
4.2) A PS profile script will be run if it exists. A PS profile for just yourself must be saved in%userprofile%\Documents\WindowsPowerShellfolder, and a PS profile for all users inC:\Windows\System32\WindowsPowerShell\v1.0folder
4.3) Profile script for normal PS must be named asMicrosoft.PowerShell_profile.ps1, and for PS ISE asMicrosoft.PowerShellISE_profile.ps1
4.4) When my sample profile script starts, it will read the current time to variable $Hour in 24 hour format (HH:mm):
$Hour = Get-Date -Format "HH:mm"
4.5) In my example case, the current time is told to user in both 24 hour and 12 hour formats. To get both formats, I'll create a new variable $Now, read current time to it and format it to be shown in 24H format (HH:mm) and in 12H format (h:mm tt, single lower case h telling it's 12H format and tt adding AM or PM):
$Now = Get-Date -Format "HH:mm (h:mm tt)"
At this point I have current time in 24H time in variable $Hour and in variable $Now the same current time in 24h time plus 12H time in parenthesis.
4.6) Now the first IF statement. An IF statement syntax is IF (this) then {that}; the word then will not be used and typed but you should think it being there.
Time comparisons are easier to do using 24H clock. The 24H clock goes from midnight 00:00 to 23:59 (11:59 PM). Time can never be less than 00:00 or more than 23:59. To greet the user when the time using 24H clock is more than 00:00 (after midnight) but less than 06:00 (6 AM), I want to use string "It's quite late", then show the current time in both 24H and 12H formats.
For that I need to tell PS to do this:
If the current time in 24H format (variable $Hour) is more than 00:00 but less than 06:00, print (output) "It's quite late %username%. The time is $Now" (time shown in both 24 and 12H formats)
As a PS command it would look like this:
If ($Hour -lt "06:00")
    {Write-Host "It's quite late" $env:username". The time is "$Now}
Notice that the text I want to output is in quotes (see highlights in above sample), the variables I want to output not.
The comparison operator -lt means less than. I do not need to use "more than 00:00 but less than 06:00" because for PS 00:00 means zero; all values from 00:00 to 05:59 are covered with comparison operator "less than 06:00". The variable$env:usernameis a default, built-in variable which has the value of current signed in user.
4.7) OK, next step is to check if the time is 06:00 or more but less than 12:00 (noon). Using ELSEIF statement after the above IF statement, if its conditions were not met (if the time is more than 06:00) I can write the next line in my PS profile script:
Elseif ($Hour -lt "12:00") {Write-Host "Good morning" $env:username". The time is "$Now}
Notice the difference between IF and ELSEIF.
The first conditional statement in our script checks IF the time is less than 06:00. Next statement uses ELSEIF; an ELSEIF statement is only run if the statement before it was not true, in this case now the first ELSEIF is only executed if the time is 06:00 or more.
The whole series of IF and ELSEIF statements will stop executing and jump to first command line after the IF - THEN - ELSE command group as soon as the first IF statement or one of later ELSEIF statements is true.
After that, if both earlier conditions are not met, if it's past noon but before 18:00 (6 PM):
Elseif ($Hour -lt "18:00") {Write-Host "Good afternoon" $env:username". The time is "$Now}
4.8) We've covered three quarters of a day. Now the final step: if the time is 18:00 (6 PM) or more, we'll wish Good evening:
Elseif ($Hour -ge "18:00") {Write-Host "Good evening" $env:username". The time is "$Now}
The comparison operator -ge means greater or equal, in this sample case now any time between 18:00 (6 PM) and midnight.
4.9) Final step in my PS profile script is to set default working folder to user profile folder, regardless if user runs normal or elevated PS. That is done with a simple cmdlet:
Set-Location $env:userprofile
4.10) Finally I can collect the necessary cmdlets and make the script:
The script as seen in PS ISE Script Pane:Code:$Hour = Get-Date -Format "HH:mm" $Now = Get-Date -Format "HH:mm (h:mm tt)" If ($Hour -lt "06:00") {Write-Host "It's quite late" $env:username". The time is "$Now} ElseIf ($Hour -lt "12:00") {Write-Host "Good morning" $env:username". The time is "$Now} ElseIf ($Hour -lt "18:00") {Write-Host "Good afternoon" $env:username". The time is "$Now} ElseIf ($Hour -ge "18:00") {Write-Host "Good evening" $env:username". The time is "$Now} Set-Location $env:USERPROFILE
You can run any script currently open and active in script pane by pressing F5. This is very practical feature when creating scripts, allowing fast debugging; edit script in script pane, run with F5, if it does not work check the error message and correct script.
Notice how I improved the readability of my script by separating IF and ELSEIF statements to two rows. Row 1 is the IF THIS part, row 2 is indented (tabbed) containing THEN DO THAT.
You can do this with all PS script cmdlets, just remember that you can only split commands to separate lines logically, from where a new part of command line starts.
This works:
Code:If ($Hour -lt "06:00") {Write-Host "It's quite late" $env:username". The time is "$Now}
This does not work:
Code:If ($Hour -lt "06:00") {Write-Host "It's quite late" $env:username". The time is "$Now}
That's it. Let's start scripting :)
Kari
PowerShell Scripting - The Basics
-
New #1
Thanks @Kari for this introduction to PowerShell scripting.
I think everybody should read this and try to understand everything. PS plays bigger and bigger role in Windows with each year that goes by. I am not saying that everybody should become a scripting guru, but every Windows poweruser should have at least a basic understanding of how PS works.
-
New #2
Great tutorial.
Out of interest, does the elseif support boolean logic e.g.
(syntax is pseudo code here)
elseif (a>b or z=g) ......
type of logic.
As an aside, I find it quite funny use of textual comparators such as lt, ge etc. Must have been written by a FORTRAN programmer - LOL.
-
New #3
A second question.
Is it possible to execute multiple command
If (a=1) then
x
y
z
elseif (a=2) then
f
g
h
endif
I guess not (and you would need an endif statement I suppose).
You can of course put endif on each command separately.
In good old Fortran 66 days, If then else did not exist, and you had to use goto statements all over the place. Coding was like spaghetti!
-
-
New #5
My use of > and < was just for representative pseudo logic notation, not for syntax accuracy.
I actually think use of boolean logic makes things clearer.
If a < 1 do A
Else a<2 do b
Else a<3 do c
Else a>=3 do d
Is clearer as (imo)
If a<1 do a
Else a>=1 and a<2 do b
Else a>=2 and a<3 do c
Else a>=3 do d
Of course in this trivial example, the original is clear enough, but when you get unrelated operators, it can be harder to follow e.g.
if a<2 or b<a do x
Is easily split into two lines
If a<2 do x
If b<a do x
how do you easily split up?
If a<2 and b=a do x
In Excel for example you can do this by nesting if statements, or use boolean logic.
Of course, this is all moot, as you cannot do it. I was only asking out of curiosity rather than a specific desire to see such functionality.
Joys of programming .
.
-
New #6
Sure boolean logic is way more clear than using a parametric aproach. But it becomes very ugly looking when you have to escape each and every operator. If boolean operators would be allowed then we could not have redirection operators and piping operators which are very important in command line executions.
Let's not get stuck on this issue anymore. One has to understand internal workings of a command-line interpreter in order to understand why all these operators are so important and useful.
-
-
New #8
PowerShell has no issues with logical operators. In screenshot beginning of a sample script reading 3 numbers and outputting them in ascending order, comparison in IF statement uses one AND operator (-and in PS) and in ELSEIF statement two AND operators:
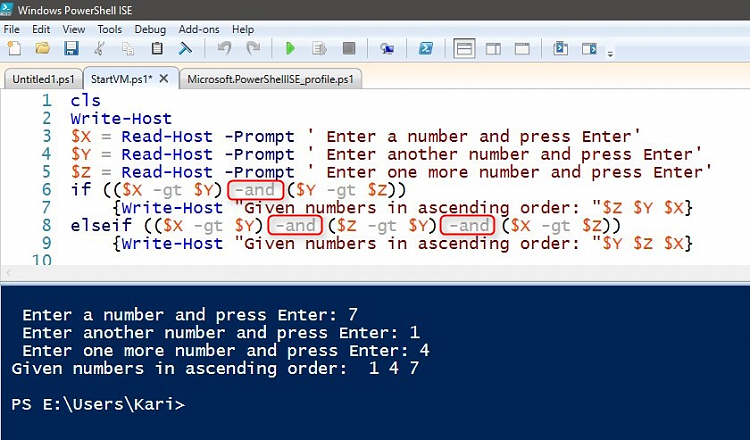
You can use AND (-and), OR (-or), XOR (-xor) and NOT (-not).
Yes it is.
Code:if (this condition is met) { Do this Then do this Finally do this, too }
An IF statement can also include other IF statements:
Code:if (this condition is met) { if (this condition is met, too) { Do this Then do this Finally do this, too } Do this Do that }
Kari
-
-

PowerShell Scripting - The Basics
How to Get Started with PowerShell ScriptsPublished by Kari "Kalsarikänni" FinnCategory: General Tips
13 May 2018


 Quote
Quote
Tutorial Categories

Related Discussions
