

Information
Some time ago in another thread I promised a fellow Ten Forums member, esteemed geek and a good friend of mine Tony K to make him a custom DISKPART script when needed:
Well, a few days ago Tony sent a PM telling what he wants to do: Dual boot Windows 10 Fall Creators Update and Fast Ring Windows Insider Fast Ring builds, doing this on small 120 GB SSD which is currently partitioned as an MBR disk but should be partitioned as GPT disk in new dual boot setup. He also has an additional 2 TB HDD for data. Instead of simply replying to him, I decided to make a tutorial about this process because this might benefit other fellow members, too.
This tutorial could have been named as "Dual Boot - The Easy Way"
In this tutorial we will use DISKPART to convert an MBR disk to GPT, partition the disk following Microsoft's guidelines, and install two operating systems on it (we'll cover single OS partitioning and setup, too).
Here's a screenshot of Tony's Disk Management before we start:

(Click to enlarge.)
Note
Please notice that although the tutorial might look somewhat long and complicated, procedure itself to use DISKPART script to partition HDD and install two operating systems as told in this tutorial is quite easy. If you are not interested in "under the hood" information about DISKPART, how the script works and want to get going faster, grab the script from step 2.3, and jump directly to step 3.1.
Step One: Preparations - Create USB install media Step Two: Preparations - Create DISKPART Script Step Three: Boot from USB Step Four: Run DISKPART script Step Five: Install Primary OS Step Six: Install Secondary OS
1.1) Download Windows 10 ISO image or create one from Insider or Feature Upgrade UUP files:
- Download Windows 10 ISO File Installation Upgrade Tutorials
- UUP to ISO - Create Bootable ISO from Windows 10 Build Upgrade Files Installation Upgrade Tutorials
1.2) Create a bootable USB flash drive install media for Windows 10 version and edition you want to install (primary operating system in dual boot) as told in following tutorial: PowerShell Scripting - Create USB Install Media for Windows 10 Installation Upgrade Tutorials
2.1) A DISKPART script is a text file with extension .txt containing all necessary DISKPART commands. It can be made and edited with Notepad
2.2) Each line is one command with possible parameters. A line starting with REM (remark, not case sensitive) will be ignored, allowing explanations and comments to be added. Even if the script will only be used by yourself, I recommend adding as many REM lines as required to help you to better remember, understand and see what script does also in the future
2.3) The script I made for Tony is in CODE box below, with REM lines to explain what each command is doing. You can and of course should edit it to meet your needs. We will go through the script command by command but for those anxious to get started, just copy the script, paste it in Notepad and edit.
Script One: DISKPART script to partition a HDD / SSD for dual boot, or for separate Windows and Data partitions:
Code:rem DISKPART script for single disk dual boot rem OS 1: Windows 10 Fall Creators Update (W10 FCU) rem OS 2: Windows 10 Insider Preview (W10 IP) rem --------------------------------------------------- rem Select Disk, wipe it empty, convert to GPT rem select disk 0 clean convert gpt rem rem --------------------------------------------------- rem Create & format 100 MB EFI System partition rem create partition efi size=100 format quick fs=fat32 label="System" rem rem --------------------------------------------------- rem Create 16 MB MSR partition (will not be formatted) rem create partition msr size=16 rem rem --------------------------------------------------- rem Create a 52 GB (53,248 MB) partition for primary OS rem create partition primary size=53248 rem rem --------------------------------------------------- rem Format OS partition, label it, assign drive letter rem W. Windows Setup will change this drive letter to C rem when installed. It is important now to use a not rem reserved letter, therefore we use a letter from rem end of alphabet rem format quick fs=ntfs label="W10 FCU" assign letter="W" rem rem --------------------------------------------------- rem Create & format a 450 MB recovery partition. rem Notice that ID must be set exactly as shown! rem create partition primary size=450 format quick fs=ntfs label="WinRE" set id="de94bba4-06d1-4d40-a16a-bfd50179d6ac" rem rem --------------------------------------------------- rem Create partition for 2nd OS using all free space rem create partition primary rem rem --------------------------------------------------- rem Format 2nd OS partition, label it, no drive letter rem format quick fs=ntfs label="W10 IP" rem rem --------------------------------------------------- rem Exit Diskpart rem exit
Script Two: An alternative DISKPART script to partition a HDD / SSD for single OS assigning all available space to system (Windows) partition:
Code:rem DISKPART script for single disk dual boot rem OS: Windows 10 (any version & edition) rem --------------------------------------------------- rem Select Disk, wipe it empty, convert to GPT rem select disk 0 clean convert gpt rem rem --------------------------------------------------- rem Create & format 100 MB EFI System partition rem create partition efi size=100 format quick fs=fat32 label="System" rem rem --------------------------------------------------- rem Create 16 MB MSR partition (will not be formatted) rem create partition msr size=16 rem rem --------------------------------------------------- rem Create OS partition using all available space, rem shrink it with 450 MB to leave space at end of HDD rem for WinRE partition rem create partition primary shrink minimum=450 rem rem --------------------------------------------------- rem Format OS partition, label it, assign drive letter rem W. Windows Setup will change this drive letter to C rem when installed. It is important now to use a not rem reserved letter, therefore we use a letter from rem end of alphabet rem format quick fs=ntfs label="Windows 10" assign letter="W" rem rem --------------------------------------------------- rem Create & format WinRE recovery partition at the rem end of the disk. Not defining the size, it will use rem all available space, 500 MB that we shrunk OS rem partition with. Notice that ID must be set exactly rem as shown! rem create partition primary format quick fs=ntfs label="WinRE" set id="de94bba4-06d1-4d40-a16a-bfd50179d6ac" rem rem --------------------------------------------------- rem Exit Diskpart rem exit
2.4) First set of DISKPART commands in script selects DISK 0, the primary disk which in most cases is correct (more about this in step 3.4), the disk where Windows will be installed, then wipes it clean and finally converts disk to GPT even if the disk previously already was a GPT disk:
sel disk 0
clean
convert gpt
If you are using DISKPART command line entering commands one by one instead of running script, you need first to start DISKPART with commanddiskpart, then enter above commands one by one pressing ENTER after each command. Be careful, selected disk will be wiped clean without any warnings (how to check disk ID, see Step 3.4)!
2.5) The first partition will be a 100 MB EFI system partition formatted in FAT32 file system. We will create, format and label it with following two commands:
create partition efi size=100
format quick fs=fat32 label="System"
2.6) Next, the 16 MB MSR (Microsoft Reserved) partition. This partition will not be formatted, nor will it get a label:
create partition msr size=16
2.7) Now the primary OS partition. In this example using Tony's 120 GB SSD, I will make it a 52 GB (53,248 MB) partition. You can of course make the partition exactly as big or small as you wish, minimum size recommended for Windows 10 is 25 GB:
create partition primary size=53248
If you are partitioning disk only for a single Windows partition using all disk capacity (Script Two in step 2.3), use following commands to create Windows and WinRE partitions and jump then to step 2.11 skipping 2.8 through 2.10:
Code:create partition primary shrink minimum=450 format quick fs=ntfs label="Windows" create partition primary format quick fs=ntfs label="WinRE" set id="de94bba4-06d1-4d40-a16a-bfd50179d6ac"
The above set of DISKPART commands first creates a partition for Windows using all available space, then shrinks it from end of partition with 450 MB and then creates a 450 MB WinRE partition on that space.
2.8) I will format OS partition as NTFS and label it as W10 FCU, assigning it drive letter W: (I can't use currently reserved drive letters, Windows setup will later automatically change it to C:) :
format quick fs=ntfs label="W10 FCU"
assign letter="W"
You can of course label your Windows partition as you prefer, W10 FCU here is just an example.
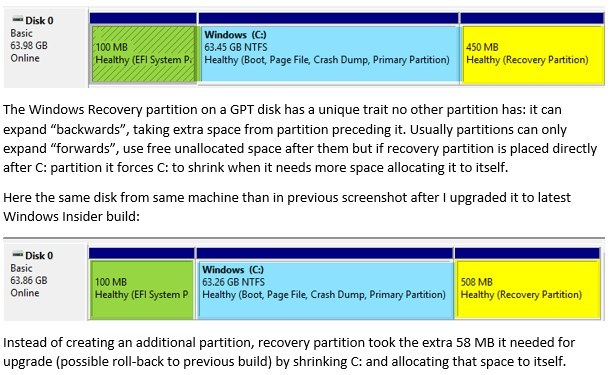
2.9) The recovery partition (WinRE) will be placed between primary OS partition and secondary OS partition. WinRE partition is the only partition that can expand "backwards"; future upgrades requiring more space on WinRE will shrink the C: (primary OS) partition:
We will create WinRE partition with following commands. Please notice, WinRE partition requires an ID which must be exactly as shown:
create partition primary size=450
format quick fs=ntfs label="WinRE"
set id="de94bba4-06d1-4d40-a16a-bfd50179d6ac"
2.10) Finally, we'll create partition for secondary OS using all available space left on disk, format and label it but do not assign a drive letter, then exit DISKPART with following commands:
create partition primary
format quick fs=ntfs label="W10 IP"
exit
2.11) Save the script as Disk0Config.txt on your Windows install USB
A couple of times I've seen a UEFI PC with GPT partitioning to list the boot USB as disk 0, and Windows system disk as disk 1.
I always prepare myself for this oddity by saving the original script as Disk0Config.txt, then saving another copy of it as Disk1Config.txt with one small but important change: I'll edit disk selection command sel disk 0 as seen in step 2.4, the very first command in script to read sel disk 1, to select disk 1 instead of disk 0.
This way I am prepared, having a script regardless if the Windows system disk is listed as disk 0 or disk 1.
3.1) Boot the PC from your Windows 10 install media (USB flash drive)
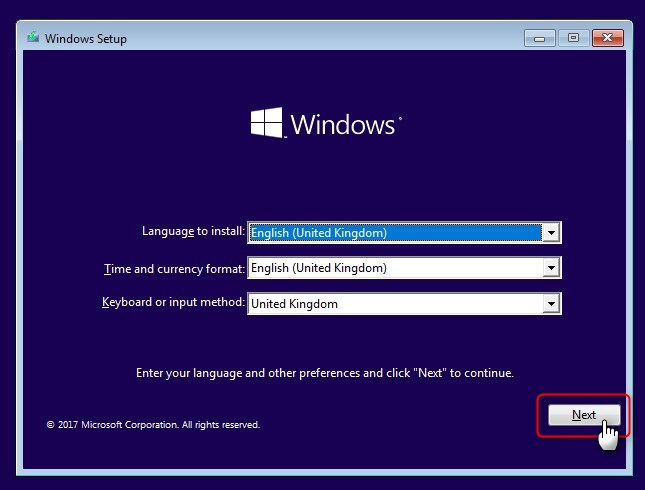
3.2) On region and language selection screen, press SHIFT + F10 to open Command Prompt:
3.3) Typediskpartand press Enter to launch Windows Disk Partition Utility DISKPART, typelist diskand press Enter to list available disks, typelist voland press Enter to list available volumes, typeexitand press Enter to exit DISKPART (commands highlighted with yellow in screenshot in next step)
3.4) Note the disk number for Windows system disk shown after commandlist disk. In most cases it is disk 0, but can occasionally be shown as disk 1 (see note in step 2.7). In this sample case it is as it should be, disk 0. Also note the drive letter for your USB install media shown after commandlist vol. In this example it is drive E:
4.1) In steps 3.3 & 3.4 I found out that my Windows system disk is disk 0 and USB drive containing Windows setup files and DISKPART scripts is drive E:
4.2) I can now run DISKPART again, this time telling it with switch /s that I want to run a script Disk0Config.txt (Disk1Config.txt if I had found out that system disk this time had been disk 1):
diskpart /s E:\Disk0Config.txt
Script in action (video length 32 seconds):
4.3) Close Command Prompt
5.1) Continue installation normally:
Clean install tutorial: Clean Install Windows 10 Installation Upgrade Tutorials
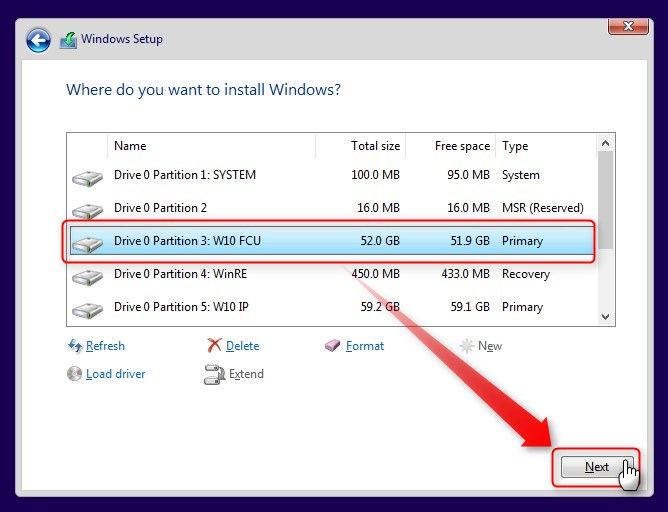
5.2) System disk is partitioned exactly as told in script we run in 4.2. Select the Windows partition (partition for primary OS in dual boot scenario) and click Next, in this example my script labelled it as W10 FCU (Fall Creators Update):
5.3) Primary OS successfully installed:
6.1) Open Disk Management, right click partition reserved for secondary OS, select Change Drive Letter and Paths and add a drive letter to this partition. Remember, it is currently without drive letter therefore not shown in Explorer because in DISKPART script we didn't assign any letter to it. See tutorial if you need any help in assigning a drive letter: Change and Assign Drive Letter in Windows 10 Hardware Drivers Tutorials
In this example I assigned letter Z: to this partition
6.2) Download (or copy from another PC) ISO image for the secondary OS, for instance a Windows Insider ISO or another edition of same version as primary OS. Mount it as virtual DVD by right clicking ISO file and selecting Mount. Note the drive letter ISO got when mounted. In this example mounted ISO is drive G:
6.3) Open an elevated PowerShell (tutorial)
6.4) Type following command and press Enter, replacing drive letter for mounted ISO (G: in this example) in /WimFile switch with actual drive letter:
dism /Get-WimInfo /WimFile:G:\Sources\install.wim
Note the index number to the edition you want to install as secondary OS. In this example I want to install Enterprise edition, index 3:
Default path to install.wim file is DRIVE:\Sources\install.wim. If you are using an ESD based ISO, or a dual bit architecture ISO, you need to change the path in above command accordingly:
- In an ESD based ISO the path is DRIVE:\Sources\install.esd
- In dual bit architecture ISO the path is DRIVE:\x86\Sources\install.wim (or install.esd) for 32 bit W10
- In dual bit architecture ISO the path is DRIVE:\x64\Sources\install.wim (or install.esd) for 64 bit W10
6.5) Type the following command, replacing drive letter for secondary OS partition (Z:\ in this example) in /ApplyDir switch and mounted ISO drive letter (G: in this example) in /ImageFile switch. Same rules apply as in note in step 6.4 if you are using an ESD based ISO or a dual bit architecture ISO. Be sure to use correct index number:
dism /Apply-Image /ImageFile:G:\Sources\install.wim /index:3 /ApplyDir:Z:\
6.6) Press Enter, installation starts:

Depending on your hardware performance, this takes anything from a minute and a half to 10 minutes. You can freely browse the web or use your PC for anything else while DISM applies Windows image for your secondary OS, Windows is quite good in multitasking
6.7) When done, the secondary Windows needs to be added to boot menu. Do this with following command (#1 in screenshot in step 6.11), replacing the secondary OS drive letter (Z: in this example) with the actual one:
bcdboot Z:\Windows
6.8) Secondary OS was added as default OS to boot menu, the OS which will be booted if user makes no selection within given timeframe (30 seconds by default). We leave it as default OS for now
6.9) All Windows 10 operating systems are by default listed as Windows 10 on boot menu, regardless of their edition. It is better to change boot entry names to more individual ones, to be sure correct OS will be selected when boot menu is shown. For that we will need command bcdedit. However, as bcdedit switches do not work in PowerShell we need first switch PowerShell to Command Prompt mode.
This is done with a simple commandcmd(#2 in screenshot in 6.11)
6.10) As the secondary OS is at the moment the default OS, its identifier is {default}. I want to change its description, boot menu entry to W10 Enterprise, doing it with following command (#3 in screenshot in 6.11, description in quotes if it contains spaces):
bcdedit /set {default} description "W10 Enterprise"
6.11) Current OS we are booted to at the moment, the primary one has identifier {current}. I want to change it to W10 Pro (#4 in screenshot):
bcdedit /set {current} description "W10 Pro"
6.12) Close PowerShell, restart PC
6.13) We left secondary OS default for now because finalizing Windows setup still needs two restarts. Being default OS it will be automatically booted if user makes no selection within given timeframe, by default 30 seconds:
You can leave PC to finish setting up secondary OS and restart to it and have a break
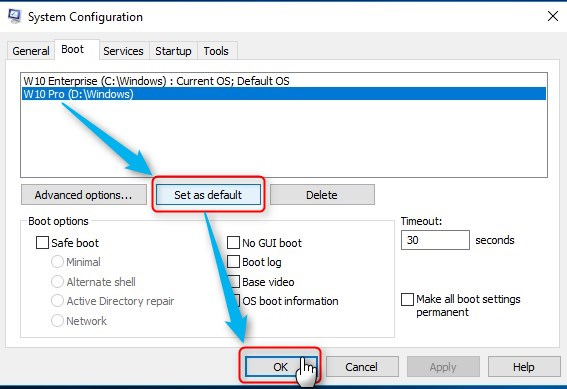
6.14) When on desktop after secondary OS has finished the setup, press WIN + R to open RUN prompt, typemsconfigand press Enter to open System Configuration. Select the Boot tab, select your primary OS and click Set as default. Click OK to confirm:
6.15) Click restart and boot back to primary OS:
6.16) Both operating systems have now been installed, primary OS set as default:
That's it geeks!
Kari
DISKPART - How to Partition GPT disk
-
New #1
Oh good! Thanks so much, Kari.
I feel like a kid opening my Erector Set - Wikipedia on Christmas morning. Played with that thing for hours.
Automated scripting is the cat's meow. :)
-
-
-
-
-
New #6
@Kari
Another successful install with the dual boot Diskpart script. Great stuff. :)
I'm clean installing again to test this: Backup and Restore Start Layout in Windows 10 Windows 10 Backup Restore Tutorials
-
New #7
Firstly, thank you for this guide.
After some years, I am manually doing a complete reinstall of my dual boot system on a single SSD. I opted to install Windows first, after some partitioning with GParted, and when selecting Windows to install to 100GB of the drive, I was dismayed to discover that it had put the Windows partition first, and then after that EFI, MSR, and recovery (unsure of exact order of the latter three).
Knowing that in the past EFI was closer to the beginning of the drive, I found your guide, and discovered if I used diskpart, clean, convert gpt, and then used the installed to create the 100GB, it put the 4 partitions in an order I was more used to, with the Windows partition coming last.
I had read recently that the recommended size for an EFI partition is actually 577MB, despite the fact you can dual boot fine with the 100MB EFI partition Windows creates, so seeing the scripts in your guide allow creating a custom size EFI, I very, very (especially in reference to the WinRE ID) carefully manually entered the commands into diskpart.exe:
Note, I put my Windows partition at the end, after recovery.Code:create partition efi size=600 format quick fs=fat32 label="System" create partition msr size=16 create partition primary size=450 format quick fs=ntfs label="WinRE" set id="de94bba4-06d1-4d40-a16a-bfd50179d6ac" create partition primary size=102400 format quick fs=ntfs label="windows" assign letter="W"
I have booted into Windows 10 fine, and am several restarts through the update process.
Looking at partitions in Disk Management, they look very similar to those in your guide, although I was concerned about the EFI and recovery partitions showing 100% free. I have confirmed with msinfo32 that the BIOS is installed in UEFI mode, and learned that the file on EFI is probably just a few KB. I am still unsure about the recovery partition being empty, is this normal or should I be concerned?
I would hate to have gotten through all the Windows updates, Vercrypt configuration, and custom dm-crypt LUKS LVM Ubuntu, only to discover I had to start all over again because something is wrong with my Windows 10 partitions!
-
New #8
I have been reading about the recovery partition's unique ability to expand backwards if necessary during a major upgrade, and I see no mention of it expanding forwards, so I think I will erase and restart!
-
-
New #9
Yes, that is a unique detail in recovery partition, or OEM partition as Windows names it nowadays. If placed in front of system partition C:, when it needs to expand after a certain amount of upgrades, it can't, and therefore a new, second OEM partition is created after the C: partition.
To avoid this, it's recommended to place OEM partition after the C: partition. When it needs to expand, it shrinks C: and takes the additional space it needs. It is the only partition in Windows which can expand backwards.
This is told in tutorial step 2.9:
2.9) The recovery partition (WinRE) will be placed between primary OS partition and secondary OS partition. WinRE partition is the only partition that can expand "backwards"; future upgrades requiring more space on WinRE will shrink the C: (primary OS) partition:
Kari
DISKPART - How to Partition GPT disk
How to Use DISKPART Script to Partition GPT Disk for Single and Dual Boot ScenariosPublished by Kari "Kalsarikänni" FinnCategory: Installation & Upgrade
15 Sep 2020


 Quote
Quote
Tutorial Categories

Related Discussions
