

How to Enable or Disable Scheduled System Maintenance in Windows
Information
By default, Windows will automatically run the System Maintenance troubleshooter on a scheduled basis in the background to check for routine maintenance issues, proactively fix detected problems if able, and notifes you if user input is required.
Potential issues checked by System Maintenance:
- Broken shortcuts - Broken shortcuts are invalid references to programs and other resources. For example, a desktop shortcut for a USB device may be regarded as broken if the USB device is not connected when the System Maintenance troubleshooter performs its maintenance. When there are more than 4 broken shortcuts on the desktop, then all broken shortcuts on the desktop are removed.
- Troubleshooting history is taking up disk space - Frees up disk space by removing troubleshooting history logs older than 1 month.
- System time is incorrectly set - Sets the correct system time and synchronize system clock with the time server. When the system time is set incorrectly, features that rely on time measurement such as Product Activation, malware scanners, and browser certificates might not work correctly.
- Unused desktop icons - Icons and shortcuts on the desktop that have been unused in 3 months are removed.
- Disk volume errors - Frees up disk space by repairing hard disk volume errors such as bad sectors, lost clusters, cross-linked files and directory errors. These problems can cause the file system to report incorrect volume details and occupy excessive disk space.
- Error reports are taking up disk space - Frees up disk space by removing error reports and logs older than 1 month.
This tutorial will show you how to enable or disable automatic scheduled system maintenance in Windows 7, Windows 8, and Windows 10.
You must be signed in as an administrator to turn on/off or enable/disable scheduled system maintenance.
Note
You will always be able to manually run the System Maintenance troubleshooter.
CONTENTS:
- Option One: To Turn On or Off Scheduled System Maintenance in Troubleshooting Settings
- Option Two: To Turn On or Off Scheduled System Maintenance using a REG file
- Option Three: To Enable or Disable Scheduled System Maintenance in Local Group Policy Editor
- Option Four: To Enable or Disable Scheduled System Maintenance using a REG file
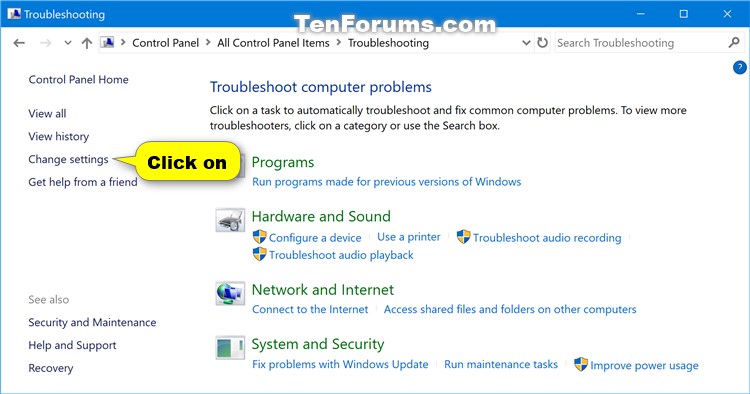
1. Open the Control Panel (icons view), and click/tap on the Troubleshooting icon.
2. Click/tap on the Change settings link on the left side in Troubleshooting. (see screenshot below)
3. Select (dot) On (default) or Off for what you want under Computer Maintenance, and click/tap on OK. (see screenshot below)
4. You can now close the "Change settings" window if you like.
This option does the same thing as Option One above.
The .reg files below will modify the DWORD value in the registry key below.
HKEY_LOCAL_MACHINE\SOFTWARE\Microsoft\Windows\ScheduledDiagnostics
EnabledExecution DWORD
0 = Off
1 = On
1. Do step 2 (on) or step 3 (off) below for what you would like to do.
Note: This is the default setting.
A) Click/tap on the Download button below to download the file below, and go to step 4 below.
Turn_On_scheduled_system_maintenance.reg
Download
A) Click/tap on the download button below to download the file below, and go to step 4 below.
Turn_Off_scheduled_system_maintenance.reg
Download
4. Save the .reg file to your desktop.
5. Double click/tap on the downloaded .reg file to merge it.
6. If prompted, click/tap on Run, Yes (UAC), Yes, and OK to approve the merge.
7. If you like, you can now delete the downloaded .reg file.
Local Group Policy Editor is only available in the Windows 10 Pro, Enterprise, and Education editions.
All editions can use Option Four below.
1. Open the Local Group Policy Editor.
2. In the left pane of local group policy editor, navigate to the location below. (see screenshot below)
Computer Configuration\Administrative Templates\System\Troubleshooting and Diagnostics\Scheduled Maintenance
3. In the right pane of Scheduled Maintenance in Local Group Policy Editor, double click/tap on the Configure Scheduled Maintenance Behavior policy to edit it. (see screenshot above)
4. Do step 5 (default), step 6 (enable - troubleshoot only), step 7 (enable - regular), or step 8 (disable) below for what you would like to do.
A) Select (dot) Not Configured, click/tap on OK, and go to step 9 below. (see screenshot below step 8)
A) Select (dot) Enabled, select Troubleshooting Only in the Execution Level drop down, click/tap on OK, and go to step 9 below. (see screenshot below step 8)
A) Select (dot) Enabled, select Regular in the Execution Level drop down, click/tap on OK, and go to step 9 below. (see screenshot below step 8)
9. You can now close the local group policy editor if you like.
This option does the same thing as Option Three above.
The .reg files below will modify the DWORD values in the registry key below.
HKEY_LOCAL_MACHINE\SOFTWARE\Policies\Microsoft\Windows\ScheduledDiagnostics
EnabledExecution DWORD
(delete) = Not configured (default)
0 = Disable
1 = Enable
EnabledExecutionLevel DWORD
(delete) = Not configured (default)
1 = Troubleshoot only
2 = Regular (Troubleshoot and fix)
2. Do step 2 (default), step 4 (enable - troubleshoot only), step 4 (enable - regular), or step 5 (disable) below for what you would like to do.
A) Click/tap on the Download button below to download the file below, and go to step 6 below.
Default_scheduled_system_maintenance.reg
Download
A) Click/tap on the Download button below to download the file below, and go to step 6 below.
Enable_scheduled_troubleshoot_only_system_maintenance.reg
Download
A) Click/tap on the Download button below to download the file below, and go to step 6 below.
Enable_scheduled_regular_system_maintenance.reg
Download
A) Click/tap on the Download button below to download the file below, and go to step 6 below.
Disable_scheduled_system_maintenance.reg
Download
6. Save the .reg file to your desktop.
7. Double click/tap on the downloaded .reg file to merge it.
8. If prompted, click/tap on Run, Yes (UAC), Yes, and OK to approve the merge.
9. If you like, you can now delete the downloaded .reg file.
That's it,
Shawn
Related Tutorials
- How to Run System Maintenance Troubleshooter in Windows
- How to Enable or Disable Automatic Maintenance in Windows 10
- How to View All Automatic Maintenance Tasks in Windows 10
Enable or Disable Scheduled System Maintenance in Windows
Enable or Disable Scheduled System Maintenance in Windows
How to Enable or Disable Scheduled System Maintenance in WindowsPublished by Shawn BrinkCategory: Performance & Maintenance
24 Oct 2017


Tutorial Categories

Related Discussions
