

How to Hide or Show a Library in Navigation Pane in Windows 10
Information
Libraries gather folders that are stored in different locations so you can browse them in one place. You can add or remove folders and drives to be included in a library as you like.
Windows 10 has the Camera Roll, Documents, Music, Pictures, Saved Pictures, and Videos libraries by default.
When Libraries is set to show in the navigation pane, only the Documents, Music, Pictures, and Videos libraries are shown in the navigation pane by default under the Libraries group.
This tutorial will show you different ways on how to hide or show a specific library in the navigation pane of File Explorer for only your account in Windows 10.
Note
If you have turned on Show all folders in the navigation pane, all of the Show in navigation pane and Don't show in navigation pane type settings in this tutorial below will be grayed out until your turn off Show all folders.
CONTENTS:
- Option One: To Hide or Show a Library in Navigation Pane from File Explorer Ribbon
- Option Two: To Hide or Show a Library in Navigation Pane from Context Menu
- Option Three: To Hide or Show a Library in Navigation Pane from Properties
EXAMPLE: Libraries in File Explorer
1. Open Libraries in File Explorer.
2. Select the library you want to hide or show in the navigation pane. (see screenshots below)
3. Click/tap on the "Library Tools" Manage tab.
4. Click/tap on Show in navigation pane to toggle to hide or show the selected library.
If the selected library is currently shown in the navigation pane, the Show in navigation pane setting will be highlighted by default to indicate so.
If the selected library is currently not shown in the navigation pane, the Show in navigation pane setting will not be highlighted to indicate so.

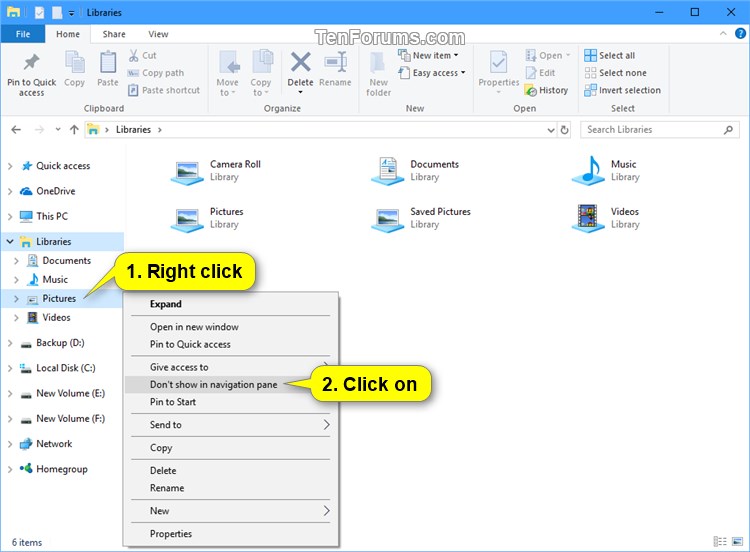
1. Open Libraries in File Explorer.
2. Right click or press and hold on the library you want to hide or show in the navigation pane, and click/tap on Show in navigation pane or Don't show in navigation pane depending on if the library is currently shown or not in the navigation pane. (see screenshots below)


1. Open Libraries in File Explorer.
2. Right click or press and hold on the library you want to hide or show in the navigation pane, and click/tap on Properties. (see screenshot below)
3. Check or uncheck the Shown in navigation pane box for what you want, and click/tap on OK. (see screenshot below)
That's it,
Shawn
Related Tutorials
- How to Add or Remove Libraries in Navigation Pane of File Explorer in Windows 10
- How to Restore Default Libraries in Windows 10
- How to Add or Remove Camera Roll Library in Windows 10
- How to Add or Remove Documents Library in Windows 10
- How to Add or Remove Music Library in Windows 10
- How to Add or Remove Pictures Library in Windows 10
- How to Add or Remove Saved Pictures Library in Windows 10
- How to Add or Remove Videos Library in Windows 10
Hide or Show a Library in Navigation Pane in Windows 10
Hide or Show a Library in Navigation Pane in Windows 10
How to Hide or Show a Library in Navigation Pane in Windows 10Published by Shawn BrinkCategory: General Tips
25 Aug 2017


Tutorial Categories

Related Discussions
