

How to Show Hidden Files, Folders, and Drives in Windows 10
Hidden files, folders, and drives do not show by default in Windows. Windows protected system files (ex: desktop.ini files) are hidden by default. You can also manually hide a file or folder by setting its hidden attribute.
It's recommended to not modify or delete hidden files since these are usually app and system files, and is why they do not show in File Explorer by default.
When you set to show hidden files, folders, and drives, they will appear dimmed to indicate that they are hidden items.
This tutorial will show you how to show or don't show hidden files, folders, and drives for your account in Windows 10.
If you want an empty CD/DVD drive to show in the navigation pane, you'll need to set show empty drives below, and set to show all folders in the navigation pane.
Contents
- Option One: To Hide or Show Hidden Files in File Explorer Options
- Option Two: To Hide or Show Hidden Files in File Explorer Ribbon
- Option Three: To Hide or Show Hidden Files using a BAT file
EXAMPLE: Hidden (dimmed) files set to show in File Explorer
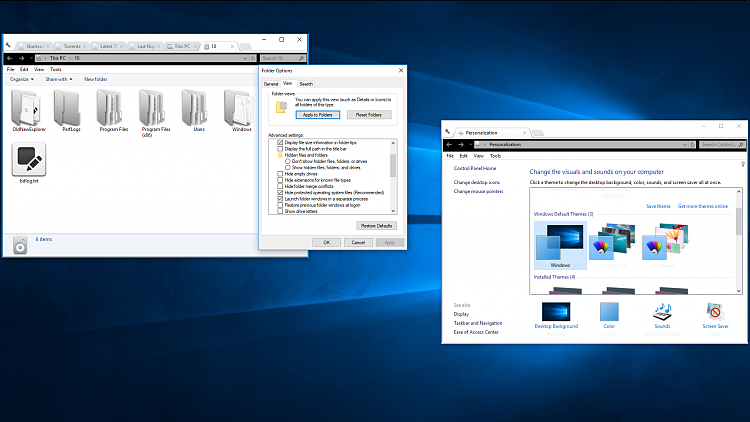
1 Open Folder Options.
2 Do step 3, step 4, step 5, or step 6 below for what you would like to do.
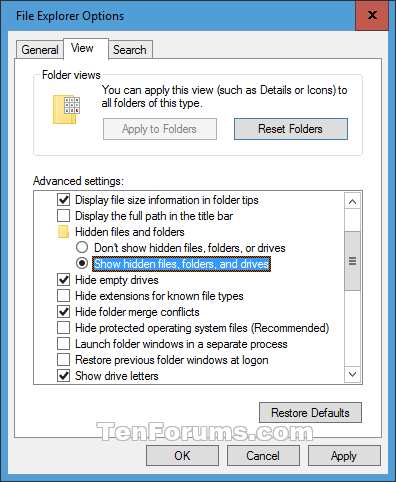
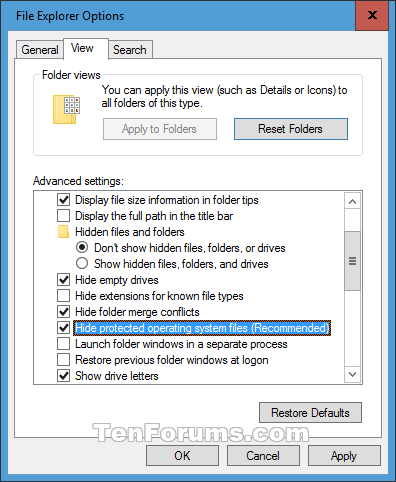
A) In the View tab, select (dot) Show hidden files, folders, and drives, and click/tap on OK. (see screenshot below)
This is the default setting.
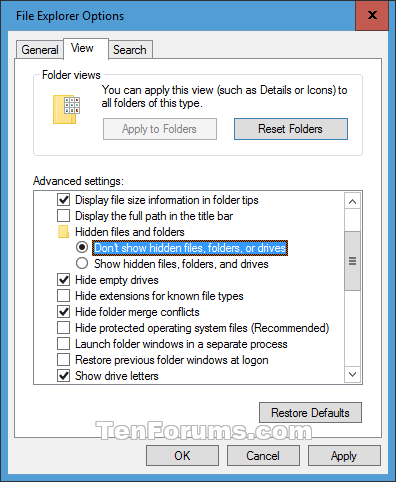
A) In the View tab, select (dot) Don't show hidden files, folders, and drives, and click/tap on OK. (see screenshot below)
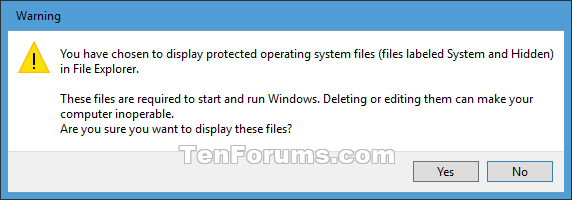
A) In the View tab, select (dot) Show hidden files, folders, and drives, uncheck the Hide protected operating system files box, and click/tap on OK. (see screenshot below)
B) Click/tap on Yes to confirm. (see screenshot below)
This is the default setting.
A) In the View tab, check the Hide protected operating system files box, and click/tap on OK. (see screenshot below)
This option will allow you to quickly toggle to hide or show whatever you have set from Option One above.
1 While you have File Explorer (Win+E) open, click/tap on the View tab, and check (show) or uncheck (hide) the Hidden items box in the ribbon for what you want. (see screenshot below)
The downloadable .bat files below are for changing the DWORD values in the registry key below.
HKEY_CURRENT_USER\SOFTWARE\Microsoft\Windows\CurrentVersion\Explorer\Advanced
Hidden DWORD
0 = Don't show hidden files, folders, and drives
1 = Show hidden files, folders, and drives
ShowSuperHidden DWORD
0 = Hide protected operating system files
1 = Show protected operating system files
1 Do step 2, step 3, step 4, or step 5 below for what you would like to do.
A) Click/tap on the Download button below to download the BAT file below, and go to step 6 below.
Show_hidden_files_folders_and_drives.bat
Download
This is the default setting.
A) Click/tap on the Download button below to download the BAT file below, and go to step 6 below.
Don't_show_hidden_files_folders_and_drives.bat
Download
This is the default setting.
A) Click/tap on the Download button below to download the BAT file below, and go to step 6 below.
Hide_protected_operating_system_files.bat
Download
This also does step 2 above.
A) Click/tap on the Download button below to download the BAT file below, and go to step 6 below.
Show_protected_operating_system_files.bat
Download
6 Save the .bat file to your desktop, and run the .bat file.
7 If prompted, click/tap on Run to approve.
If you like, you can unblock the .bat file to stop getting the Run prompt.
8 You will now notice your screen flicker and a command prompt quickly open and close as explorer is restarted to apply the registry changes.
9 When finished, you can delete the downloaded .bat file if you like.
That's it,
Shawn
Related Tutorials
- How to Set or Unset Hidden Attribute of Files and Folders in Windows 10
- How to Add Hide selected items to Context Menu in Windows 10
- How to Add Hidden items to Context Menu in Windows 10
Show Hidden Files, Folders, and Drives in Windows 10
-
New #1
My optical drive is working but only shows up in file explorer when there is a disk inserted. I have followed all instructions to show hidden files and folders and it still does not show up on any of my windows 10 pcs. Any other suggestions?
-
New #2
Hello febsr, and welcome to Ten Forums. :)
This tutorial wouldn't apply to your issue.
Do you mean the DVD drive doesn't show in "This PC" or navigation pane when empty?
The DVD drive should show in "This PC".
Using the tutorial below to show drives in the navigation pane may help, but the DVD drive will only show up when something is in it.
https://www.tenforums.com/tutorials/4...dows-10-a.html
-
New #3
none of the above fixes the issue for me. "show hidden files, folders, and drives" won't stay ticked and "hide protected operating system files" won't stay unchecked. i had i program that worked like a charm but i can't fine it new. any ideas and or suggestions?
-
New #4
Hello ChaChaLaBoom, :)
After you set them how you like in Folder Options and click/tap on Apply, when do they revert back on you?
Do you have any 3rd party tweaking program installed that could be overriding these settings?
-
New #5
no and i've already done a thorough virus and malware scan
-
New #6
After you set them how you like in Folder Options and click/tap on Apply, when do they revert back on you?
-
New #7
i tick show hidden files, and uncheck hide protected then click apply, ok and nothing changes even after a refresh
-
New #8
hey if you're still looking for a solution looks like i found one. at least one that works for me. in another thread here a member suggested disabling bitdefender and changing the settings, so i went into safemode, set them, and once in windows they held. i'm posting to say thanks for attempting to help, and for other to maybe see this if they run across the issue.
-
-
Show Hidden Files, Folders, and Drives in Windows 10
How to Show Hidden Files, Folders, and Drives in Windows 10Published by Shawn BrinkCategory: Customization
16 Mar 2020


 Quote
Quote

Tutorial Categories

Related Discussions
