

Add or Remove 'Look for an app in the Microsoft Store' in Open with in Windows 10
The Microsoft Store app in Windows 10 offers various apps, games, music, movies & TV, and books that users can browse through, purchase, or get for free to download and install for their Microsoft account in Windows 10 PCs and devices.
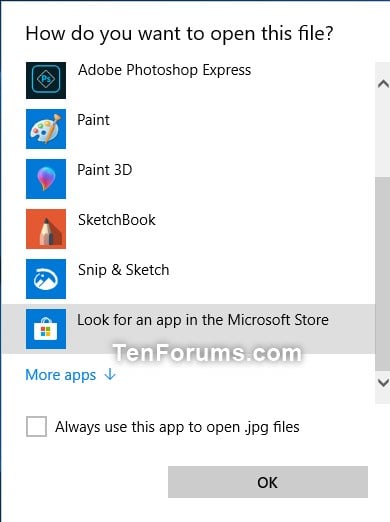
The Open with context menu allows users to choose an app to be their default app for the current file type.
By default, users can select either option below in Open with:
- More apps = Will list more apps to select from, and give you more options.
- Look for an app in the Store = Will open the Store app for you to select and install an app to open the file with.
- Look for another app on this PC = Will open File Explorer for you to navigate to and select an installed program to open the file with.
- Always use this app to open (file extension) files = To set the selected app to always open this file type by default.
This tutorial will show you how to add or remove the Look for an app in the Microsoft Store option in Open with for all users in Windows 10.
You must be signed in as an administrator to add or remove "Look for an app in the Microsoft Store".
This does not affect the Open with > Search the Microsoft Store context menu item.
Contents
- Option One: To Add or Remove "Look for an app in the Microsoft Store" in Open with using Local Group Policy Editor
- Option Two: To Add or Remove "Look for an app in the Microsoft Store" in Open with using a REG file
EXAMPLE: "Look for an app in the Microsoft Store" in Open with > Choose another app
The Local Group Policy Editor is only available in the Windows 10 Pro, Enterprise, and Education editions.
All editions can use Option TWO below.
1 Open the Local Group Policy Editor.
2 In the left pane of Local Group Policy Editor, navigate to the location below. (see screenshot below)
Computer Configuration\Administrative Templates\System\Internet Communication Management\Internet Communication settings
3 In the right pane of Internet Communication settings in Local Group Policy Editor, double click/tap on the Turn off access to the Store policy to edit it. (see screenshot above)
4 Do step 5 (add) or step 6 (remove) below for what you would like to do.
A) Select (dot) Not Configured or Disabled, click/tap on OK, and go to step 7 below. (see screenshot below)
Not Configured is the default setting.
7 When finished, you can close the Local Group Policy Editor if you like.
The downloadable .reg files below will add and modify the DWORD value in the registry keys below.
HKEY_CURRENT_USER\Software\Policies\Microsoft\Windows\Explorer
HKEY_LOCAL_MACHINE\SOFTWARE\Policies\Microsoft\Windows\Explorer
NoUseStoreOpenWith DWORD
(delete) = Add
1 = Remove
1 Do step 2 (add) or step 3 (remove) below for what you would like to do.
This is the default setting.
A) Click/tap on the Download button below to download the file below, and go to step 4 below.
Add_Look_for_an_app_in_the_Store.reg
Download
A) Click/tap on the Download button below to download the file below, and go to step 4 below.
Remove_Look_for_an_app_in_the_Store.reg
Download
4 Save the .reg file to your desktop.
5 Double click/tap on the downloaded .reg file to merge it.
6 When prompted, click/tap on Run, Yes (UAC), Yes, and OK to approve the merge.
7 You can now delete the downloaded .reg file if you like.
That's it,
Shawn
Related Tutorials
- How to Choose Default Apps to Open Files with in Windows 10
- How to Add Default Apps to Desktop Context Menu in Windows 10
- How to Add or Remove Open with Context Menu in Windows 10
- How to Add or Remove Open with Context Menu to BAT files in Windows 10
- How to Add or Remove Open with Context Menu to URL files in Windows 10
- How to Allow or Block Access to the Store App in Windows 10
- How to Remove Programs from "Open with" Context Menu in Windows
- How to Add or Remove Open With 'Always use this app' in Windows 10
Remove 'Look for an app in the Store' from Open with in Windows 10
-
New #1
This does NOT work anymore in 1809 !
Reg-key or Local Group Policy Editor , they both does not respond to changes ............!
Seems, its not possible to remove " the store " from right-click menu in 1809 .......
-
New #2
Hello Piet,
I just tested on my 1809 system, and it still works for me.
Just to note, this only affects when you click on Open with > Choose another app.
-
New #3
Attachment 208503Tried even both options , nothing happens !
All options still visible in contextmenu.........
Look ;
-
New #4
The context menu in your screenshot is not affected by this.
Do you see it in the dialog you see when you click on Choose another app instead? It'll be the same in the example screenshot in the tutorial.
-
New #5
Dont understand , sorry !
Both menu-options still visible ( 1 ; look in the store 2 ; choose another app ) , when clicking on 1 , I go to the store , when clicking on 2 , other apps are shown/chooseable.
I can not remove the "store-option" from contextmenu , I thought its possible with the tweaks ( regkey and gpedit) ............
-
New #6
No problem.
Please go ahead and post a screenshot of the dialog like below when you click on "Choose another app" to see what you're seeing.
-
-
New #8
Your first screenshot shows that Look for an app in the Microsoft Store has been removed.
This doesn't affect Search the Microsoft Store when you click on Open with like in your bottom screenshot.
-
-
New #9
ok , Look for an app in the Microsoft Store is not equal to Search the Microsoft Store ???
" Search the Microsoft Store " is still present and can not remove it .
"Search for other app" has to stay , offcourse ( option below menu )
I want to remove the "search the store " from contextmenu , seems not possible ....
Remove 'Look for an app in the Store' from Open with in Windows 10
Add or Remove 'Look for an app in the Microsoft Store' in Open with in Windows 10Published by Shawn BrinkCategory: Apps & Features
11 May 2020


 Quote
QuoteTutorial Categories

Related Discussions
