

How to Turn On or Off Fix Scaling for Apps that are Blurry in Windows 10
Starting with Windows 10 build 17063, Microsoft has made it easier for you to fix apps that become blurry if you dock/undock, RDP, or change display settings. Some desktop apps can become blurry in these scenarios. When this happens, you have to sign out and sign in to Windows to have these apps render properly. You can now instead turn on the Fix scaling for apps feature that will enable these apps to be fixed simply by re-launching them.
Starting with Windows 10 build 18277 (19H1), Microsoft is enabling this setting by default, to help automatically address some of your scaling feedback, and reduce the number of times you see that Fix blurry apps notification.
This tutorial will show you how to turn on or off to let Windows try and fix DPI scaling for apps so they are not blurry for your account in Windows 10.
This wont work for all desktop apps and it only improves blurry desktop apps while theyre on the main display. If youre using multiple displays with different scale factors and running in Extend display mode, these apps might still be blurry on secondary displays.
Contents
- Option One: Turn On Fix Scaling for Apps using Notification
- Option Two: Turn On or Off Fix Scaling for Apps in Settings
- Option Three: Turn On or Off Fix Scaling for Apps using a REG file
- Option Four: "Override system DPI" Per-app in Compatibility Mode Settings
- Option Five: Enable or Disable Fix Scaling for Apps for All Users in Local Group Policy Editor
- Option Six: Enable or Disable Fix Scaling for Apps for Specific Users in Local Group Policy Editor
- Option Seven: Enable or Disable Fix Scaling for Apps for All Users using a REG file
1 If Windows detects that you might have blurry apps on your main display, click/tap on Yes, fix apps in the notification. (see screenshot below)
1 Open Settings, and click/tap on the System icon.
2 Click/tap on Display on the left side, and click/tap on the Advanced scaling settings link on the right side under "Scale and layout". (see screenshot below)
3 Turn on or off (default) Let Windows try to fix apps so they're not blurry for what you want. (see screenshot below)
4 You can now close Settings if you like.
The downloadable .reg files below will modify the DWORD value in the registry key below.
HKEY_CURRENT_USER\Control Panel\Desktop
EnablePerProcessSystemDPI DWORD
(delete) = Off
1 = On
1 Do step 2 (on) or step 3 (off) below for what you would like to do.
A) Click/tap on the Download button below to download the file below, and go to step 4 below.
Turn_ON_fix_scaling_for_apps.reg
Download
This is the default setting.
A) Click/tap on the Download button below to download the file below, and go to step 4 below.
Turn_OFF_fix_scaling_for_apps.reg
Download
4 Save the .reg file to your desktop.
5 Double click/tap on the downloaded .reg file to merge it.
6 When prompted, click/tap on Run, Yes (UAC), Yes, and OK to approve the merge.
7 If you like, you can delete the downloaded .reg file if you like.
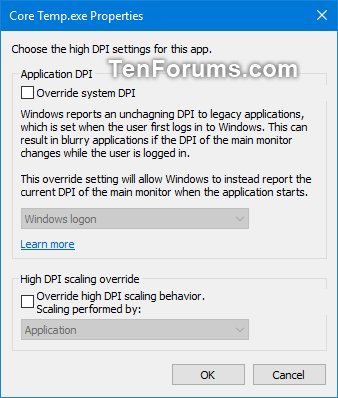
Windows reports an unchanging DPI to legacy applications, which is set when the user first signs in to Windows. This can result in blurry applications if the DPI of the main monitor changes while the user is signed in.
This override setting will allow Windows to instead report the current DPI of the main monitor when the application starts.
1 Open the compatibility settings for the .exe file of the app you want to change the override system DPI settings for.
2 Click/tap on the Change high DPI settings button. (see screenshot below)
3 Do step 4 (on) or step 5 (off) below for what you want.
A) Check the Override system DPI box. (see screenshot below)
B) Select Windows logon or Application start in the drop menu for what you want.
C) Click/tap on OK, and go to step 6 below.
A) Uncheck the Override system DPI box. (see screenshot below)
B) Click/tap on OK, and go to step 6 below.
6 Click/tap on OK. (see screenshot below step 2)
This option will override Option One, Option Two, Option Three, and Option Six.
The Local Group Policy Editor is only available in the Windows 10 Pro, Enterprise, and Education editions.
All editions can use Option Seven below.
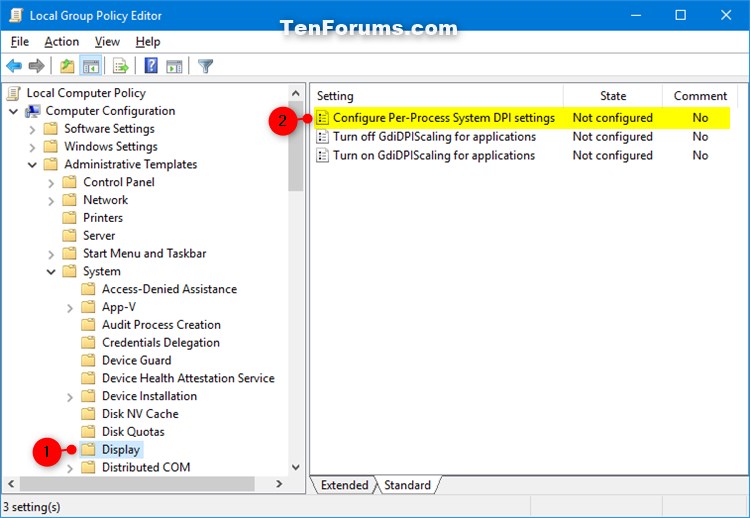
1 Open the Local Group Policy Editor.
2 In the left pane of the Local Group Policy Editor, click/tap on to expand Computer Configuration, Administrative Templates, and Start Menu and Taskbar. (see screenshot below)
3 In the right pane of Start Menu and Taskbar, double click/tap on the Configure Per-Process System DPI settings policy to edit it. (see screenshot above)
4 Do step 5 (enable) , step 6 (disable), or step 7 (default) below for what you would like to do.
A) Select (dot) Enabled, select Enable in the "Enable or disable Per-Process System DPI for all applications" drop menu under "Options", click/tap on OK, and go to step 8 below. (see screenshot below)
A) Select (dot) Enabled, select Disable in the "Enable or disable Per-Process System DPI for all applications" drop menu under "Options", click/tap on OK, and go to step 8 below. (see screenshot below)
This will allow users to use Option One, Option Two, and Option Three.
A) Select (dot) Not Configured or Disabled, click/tap on OK, and go to step 8 below. (see screenshot below)
Not Configured is the default setting.
8 When finished, you can close the Local Group Policy Editor if you like.
This option will override Option One, Option Two, and Option Three.
The Local Group Policy Editor is only available in the Windows 10 Pro, Enterprise, and Education editions.
All editions can use Option Seven below.
1 Open the all users, specific users or groups, or all users except administrators Local Group Policy Editor for how you want this policy applied.
2 In the left pane of the Local Group Policy Editor, click/tap on to expand User Configuration, Administrative Templates, and Start Menu and Taskbar. (see screenshot below)
3 In the right pane of Start Menu and Taskbar, double click/tap on the Configure Per-Process System DPI settings policy to edit it. (see screenshot above)
4 Do step 5 (enable) , step 6 (disable), or step 7 (default) below for what you would like to do.
A) Select (dot) Enabled, select Enable in the "Enable or disable Per-Process System DPI for all applications" drop menu under "Options", click/tap on OK, and go to step 8 below. (see screenshot below)
A) Select (dot) Enabled, select Disable in the "Enable or disable Per-Process System DPI for all applications" drop menu under "Options", click/tap on OK, and go to step 8 below. (see screenshot below)
This will allow users to use Option One, Option Two, and Option Three.
A) Select (dot) Not Configured or Disabled, click/tap on OK, and go to step 8 below. (see screenshot below)
Not Configured is the default setting.
8 When finished, you can close the Local Group Policy Editor if you like.
This option will override Option One, Option Two, Option Three, and Option Six.
The downloadable .reg files below will add and modify the DWORD and string values in the registry keys below.
HKEY_CURRENT_USER\Software\Policies\Microsoft\Windows\Control Panel\Desktopr
HKEY_LOCAL_MACHINE\SOFTWARE\Policies\Microsoft\Windows\Control Panel\Desktop
EnablePerProcessSystemDPI DWORD
(delete) = Default
0 = Disable
1 = Enable
HKEY_CURRENT_USER\Software\Policies\Microsoft\Windows\Display
HKEY_LOCAL_MACHINE\SOFTWARE\Policies\Microsoft\Windows\Display
EnablePerProcessSystemDPIForProcesses String value
DisablePerProcessSystemDPIForProcesses String value
(delete) = Default
1 Do step 2 (default) or step 3 (enable), or step 4 (disable) below for what you would like to do.
This will allow users to use Option One, Option Two, and Option Three.
A) Click/tap on the Download button below to download the file below, and go to step 5 below.
Default_user_choice_Per-Process_System_DPI_for_apps.reg
Download
This is the default setting.
A) Click/tap on the Download button below to download the file below, and go to step 4 below.
Enable_Per-Process_System_DPI_for_apps.reg
Download
A) Click/tap on the Download button below to download the file below, and go to step 4 below.
Disable_Per-Process_System_DPI_for_apps.reg
Download
5 Save the .reg file to your desktop.
6 Double click/tap on the downloaded .reg file to merge it.
7 When prompted, click/tap on Run, Yes (UAC), Yes, and OK to approve the merge.
8 You can now delete the downloaded .reg file if you like.
That's it,
Shawn
Related Tutorials
- How to Change your DPI Scaling Level for Displays in Windows 10
- How to Change Compatibility Mode Settings for Apps in Windows 10
- How to See DPI Awareness of Running Apps in Task Manager in Windows 10
Turn On or Off Fix Scaling for Apps that are Blurry in Windows 10
-
New #1
Please correct from NavPaneShowAllCloudStates toEnablePerProcessSystemDPI.
-
-
New #3
I still have blurry text in Properties windows and Windows tools like Group Policy Editor. My screen is 1920x1080.

-
New #4
Hello @ntd252,
You might see if turning on ClearType may help.
 Turn On or Off ClearType in Windows 10 | Windows 10 Tutorials
-
New #5
-
New #6
If you have build 17692 or higher installed, you could use "Make text bigger" for at least text.
Change Text Size in Windows 10 | Windows 10 Tutorials
You could also try a lower screen resolution to make thinks larger to see if it's blurry.
-
New #7
There is only one solution that works: Back to Windows 8 scaling.
In the Advanced Scaling settings windows type in your custom scaling size: like 125 for 125%
Log off and on to see the effect.
In the registry:
HKEY_CURRENT_USER\Control Panel\Desktop
Win8DpiScaling dword 0x1
LogPixels dword 0x78 (is 120 i.e. nearly 125)
Cheers
-
New #8
-
-
New #9
The header for option three has a typo. "Turn On or Off Show OneDrive Cloud States in Navigation Pane using a REG file"

Turn On or Off Fix Scaling for Apps that are Blurry in Windows 10
How to Turn On or Off Fix Scaling for Apps that are Blurry in Windows 10Published by Shawn BrinkCategory: Apps & Features
13 Sep 2020


 Quote
QuoteTutorial Categories

Related Discussions
