

How to Enable or Disable IPv6 in Windows 7, Windows 8, and Windows 10
The Internet Protocol version 6 (IPv6) is a new suite of standard protocols for the network layer of the Internet. IPv6 is designed to solve many of the problems of the current version of the Internet Protocol suite (known as IPv4) with regard to address depletion, security, auto-configuration, extensibility, and so on. IPv6 expands the capabilities of the Internet to enable new kinds of applications, including peer-to-peer and mobile applications.
IPv6 is enabled by default in Windows, but sometimes you find that you may need to disable IPv6. For example, when you join your PC to a domain.
See also: Guidance for configuring IPv6 in Windows for advanced users - Microsoft Support
This tutorial will show you how to enable or disable Internet Protocol version 6 (IPv6) for all or specific network adapters in Windows 7, Windows 8, and Windows 10.
You must be signed in as an administrator to enable or disable IPv6.
Contents
- Option One: To Enable or Disable IPv6 or its Components using Microsoft Easy Fix Wizard
- Option Two: To Enable or Disable IPv6 in Network Adapter Properties
- Option Three: To Enable IPv6 for Specific Network Adapter in PowerShell
- Option Four: To Enable IPv6 for All Network Adapters in PowerShell
- Option Five: To Disable IPv6 for Specific Network Adapter in PowerShell
- Option Six: To Disable IPv6 for All Network Adapters in PowerShell
This option can be used in Windows 7, Windows 8, Windows 8.1, and Windows 10.
This option can be used in Windows 7, Windows 8, Windows 8.1, and Windows 10.
1 Open the Control Panel (icons view), and click/tap on the Network and Sharing Center icon.
2 Click/tap on the Change adapter settings link on the left side, and close the Network and Sharing Center if you like. (see screenshot below)
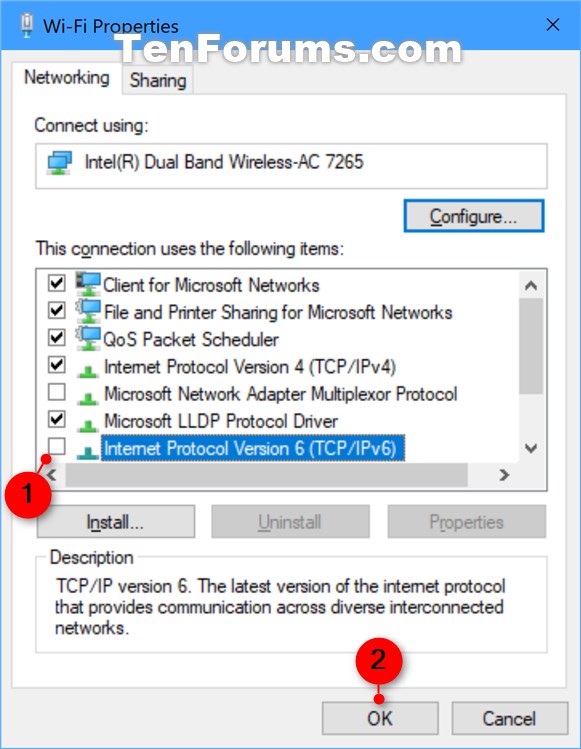
3 Right click or press and hold on the network adapter (ex: "Wi-Fi") you want, and click/tap on Properties. (see screenshot below)
4 Check (enable) or uncheck (disable) the Internet Protocol Version 6 (TCP/IPv6) box for what you want to do, and click/tap on OK. (see screenshot below)
5 When finished, you can close Network Connections if you like.
This option can be used in Windows 8.1 and Windows 10.
To see more information and usage options for the Enable-NetAdapterBinding command, see: Enable-NetAdapterBinding - Microsoft Docs
1 Open an elevated PowerShell.
2 Copy and paste the command below into the elevated PowerShell, and press Enter to see the current status of IPv6 for all network adapters. Make note of the network adapter name (ex: "Wi-Fi") you want to enable IPv6 for. (see screenshot below)
Get-NetAdapterBinding -ComponentID ms_tcpip6
3 Type the command below into the elevated PowerShell, and press Enter. (see screenshot below)
Enable-NetAdapterBinding -Name "Adapter Name" -ComponentID ms_tcpip6
Substitute Adapter Name in the command above with the actual network adapter name (ex: "Wi-Fi") from step 2 you want to enable IPv6 for.
For example:Enable-NetAdapterBinding -Name "Wi-Fi" -ComponentID ms_tcpip6
4 When finished, you can close the elevated PowerShell if you like.
This option can be used in Windows 8.1 and Windows 10.
To see more information and usage options for the Enable-NetAdapterBinding command, see: Enable-NetAdapterBinding - Microsoft Docs
1 Open an elevated PowerShell.
2 Copy and paste the command below into the elevated PowerShell, and press Enter. (see screenshot below)
Enable-NetAdapterBinding -Name "*" -ComponentID ms_tcpip6
3 When finished, you can close the elevated PowerShell if you like.
This option can be used in Windows 8.1 and Windows 10.
To see more information and usage options for the Disable-NetAdapterBinding command, see: Disable-NetAdapterBinding - Microsoft Docs
1 Open an elevated PowerShell.
2 Copy and paste the command below into the elevated PowerShell, and press Enter to see the current status of IPv6 for all network adapters. Make note of the network adapter name (ex: "Wi-Fi") you want to disable IPv6 for. (see screenshot below)
Get-NetAdapterBinding -ComponentID ms_tcpip6
3 Type the command below into the elevated PowerShell, and press Enter. (see screenshot below)
Disable-NetAdapterBinding -Name "Adapter Name" -ComponentID ms_tcpip6
Substitute Adapter Name in the command above with the actual network adapter name (ex: "Wi-Fi") from step 2 you want to disable IPv6 for.
For example:Disable-NetAdapterBinding -Name "Wi-Fi" -ComponentID ms_tcpip6
4 When finished, you can close the elevated PowerShell if you like.
This option can be used in Windows 8.1 and Windows 10.
To see more information and usage options for the Disable-NetAdapterBinding command, see: Disable-NetAdapterBinding - Microsoft Docs
1 Open an elevated PowerShell.
2 Copy and paste the command below into the elevated PowerShell, and press Enter. (see screenshot below)
Disable-NetAdapterBinding -Name "*" -ComponentID ms_tcpip6
3 When finished, you can close the elevated PowerShell if you like.
That's it,
Shawn
Related Tutorials
- How to Find Private and Public IP Address of Your Windows 10 PC
- How to Change IPv4 and IPv6 DNS Server Address in Windows
Enable or Disable IPv6 in Windows
-
New #1
Thank You [I don't find this button]
exist somehow a way to CHECK if ipv6 is enabled or not ?
c
-
-
New #3
-
New #4
Hello,
I've disabled IPv6 executing the following actions:
1. Edit System Registry: providing value 0xFF to DisabledComponents key (as per Microsoft guide https://support.microsoft.com/en-us/...advanced-users)
2. Unchecked "Internet Protocol Version 6 (TCP/IPv6)" from all the NICs configuration.
3. Disable IPv6 on all the NICs via Administrative PoweShell:Disable-NetAdapterBinding -Name "*" -ComponentID ms_tcpip6
and then rebooted the computer.
After the reboot, withnetstat -abn, I still socket binding IPv6:

Any advice how to definetly stop Windows to bind on IPv6?
Thanks
-
-
-

Enable or Disable IPv6 in Windows
How to Enable or Disable IPv6 in Windows 7, Windows 8, and Windows 10Published by Shawn BrinkCategory: Network & Sharing
21 Apr 2020


 Quote
Quote

Tutorial Categories

Related Discussions
