

How to Choose to Skip Ahead to Next Version of Windows 10 for Insiders in Fast Ring
This tutorial is no longer valid.
Starting with Windows 10 build 19018, Microsoft will not be offering Skip Ahead as an option for Insiders to sign-up for.
Windows Insiders in the Fast ring will see a Skip ahead to the next Windows release drop-down in their Windows Insider Program Settings.
See also: Insider Previews updates, rings and support | Windows Insider Program
Starting with Windows 10 build 19018, Microsoft will not be offering Skip Ahead as an option for Insiders to sign-up for.
This tutorial will show you how to skip ahead to the RS_PRERELEASE branch for 20H1 builds of Windows 10 for Insiders in the Fast ring.
You must be signed in as an administrator that is a Windows Insider in the Fast ring to skip ahead.
- Option One: Skip Ahead to Next Version of Windows 10 from Settings
- Option Two: Skip Ahead to tNext Version of Windows 10 using a REG file
1. While signed in to Windows 10 with your Microsoft account, open Settings, and click/tap on the Update & recovery icon.
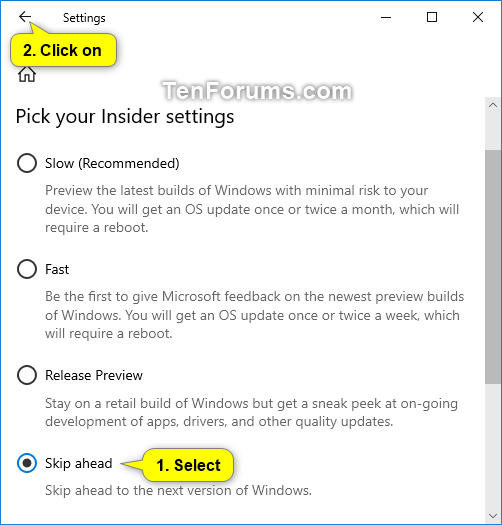
2. Click/tap on Windows Insider Program on the left side, and click/tap on the current ring (ex: Fast) under Pick your Insider settings on the right side. (see screenshot below)
3. Select (dot) Skip ahead, and click/tap on the Back (arrow) button at the top left corner. (see screenshot below)
4. When finished, you can close Settings if you like.
The downloadable .reg file below will modify the string values in the registry keys below.
HKEY_LOCAL_MACHINE\SOFTWARE\Microsoft\WindowsSelfHost\Applicability
BranchName string value
external = Skip ahead
ContentType string value
Skip = Skip ahead
Ring string value
WIF = Skip ahead
UIBranch string value
external = Skip ahead
UIContentType string value
Skip = Skip ahead
UIRing string value
WIF = Skip ahead
1. Click/tap on the Download button below to download the file below.
2. Save the .reg file to your desktop.
3. Double click/tap on the downloaded .reg file to merge it.
4. When prompted, click/tap on Run, Yes (UAC), Yes, and OK to approve the merge.
5. If you like, you can delete the downloaded .reg file if you like.
That's it,
Shawn
Related Tutorials
- How to Start or Stop Receiving Insider Preview Builds in Windows 10
- How to Choose Your Insider Ring Level on your Windows 10 PC
- How to clean install latest Fast Ring Insider build in supported way
Skip Ahead to Next Version of Windows 10 for Insiders in Fast Ring
-
New #1
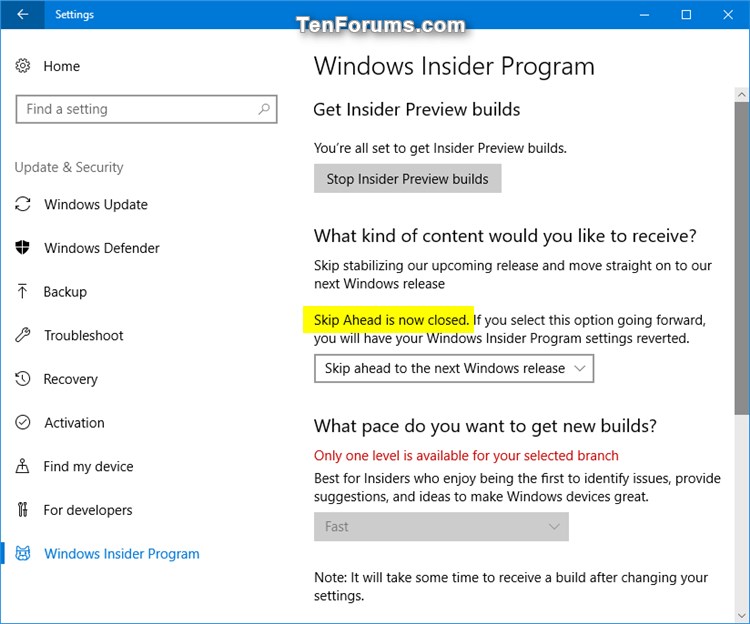
Update: Skip Ahead is now closed.
Before choosing to skip ahead there are a few things to keep in mind: builds from RS_PRERELEASE will get less stable as teams start checking in new code. So just like Insider Preview builds usually are after a Windows 10 release, things will likely be a little rough. If this concerns you or makes you uncomfortable dont choose to skip ahead and simply wait for the Fast ring to transition back to RS_PRERELEASE down the road. We also need to have Windows Insiders in the Fast ring helping us get the Windows 10 Fall Creators Update ready and giving us feedback on issues they are experiencing. So there will be a limit as to how many Windows Insiders can skip ahead. Once that limit is met, the UI on the flight settings page will notify Windows Insiders trying to choose to skip ahead that its been closed.
Last edited by Brink; 21 May 2021 at 10:10.
-
-
-
-
New #5
Update:
Skip Ahead is now open! #WindowsInsiders can now choose to skip ahead to the next feature update of Windows 10. Please note: Only a limited number of Insiders will be allowed to skip ahead and once that limit has been reached, Skip Ahead will be closed.Last edited by Brink; 21 May 2021 at 10:10.
-
New #6
I tried this to get 18242 and it failed - just reverting back to Fast Ring.
The old pause trick still works
1) Navigate to
[HKEY_LOCAL_MACHINE\SOFTWARE\Microsoft\WindowsSelfHost\Applicability]
2) Change content type to "ContentType"="Skip" BUT DO NOT PRESS ENTER YET TO COMMIT CHANGE
3) Change to Skip Ahead in Windows Insider Programme menu
4) Now immediately press ok on regedit.
You are now set to Skip Ahead, and it does not revert.
-
-
-
-
Skip Ahead to Next Version of Windows 10 for Insiders in Fast Ring
How to Choose to Skip Ahead to Next Version of Windows 10 for Insiders in Fast RingPublished by Shawn BrinkCategory: Windows Update & Activation
21 May 2021


 Quote
Quote

Tutorial Categories

Related Discussions
