

How to Change Startup Sound in Windows 10
Windows 10 can play a sound at startup to let you know it's loaded and ready.
This tutorial will show you how to change the Windows Startup sound to play a WAV file you want in Windows 10 without using 3rd party software.
You must be signed in as an administrator to be able to change the Windows startup sound.
If you run a sfc /scannow command, it will restore the default imageres.dll system file to have the default Windows Startup sound again.
Updating to a new build of Windows 10 may sometimes also restore the default imageres.dll system file to have the default Windows Startup sound again.
Here's How:
1 Turn on "Play Windows Startup sound".
2 Take ownership of the C:\Windows\System32\imageres.dll file in File Explorer.
Starting with Windows 10 version 1903, you will need to take ownership of the C:\Windows\SystemResources\imageres.dll.mun file instead.
3 If you haven't already, you will need to download and install Resource Hacker.
4 Open Resource Hacker.
5 In Resource Hacker, click/tap on File on the menu bar, and click/tap on Open (Ctrl+O). (see screenshot below)
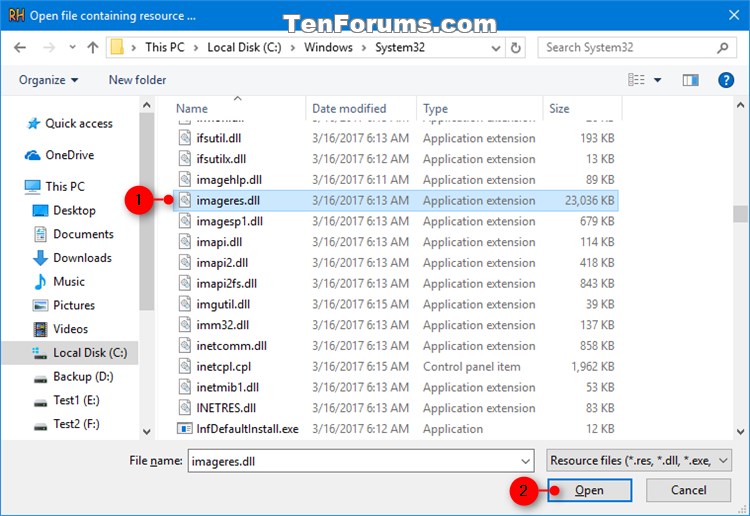
6 Browse to the C:\Windows\System32 folder, select the imageres.dll file, and click/tap on Open. (see screenshot below)
Starting with Windows 10 version 1903, you will need to change Resource files to All files (*.*) at the bottom right of the Open dialog, and then browse to the C:\Windows\SystemResources folder, select the imageres.dll.mun file, and click/tap on Open.
7 In the left pane of Resource Hacker, expand open WAVE, right click or press and hold on 5080 : 1030, and click/tap on Replace Resource. (see screenshot below)
8 Click/tap on Select File. (see screenshot below)
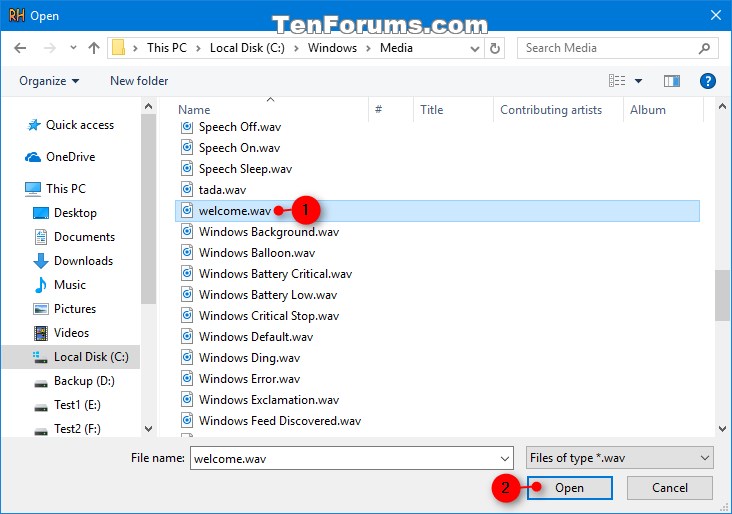
9 Browse to and select the .wav file (ex: "welcome.wav") you want to have played for the Windows startup sound. (see screenshot below)
Be sure that your .wav file is unblocked first.
It's usually best to keep your .wav file saved in the C:\Windows\Media folder to prevent issues with it playing at startup.
10 Click/tap on Replace. (see screenshot below)
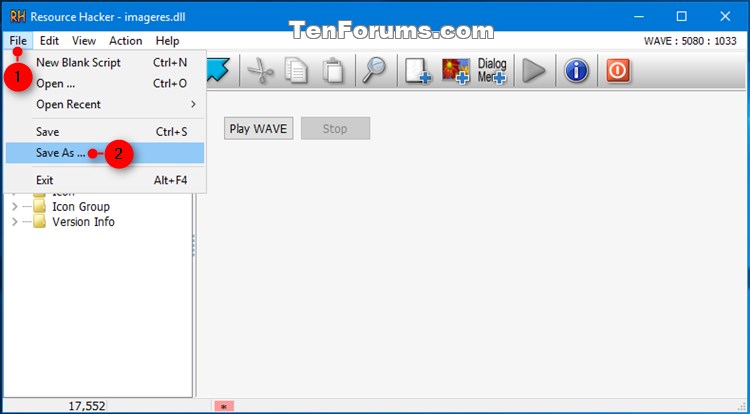
11 In Resource Hacker, click/tap on File on the menu bar, and click/tap on Save As. (see screenshot below)
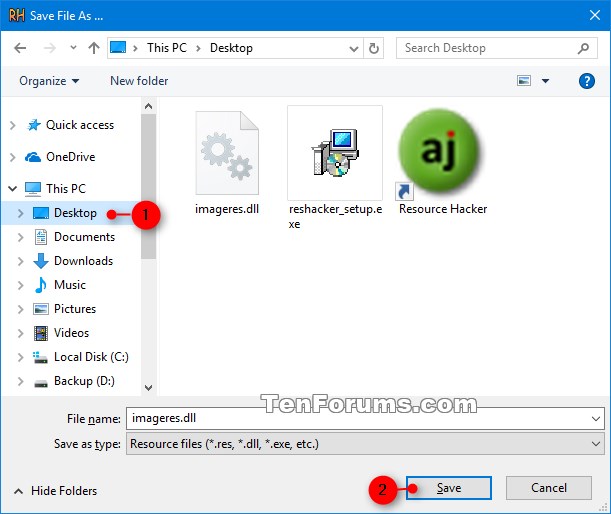
12 Select to save this custom imageres.dll file to your Desktop for now. (see screenshot below)
Starting with Windows 10 version 1903, this will be the imageres.dll.mun file instead.
13 Close Resource Hacker.
14 Boot Windows into Safe Mode.
If you like, adding the Safe Mode context menu can help make it easier to start Windows into Safe Mode and back to Normal Mode afterwards.
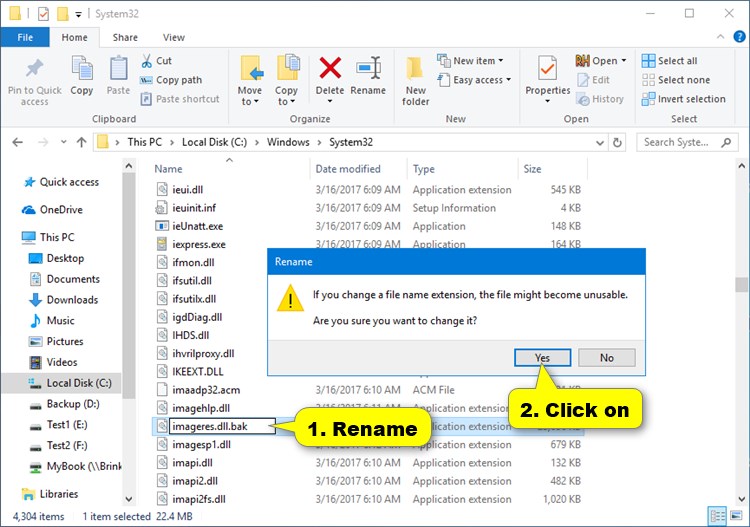
15 Right click or press and hold on the C:\Windows\System32\imageres.dll file in File Explorer, click/tap on Rename, rename the file to only add .bak to the end, press Enter, and click/tap on Yes to confirm. (see screenshots below)
This will be the backup copy of your original imageres.dll file.
To restore the original imageres.dll file, you can rename the current custom imageres.dll to imageres.dll.old, and rename the original imageres.dll.bak to imageres.dll again.
Starting with Windows 10 version 1903, this will be the imageres.dll.mun file instead.
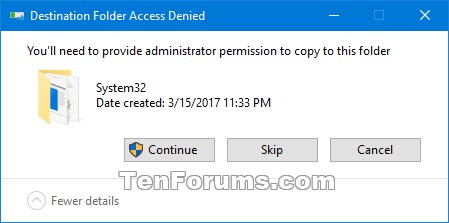
16 Drag and drop the custom imageres.dll file on your desktop from step 12 above into the C:\Windows\System32 folder, and click/tap on Continue if prompted. (see screenshot below)
Starting with Windows 10 version 1903, you will need to drag and drop the custom imageres.dll.mun file instead into the C:\Windows\SystemResources folder instead, and click/tap on Continue if prompted.
17 Boot Windows back into Normal Mode.
You should now here your .wav file play as the Windows Startup sound.
That's it,
Shawn
Related Tutorials
- How to Turn On or Off Play Windows Startup Sound in Windows 10
- How to Change your Sounds in Windows 10
- How to Play Sound when Lock Computer in Windows
- How to Play Sound when Unlock Computer in Windows
- How to Play Sound at Logoff (Sign-out) in Windows 10
- How to Play Sound at Logon (Sign-in) in Windows 10
- How to Play Sound at Shutdown in Windows 10
Change Windows Startup Sound in Windows 10
-
New #1
I just got done setting my Dodge Demon custom sound back, since(of course) it got reset after the build upgrade to Creators Update
Aaaaaah! The sound of raw power, when rebooting
-
New #2
how long can the sound bite be to use as startup sound? i forget
i thought i put one in my windows 8.1
-
New #3
Hello mrdreaners,
The shorter the better, but it depends on how fast your system is for a max length.
-
New #4
if i remember correctly (which is rare lol) it was 10 seconds or 7 i guess, ill just try 10 then go from there, thanks Brink for the quick response like always! :)
-
-
-
New #7
I managed to make one about 47 seconds long...
..., maybe that's why it only plays on Restart!!!
-
-
-
New #9
I found this on link https://www.petri.com/change_to_no_sounds_sound_scheme_by_default showing you how to set the default key to .None no sound. I not sure how to set the default key to .None.
reg add "HKEY_USERS\.DEFAULT\AppEvents\Schemes" /v "default" /t REG_SZ /D .None /f
or
reg add "HKEY_Current_USERS\AppEvents\Schemes" /v "default" /t REG_SZ /D .None /f
but that just adds another key under Schemes. how do you change the key to .None?

Change Windows Startup Sound in Windows 10
How to Change Windows Startup Sound in Windows 10Published by Shawn BrinkCategory: Customization
21 Jan 2020


 Quote
Quote
Tutorial Categories

Related Discussions
