

How to Set CPU Process Priority for Applications in Windows 10
Windows shares processor resources between all running processes based upon their priority level. If a process (application) has a higher priority level, it gets more processor resources for better performance compared to a process having lower priority.
If you like, you can manually set priority for processes to run with a Realtime, High, Above normal, Normal, Below normal, or Low priority level in Windows based on your needs instead of the default priority. The changes you make to the priority level of a process (application) are only temporary and not set permanently. Once the application is closed or you restart the computer, Windows will forget the priority level you set for it.
This tutorial will show you how to change the process priority of applications for processor resources in Windows 10.
It is not recommended to set processes to have a realtime priority level since it could lower the performance of your system by causing all other lower priority processes to not have the resources they need.
When you set a 100% CPU program to real-time priority, you get what you asked for | The Old New Thing
Contents
- Option One: To Change Priority of Running Process in Task Manager
- Option Two: To Change Priority of Running Process in PowerShell
- Option Three: To Change Priority of Running Process in Command Prompt
- Option Four: To Start Application with a Set Priority in Command Prompt
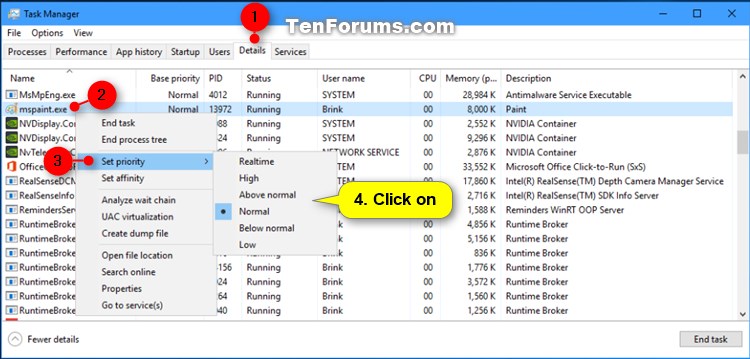
1 Open Task Manager in more details view.
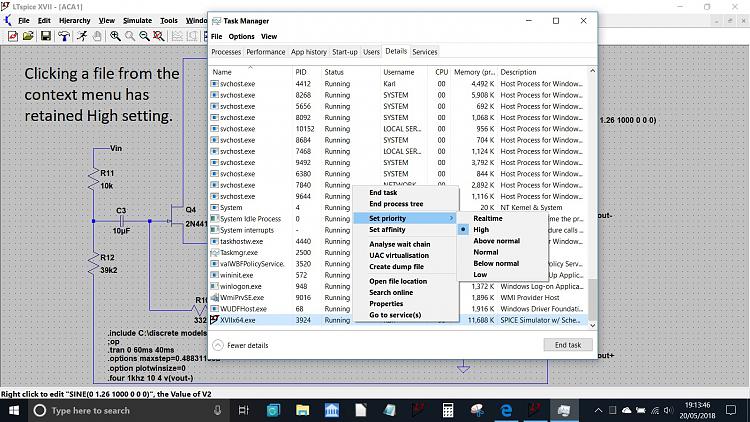
2 Click/tap on the Details tab, right click or press and hold on the process name (ex: "mspaint.exe"), click/tap on Set priority, and click/tap on the Realtime, High, Above normal, Normal, Below normal, or Low priority level you want to set for this process. (see screenshot below)
3 Click/tap on Change priority to confirm. (see screenshot below)
4 When finished, you can close Task Manager if you like.
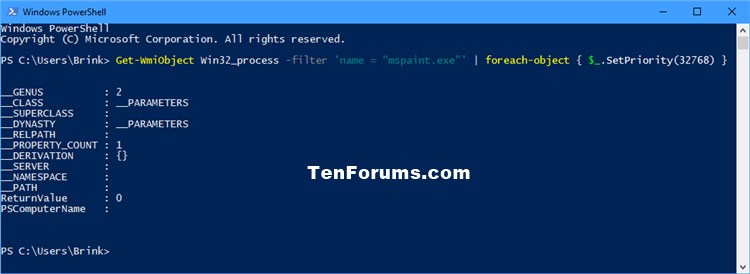
1 Open PowerShell.
2 Type the command below into PowerShell, and press Enter. (see screenshot below)
Get-WmiObject Win32_process -filter 'name = "ProcessName"' | foreach-object { $_.SetPriority(PriorityLevelID) }
Substitute ProcessName in the command above with the actual name of the running process (ex: "mspaint.exe") you want to change the priority level of.Substitute PriorityLevelID in the command above with the number (ex: "32768") in the table below for the priority level (ex: "Above normal") you want to set for this process.
For example:Get-WmiObject Win32_process -filter 'name = "mspaint.exe"' | foreach-object { $_.SetPriority(32768) }
Priority Level ID Priority Level Name 256 Realtime 128 High 32768 Above normal 32 Normal 16384 Below normal 64 Low
3 When finished, you can close PowerShell if you like.
1 Open a command prompt.
2 Type the command below you want to use into the command prompt, and press Enter. (see screenshots below)
wmic process where name="ProcessName" CALL setpriority "PriorityLevelName"
OR
wmic process where name="ProcessName" CALL setpriority PriorityLevelID
Substitute ProcessName in the command above with the actual name of the running process (ex: "mspaint.exe") you want to change the priority level of.
Substitute PriorityLevelName in the command above with the priority level name (ex: "Above normal") in the table below you want to set for this process.
Substitute PriorityLevelID in the command above with the number (ex: "32768") in the table below for the priority level (ex: "Above normal") you want to set for this process.
For example:
wmic process where name="mspaint.exe" CALL setpriority "Above normal"
OR
wmic process where name="mspaint.exe" CALL setpriority 32768
Priority Level ID Priority Level Name 256 Realtime 128 High 32768 Above normal 32 Normal 16384 Below normal 64 Low
3 When finished, you can close the command prompt if you like.

1 Open a command prompt.
2 Type the command below into the command prompt, and press Enter. (see screenshot below)
start "" /PriorityLevelName "Full path of application file"
If you like, you can use the command below to create a shortcut that will always open the application with the set priority.
cmd /c start "" /PriorityLevelName "Full path of application file"
Substitute PriorityLevelName in the command above with the priority level name (ex: "AboveNormal") in the table below you want to set for this process.
Substitute Full path of application file in the command above with the actual full path of the application file (ex: "C:\Windows\System32\mspaint.exe") you want to start.
For example:start "" /AboveNormal "C:\Windows\System32\mspaint.exe"
Priority Level Name Realtime High AboveNormal Normal BelowNormal Low
3 When finished, you can close the command prompt if you like.
That's it,
Shawn
Related Tutorials
- How to Add 'Run with priority' Context Menu in Windows 10
- Adjust Processor Resources for Best Performance of Programs or Background Services in Windows 10
- How to Save List of Running Processes to File in Windows
- How to Check What Processor or CPU is in Windows PC
- How to Change Windows Defender Antivirus Maximum CPU Usage for a Scan in Windows 10
Set CPU Process Priority for Applications in Windows 10
-
New #1
A couple more options to launch Paint with Above Normal priority
Example 1:
Create a new shortcut or edit an existing shortcut then paste the following string in the target box:
C:\Windows\System32\cmd.exe /c start "" /AboveNormal "C:\Windows\System32\mspaint.exe"
Click on "Change Icon..." then navigate to "C:\Windows\System32\mspaint.exe" to change the shortcut icon.

Example 2:
Add paint to the context menu
Code:Windows Registry Editor Version 5.00 ;Add Paint to context menu, Launch Paint with Above Normal Priority [HKEY_CLASSES_ROOT\Directory\background\Shell\Paint] @="Paint" "icon"="C:\\Windows\\system32\\mspaint.exe" "Position"=- [HKEY_CLASSES_ROOT\Directory\background\Shell\Paint\command] @="cmd.exe /c start /AboveNormal C:\\Windows\\System32\\mspaint.exe"
Remove Paint from the context menu
Code:Windows Registry Editor Version 5.00 ;Remove Paint from context menu [-HKEY_CLASSES_ROOT\Directory\background\Shell\Paint] [-HKEY_CLASSES_ROOT\Directory\background\Shell\Paint\command]
-
New #2
Very interesting... (and a question right at the end :))
I have been having ongoing issues with a certain program (LTspice XVII) that often crashes at a particular point in its operation. This point is when the screen has to 'split' into two with one window becoming a graphical display. The author of the software is aware of the issues and has tried to address whatever the cause may be via normal updates... however...
Myself and others have still been having issues and I wondered whether it could be a resource or timing issue.
I stumbled across this tutorial after generally researching possible causes and tried Shawns methods of opening the program at higher than normal priority. No crashes.
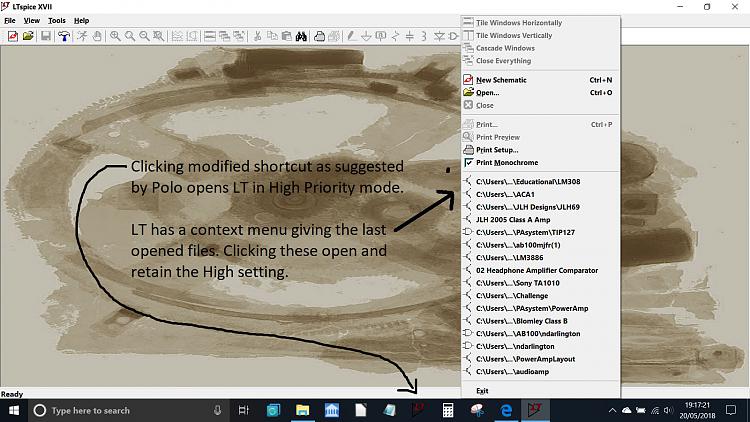
Spurred on by this I used the method suggested by Polo6RGTI to alter the target of the shortcut such that it opens LTspice in 'High' priority. All good so far (thanks for the idea).
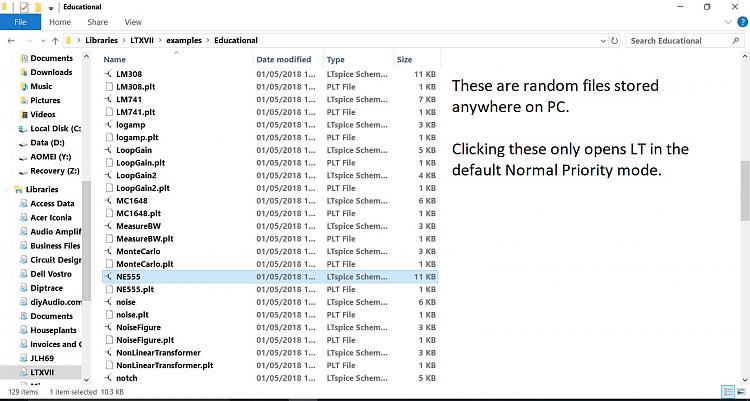
One final thing I am left with, and I'm not sure if there is a fix, is this. Opening LTspice from the modified shortcut works well, and from there I can directly open the last ten used files from within the program or as with any program I can browse for a file to open.
The minor 'annoyance' is that clicking a file directly (which opens LTspice) is of course opening it in 'normal' priority mode. I have to open LT first to get it in High Priority, then browse for a file.
Is there any way to get it so that clicking a file directly opens LT in 'High Priority' mode.
-
New #3
Hello Mooly, :)
You could create a shortcut using the command from Option Four to do so.
If you like, you could also use the added context menu below to run programs with a selected priority level.
 Add 'Run with priority' Context Menu in Windows 10 | Windows 10 Tutorials
-
New #4
Thanks Shawn, I've just tried it and I'm not sure if that's going to do what I want. It doesn't seem to have done at any rate.
Putting this into a command prompt opens the program in high priority:
start "" /High "C:\Program Files\LTC\LTspiceXVII\XVIIx64.exe"
but what I really want (if possible) is to be able to click random files (applicable to the program of course) and get it to open in High Priority.
The newly created shortcut following Polo's suggestion opens the program itself correctly, although unfortunately not correctly from clicking random files. If I browse for the file from within LT then its all good.
I hope these images make sense :) It would just be the icing on the cake to be able to do this.

-
New #5
Would the context menu I posted work for that for you?
Add 'Run with priority' Context Menu in Windows 10 | Windows 10 Tutorials
-
New #6
It doesn't seem to
The context menu is added OK and all the options are there for .exe applications but none of the individual .asc files show that option.
What I'm after is a bit like saying I want to click a notepad (a .txt file) to open it, and for it to open notepad in High Priority and not the default. It may well not be doable... but there's never any harm in trying
-
-
New #8
No worries :) I can live with it as it stands now (and at least the new shortcut opens it in High mode) and hopefully the author of the program might be able to get a better handle on what's happening and come up with a more permanent fix.
-
-
New #9
It seems like the command below after setting a process locks the priorty after turning the computer off or restarting which works like a charm. I have no complaints but is there away to do the command manually but using the wmic applet?
wmic process where name="ProcessName" CALL setpriority "PriorityLevelName"

Set CPU Process Priority for Applications in Windows 10
How to Set CPU Process Priority for Applications in Windows 10Published by Shawn BrinkCategory: Performance & Maintenance
24 Nov 2019


 Quote
Quote


Tutorial Categories

Related Discussions
