

How to Hide or Show Drive Letters in Windows 10
A drive letter is a single alphabetic character A through Z that has been assigned to a physical drive or drive partition in the computer.
This tutorial will show you how to hide or show drive letters in File Explorer for your account in Windows 10.
Contents
- Option One: To Hide or Show Drive Letters using Folder Options
- Option Two: To Hide or Show Drive Letters using a BAT file
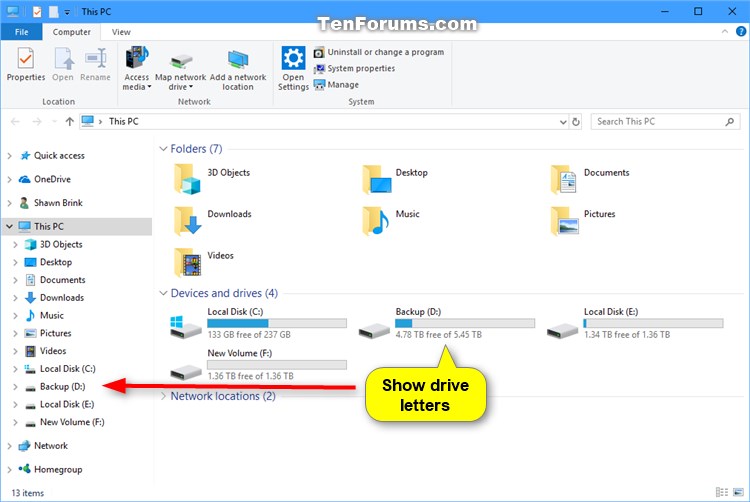
EXAMPLE: Drive Letters in This PC
1 Open Folder Options.
2 Click/tap on the View tab, check (default) or uncheck Show drive letters in "Advanced settings" for what you want, and click/tap on OK. (see screenshot below)
The downloadable .bat files below will modify the DWORD value in the registry key below.
HKEY_CURRENT_USER\SOFTWARE\Microsoft\Windows\CurrentVersion\Explorer
ShowDriveLettersFirst DWORD
0 = Show drive letters
2 = Hide drive letters
1 Do step 2 (hide) or step 3 (show) below for what you would like to do.
A) Click/tap on the Download button below to download the BAT file below, and go to step 4 below.
Hide_drive_letters.bat
Download
This is the default setting.
A) Click/tap on the Download button below to download the BAT file below, and go to step 4 below.
Show_drive_letters.bat
Download
4 Save the .bat file to your desktop.
5 Unblock the .bat file.
6 Run the .bat file.
7 You will now notice your screen flicker and a command prompt quickly open and close as the explorer.exe process is restarted to apply the registry changes.
8 When finished, you can delete the downloaded .bat file if you like.
That's it,
Shawn
Related Tutorials
- How to Change and Assign Drive Letter in Windows 10
- How to Remove a Drive Letter in Windows 10
- How to Show Drive Letters Before or After Drive Name in Windows 10
- How to Hide Specified Drives in Windows
Hide or Show Drive Letters in Windows 10
Hide or Show Drive Letters in Windows 10
How to Hide or Show Drive Letters in Windows 10Published by Shawn BrinkCategory: Hardware & Drivers
18 Apr 2021


Tutorial Categories

Related Discussions
