

How to Add or Remove Users from Groups in Windows 10
You can limit the ability of users to perform certain actions by adding or removing the user from being a member of groups. Each group has its own default rights and permissions. When a user is a member of a group, the user will be assigned the rights and permissions of the group to them.
A right authorizes a user to perform certain actions on a computer, such as backing up files and folders or shutting down a computer.
A permission is a rule that is associated with an object (usually a file, folder, or printer), and it regulates which users can have access to the object and in what manner.
See also:
- Special Identities | Microsoft Docs
- Security identifiers | Microsoft Docs
- Well-known security identifiers in Windows operating systems | Microsoft Support
This tutorial will show you how to add or remove users as members of groups to limit the ability of users to perform certain actions in Windows 10.
You must be signed in as an administrator to add or remove users from groups.
Changes to a users's group membership are not effective until the next time the user signs in.
The following table provides descriptions of the default local groups that are located in the Groups folder in Local Users and Groups (lusrmgr.msc).
Group Description Access Control Assistance Operators Members of this group can remotely query authorization attributes and permissions for resources on this computer. Administrators Members of this group have full control of the computer, and they can assign user rights and access control permissions to users as necessary. The Administrator account is a default member of this group. When a computer is joined to a domain, the Domain Admins group is added to this group automatically. Because this group has full control of the computer, use caution when you add users to it. Backup Operators Members of this group can back up and restore files on a computer, regardless of any permissions that protect those files. This is because the right to perform a backup takes precedence over all file permissions. Members of this group cannot change security settings. Cryptographic Operators Members of this group are authorized to perform cryptographic operations. Distributed COM Users Members of this group are allowed to start, activate, and use DCOM objects on a computer. Event Log Readers Members of this group can read event logs from local machine. Guests In a computer joined to the domain, members of this group have a temporary profile created at log on, and when the member logs off, the profile is deleted. Profiles in workgroup environments are not deleted. The Guest account (which is disabled by default) is also a default member of this group.
Members of this group will have a temporary profile created at log on, and when the member logs off, the profile will be deleted. The Guest account (which is disabled by default) is also a default member of this group.Hyper-V Administrators Members of this group have complete and unrestricted access to all features of Hyper-V. IIS_IUSRS This is a built-in group that is used by Internet Information Services (IIS). Network Configuration Operators Members of this group can make changes to TCP/IP settings, and they can renew and release TCP/IP addresses. This group has no default members. Performance Log Users Members of this group can manage performance counters, logs, and alerts on a computer both locally and from remote clients without being a member of the Administrators group. Performance Monitor Users Members of this group can monitor performance counters on a computer locally and from remote clients without being a member of the Administrators group or the Performance Log Users groups Power Users By default, members of this group have no more user rights or permissions than a standard user account. The Power Users group in previous versions of Windows was designed to give users specific administrator rights and permissions to perform common system tasks. In this version of Windows, standard user accounts inherently have the ability to perform most common configuration tasks, such as changing time zones. For legacy applications that require the same Power User rights and permissions that were present in previous versions of Windows, administrators can apply a security template that enables the Power Users group to assume the same rights and permissions that were present in previous versions of Windows. Remote Desktop Users Members of this group can log on to the computer remotely. Remote Management Users Members of this group can access WMI resources over management protocols (such as WS-Management via the Windows Remote Management service). This applies only to WMI namespaces that grant access to the user. Replicator This group supports replication functions. The only member of the Replicator group should be a domain user account that is used to log on the Replicator services of a domain controller. Do not add user accounts of actual users to this group. System Managed Accounts Group Members of this group are managed by the system. Users Members of this group can perform common tasks, such as running applications, using local and network printers, and locking the computer. Members of this group cannot share directories or create local printers. By default, the Domain Users, Authenticated Users, and Interactive groups are members of this group.Therefore, any user account that is created in the domain becomes a member of this group. HomeUsers HomeUsers Security Group
Contents
- Option One: To Add Groups to Users from Users folder in Local Users and Groups
- Option Two: To Remove Groups from Users from Users folder in Local Users and Groups
- Option Three: To Add Users to Groups from Groups folder in Local Users and Groups
- Option Four: To Remove Users from Groups from Groups folder in Local Users and Groups
- Option Five: To Add User to Group in Command Prompt
- Option Six: To Remove User from Group in Command Prompt
- Option Seven: To Add User to Group in PowerShell
- Option Eight: To Remove User from Group in PowerShell
The Local Users and Groups is only available in the Windows 10 Pro, Enterprise, and Education editions.
All editions can use Option Five below.
1 Press the Win + R keys to open Run, type lusrmgr.msc into Run, and click/tap on OK to open Local Users and Groups.
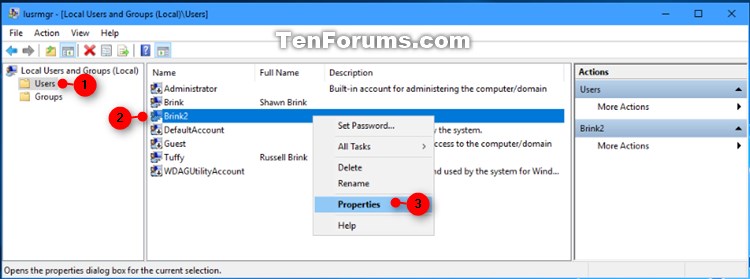
2 Click/tap on Users in the left pane of Local Users and Groups. (see screenshot below step 3)
3 Right click or press and hold on the user name (ex: "Brink2") you want to add groups to be a member of, and click/tap on Properties. (see screenshot below)
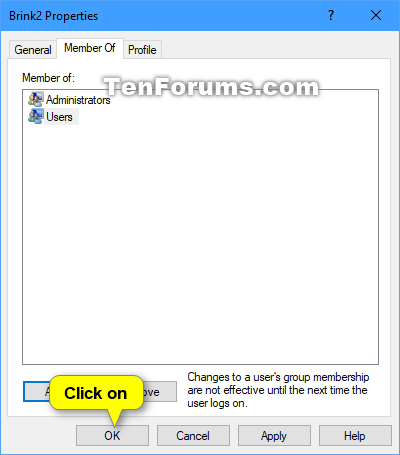
4 Click/tap on the Member Of tab, and click/tap on the Add button. (see screenshot below)
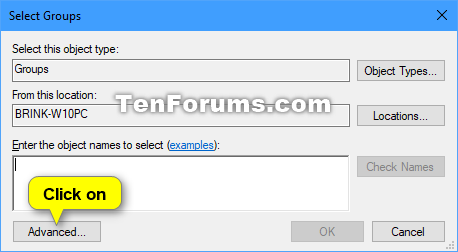
5 Click/tap on the Advanced button. (see screenshot below)
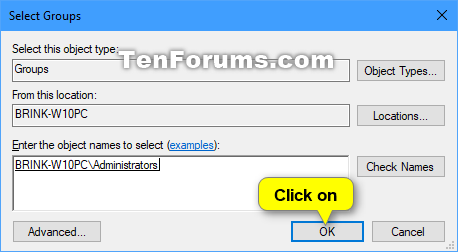
6 Click/tap on the Find Now button, select the name of the group (ex: "Administrators") you want to add, and click/tap on OK. (see screenshot below)
If you like, you can press and hold the Ctrl key to select more than one group.
7 Click/tap on OK. (see screenshot below)
8 Click/tap on OK. (see screenshot below)
9 When finished, you can close Local Users and Groups if you like.
The Local Users and Groups is only available in the Windows 10 Pro, Enterprise, and Education editions.
All editions can use Option Six below.
1 Press the Win + R keys to open Run, type lusrmgr.msc into Run, and click/tap on OK to open Local Users and Groups.
2 Click/tap on Users in the left pane of Local Users and Groups. (see screenshot below step 3)
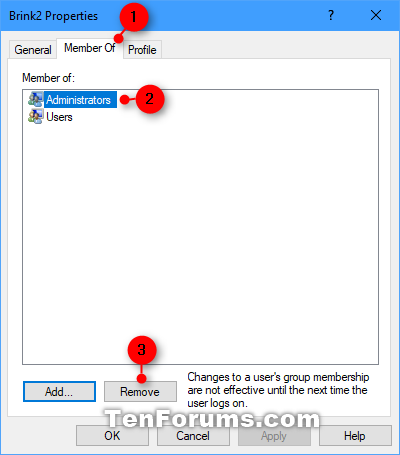
3 Right click or press and hold on the user name (ex: "Brink2") you want to remove groups from, and click/tap on Properties. (see screenshot below)
4 Click/tap on the Member Of tab, select the group (ex: "Administrators") you want to remove, and click/tap on the Remove button. (see screenshot below)
If you like, you can press and hold the Ctrl key to select more than one group.
5 Click/tap on OK. (see screenshot below)
6 When finished, you can close Local Users and Groups if you like.
The Local Users and Groups is only available in the Windows 10 Pro, Enterprise, and Education editions.
All editions can use Option Five below.
1 Press the Win + R keys to open Run, type lusrmgr.msc into Run, and click/tap on OK to open Local Users and Groups.
2 Click/tap on Groups in the left pane of Local Users and Groups. (see screenshot below step 3)
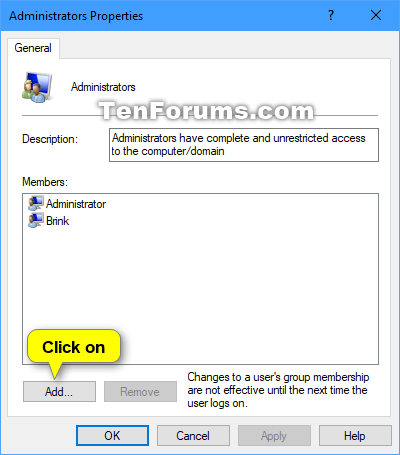
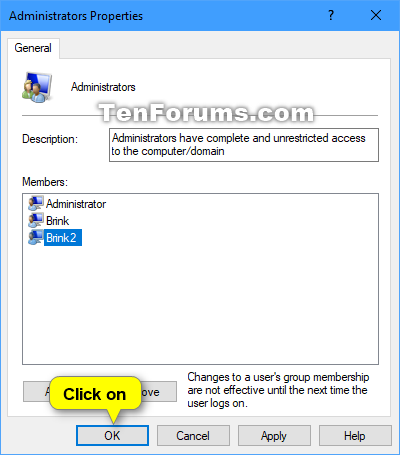
3 Right click or press and hold on the group name (ex: "Administrators") you want to add users as members of, and click/tap on Properties. (see screenshot below)
4 Click/tap on the Add button. (see screenshot below)
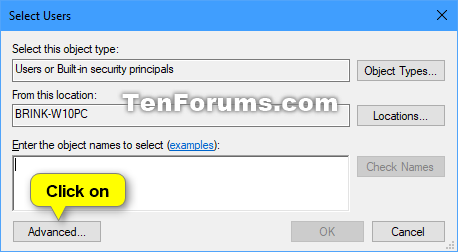
5 Click/tap on the Advanced button. (see screenshot below)
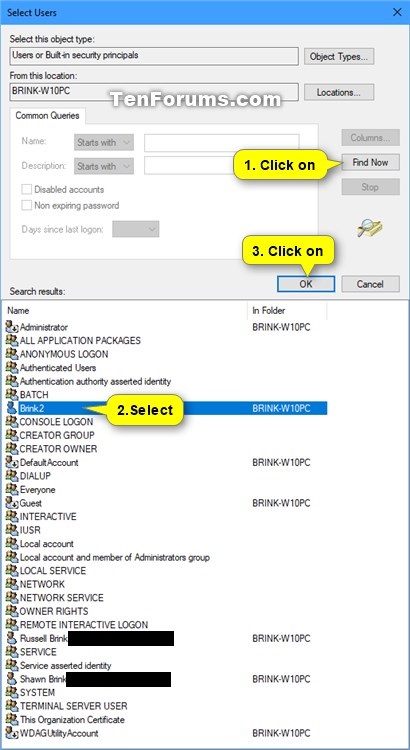
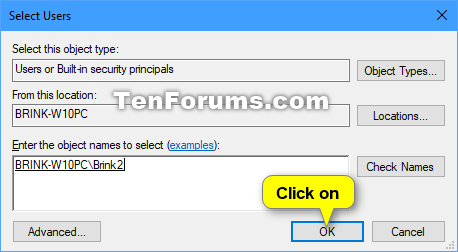
6 Click/tap on the Find Now button, select the name of the user account (ex: "Brink2") you want to add as a member, and click/tap on OK. (see screenshot below)
If you like, you can press and hold the Ctrl key to select more than one user.
7 Click/tap on OK. (see screenshot below)
8 Click/tap on OK. (see screenshot below)
9 When finished, you can close Local Users and Groups if you like.
The Local Users and Groups is only available in the Windows 10 Pro, Enterprise, and Education editions.
All editions can use Option Six below.
1 Press the Win + R keys to open Run, type lusrmgr.msc into Run, and click/tap on OK to open Local Users and Groups.
2 Click/tap on Groups in the left pane of Local Users and Groups. (see screenshot below step 3)
3 Right click or press and hold on the group name (ex: "Administrators") you want to remove users as members of, and click/tap on Properties. (see screenshot below)
4 Select a user name (ex: "Brink2") you want to remove as a member, and click/tap on the Remove button. (see screenshot below)
If you like, you can press and hold the Ctrl key to select more than one user.
5 Click/tap on OK. (see screenshot below)
6 When finished, you can close Local Users and Groups if you like.
1 Open an elevated command prompt.
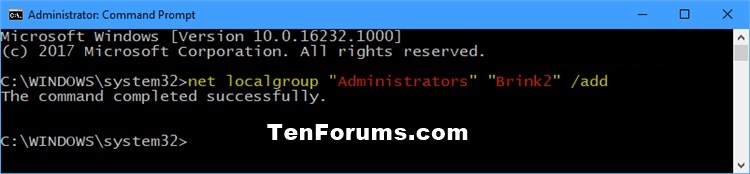
2 Type the command below into the elevated command prompt, and press Enter. (see screenshot below)3 When finished, you can close the elevated command prompt if you like.
net localgroup "Group" "User" /add
Substitute Group in the command above with the actual name of the group (ex: "Administrators") you want the user to be a member of.
Substitute User in the command above with the actual name of the user account (ex: "Brink2") you want to be a member of the group.
For example:net localgroup "Administrators" "Brink2" /add
1 Open an elevated command prompt.
2 Type the command below into the elevated command prompt, and press Enter. (see screenshot below)3 When finished, you can close the elevated command prompt if you like.
net localgroup "Group" "User" /delete
Substitute Group in the command above with the actual name of the group (ex: "Administrators") you want the user to no longer be a member of.
Substitute User in the command above with the actual name of the user account (ex: "Brink2") you want to no longer be a member of the group.
For example:net localgroup "Administrators" "Brink2" /delete
For more Add-LocalGroupMember command options and details, see: Add-LocalGroupMember - Microsoft Docs
1 Open an elevated PowerShell.
2 Type the command below into the elevated PowerShell, and press Enter. (see screenshot below)3 When finished, you can close the elevated PowerShell if you like.
Add-LocalGroupMember -Group "Group" -Member "User"
Substitute Group in the command above with the actual name of the group (ex: "Administrators") you want the user to be a member of.
Substitute User in the command above with the actual name of the user account (ex: "Brink2") you want to be a member of the group.
For example:Add-LocalGroupMember -Group "Administrators" -Member "Brink2"
For more Remove-LocalGroupMember command options and details, see: Remove-LocalGroupMember - Microsoft Docs
1 Open an elevated PowerShell.
2 Type the command below into the elevated PowerShell, and press Enter. (see screenshot below)3 When finished, you can close the elevated PowerShell if you like.
Remove-LocalGroupMember -Group "Group" -Member "User"
Substitute Group in the command above with the actual name of the group (ex: "Administrators") you want the user to no longer be a member of.
Substitute User in the command above with the actual name of the user account (ex: "Brink2") you want to no longer be a member of the group.
For example:Remove-LocalGroupMember -Group "Administrators" -Member "Brink2"
That's it,
Shawn
Related Tutorials
- How to Add a Local Account or Microsoft Account in Windows 10
- How to Add a Guest Account in Windows 10
- How to Delete a User Account in Windows 10
- How to Enable or Disable User Accounts in Windows 10
- How to Enable or Disable Built-in Elevated Administrator Account in Windows 10
- How to Change Account Type of Users in Windows 10
- How to Check if User is a Local Account or Microsoft Account in Windows 10
- How to Switch to a Local Account from a Microsoft Account in Windows 10
- How to Switch to a Microsoft Account from a Local Account in Windows 10
- How to Determine if Users are an Administrator or Standard User in Windows 10
- How to Change Owner of File, Folder, Drive, or Registry Key in Windows 10
- How to Change User Rights Assignment Security Policy Settings in Windows 10
- How to Add Reset Permissions to Context Menu in Windows
- Enable or Disable Inherited Permissions for Files and Folders in Windows
- How to Add Inherited Permissions Context Menu in Windows
- Change Permissions of File, Folder, Drive, or Registry Key for Users and Groups in Windows 10
- How to Add List Permissions Context Menu in Windows
- How to Backup and Restore Permissions of Files, Folders, or Drives in Windows 10
- How to Add or Remove Remote Desktop Users in Windows
- How to Allow or Prevent Users and Groups to Shut down System in Windows 10
- How to Allow or Prevent Users and Groups to Change Time Zone in Windows 10
- How to Allow or Prevent Users and Groups to Sign in Locally to Windows 10
- How to Deny Users and Groups to Sign in Locally to Windows 10
- How to Allow or Prevent Users and Groups to Log on with Remote Desktop in Windows 10
- How to Deny Users and Groups to Log on with Remote Desktop in Windows 10
- How to Allow or Prevent Users and Groups to Create a Pagefile in Windows 10
Add or Remove Users from Groups in Windows 10
-
New #1
Hi Shawn,
After a belated upgrade to 1809 ( I had to do it manually as it didn't do it automatically as it normally does), I noticed the following event in the event log which repeatedly occurs. From what the message says it appears that "System" is not authorised to have access. Not wishing to go down the incorrect path, can you advise.
Thanks.
Log Name: Application
Source: Microsoft-Windows-Perflib
Date: 12/07/2019 10:19:19
Event ID: 1000 Task Category: None Level: Error Keywords: User: SYSTEM Computer: Home-PC
Description: Access to performance data was denied to user "SYSTEM" (value from GetUserName() for the running thread) as attempted from module "C:\Program Files (x86)\VMware\VMware Player\vmware-authd.exe" (value from GetModuleFileName() for the binary that issued the query).
Event Xml: <Event xmlns="http://schemas.microsoft.com/win/2004/08/events/event">
<System> <Provider Name="Microsoft-Windows-Perflib" Guid="{13b197bd-7cee-4b4e-8dd0-59314ce374ce}" />
<EventID>1000</EventID> <Version>1</Version> <Level>2</Level> <Task>0</Task> <Opcode>0</Opcode> <Keywords>0x8000000000000000</Keywords> <TimeCreated SystemTime="2019-07-12T09:19:19.616243700Z" />
<EventRecordID>3272</EventRecordID> <Correlation />
<Execution ProcessID="2480" ThreadID="3136" />
<Channel>Application</Channel> <Computer>Home-PC</Computer> <Security UserID="S-1-5-18" />
</System> <EventData> <Data Name="User">SYSTEM</Data>
<Data Name="Module">C:\Program Files (x86)\VMware\VMware Player\vmware-authd.exe</Data>
</EventData>
</Event>
-
-
New #3
 NoteLocal Users and Groups is only available in the Windows 10 Pro, Enterprise, and Education editions.
All editions can use Option Five below.
For Windows 10 Home users who don't feel confident using a command prompt there is another option. Run Netplwiz, select a user then click Properties. You can change their group membership there too.

-
-
New #5
Thank you for your responses and information.
I have run Netplwiz and have the following in the usernames:- Administrator, HomeGroupUser$ and the three user names of the people that use this PC. Under the "Group" heading they all have HomeUsers and in addition the other two users have "Users". I have instead "Administrators" which is also associated with the Administrator username.
So, relating to the error above, what if anything am I missing or is incorrect in the user accounts? Sorry for being a bit dumb here but lack of knowledge on this is making me wary of moving forward without understanding what I am doing.
-
New #6
Are you having any issues with VMware Player?
The error is for System being denied access to the "C:\Program Files (x86)\VMware\VMware Player\vmware-authd.exe" file.
I would also recommend to report the full error message to vmware support to see if they may have a fix for it in the next update.
-
New #7
OK Shawn, thank you, I will report it. As far as I am aware the VMware Player is running OK but as this happened after the last VMware update it does look suspicious.
-
-
-
New #9
Hi Shawn,
I posted on two separate occasions on the VMWare sites but got no response. I also started to have power shutdowns/restarts as well. The shutdowns appeared to be down to driver problems and after some considerable time trawling through various VMWare forums, I found a post which mentioned problems with the VMPerfmon.dll. The problem stated that the permissions were not set correctly. Adding/Setting "Network Services" and "Local Services" both to Full Control appears to have sorted the original problem reported here. The shutdowns have considerably reduced, I think only having one in the last couple of weeks. Hopefully, things will be more stable now.

Add or Remove Users from Groups in Windows 10
How to Add or Remove Users from Groups in Windows 10Published by Shawn BrinkCategory: User Accounts
16 Feb 2020


 Quote
Quote


Tutorial Categories

Related Discussions
