

Information
To run a Windows Insider version of Windows 10, your PC does not have to be opted in for Insider builds. It's enough to have one machine opted in, use it to get Insider build upgrade and then use an ISO image made from upgrade files to upgrade other machines. This naturally only applies if the ISO is the same edition and bit version as the other machines; if you run W10 PRO x64 on your physical machines, upgrade and ISO needs to be done on a W10 PRO x64 machine.
There has been quite a lot of reports from our members and other Windows Insiders alike about upgrade failing to download. This tutorial will show a method to always get new Insider build upgrade, even when your physical computers fail in downloading it.
Tutorial is made for and instructions apply to Hyper-V virtualisation, but instructions can be applied to Oracle VirtualBox and VMware Workstation, too. Unfortunately free VMware Workstation Player does not include a checkpoint / snapshot feature, thus these instructions cannot be used as is with it.
I am trying to make these instructions clear enough for beginners, therefore there might be some steps explained you already know. Instructions can be summarized on quite a short list; if you know what you are doing, this list is enough instructions for you:
- Clean install latest official release of Windows 10 on VM (when writing this it would be version 1703 build 15063.0, see download instructions). Alternatively, clean install latest officially released Windows Insider build
- Update VM fully
- Opt in for Insider Fast Ring (tutorial)
- Create a checkpoint / snapshot (tutorial)
- Download Insider build upgrade
- Make ISO (tutorial)
- Shutdown VM
- When next Insider build is released, apply checkpoint / snapshot, repeat steps 5, 6 and 7
For the rest of you, see the detailed instructions below. It might look complicated but is in fact extremely easy.
Part One: Install Windows on a VM Part Two: Download Insider build upgrade Part Three: Create ISO image Part Four: Next build upgrade: Apply checkpoint
Notice that you can click / tap screenshots to enlarge them.
1.1) Set up Hyper-V, create a virtual machine (tutorial)
1.2) When VM has been created, open its settings before starting Windows installation. Set checkpoint mode to Standard, uncheck Use automatic checkpoints:
1.3) Install Windows 10 normally as you would on any other machine, physical or virtual. You can use a local (offline), Microsoft or Azure AD (workplace) account, as you prefer. Skip the product key, for our purpose the VM does not have to be activated:
1.4) When installed, update Windows fully until Windows Update tells you it's up to date:
1.5) Install TenForums UUPtoISO tool (tutorial). Do not run tool yet
1.6) Opt in for Insider Fast Ring (tutorial)
1.7) When the ring selection prompt is shown, let it stay open. Before clicking Confirm create a checkpoint:
1.8) Name the checkpoint as you wish:
1.9) Wait until the checkpoint has been created (indicator can be seen in VM window's status bar at bottom):
1.10) When checkpoint is done, confirm your Insider Ring selection:
Windows will restart to apply the settings.
2.1) After a restart, Windows Update will find the build upgrade immediately, downloading the latest available Insider build according to your ring selection:
Note
Microsoft has had some severe issues lately with Insider build upgrade delivery. Even in this example now, Windows being clean installed, all settings and registry default, unmodified, I got a notification about download failing. If this happens simply click Retry, do not edit registry or try any fixes you have heard of or read about!
Based on my experience, if downloading upgrade fails once it will probably fail second time somewhere between 50% and 90% of downloading upgrade. If so, click Retry again; the download picks up now from where it left and will finish soon.
I have used this method exclusively to get upgrade ISO images, ten or so of times with each new build (PRO and Education editions in Finnish, Swedish, German, UK and US English, Enterprise in Finnish and US English. This issue never occurs more than above mentioned two times, and again it's every time fixed by clicking Retry.
3.1) When upgrade has been downloaded and initialized, do not click Restart now! Instead, launch UUPtoISO tool and create ISO image (tutorial):
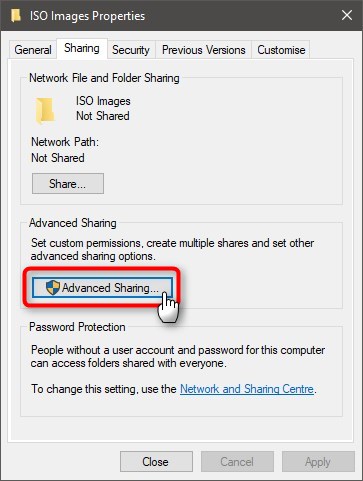
3.2) While ISO will be created (it takes a while), create a new folder anywhere on your host computer, naming it as you prefer. Right click the folder, select Properties, select Sharing tab and select Advanced Sharing:
3.3) Select Share this folder, give the share a simple name, click Permissions:
3.4) Give Full Control to Everyone:
3.5) Click OK to close Permissions, click OK to close Advanced Sharing, click Close to close Properties
3.6) When ISO is done, press any key to exit UUPtoISO script to Command Prompt. You will be automatically taken to your UUPtoISO folder. Enter the following command to access the host folder you created and shared in above steps 3.2 through 3.5:
net use W: \\YourHostComputerName\YourShareName
For instance, if your host PC name is MyMonsterRig and the shared folder has a share name ISO-Images, the command would be:
net use W: \\MyMonsterRig\ISO-Images
If the shared folder path contains spaces, it must be given within quotes:
net use W: "\\MyMonsterRig\My ISO Images"
3.7) The VM will now see the host shared folder as W: drive. Copy the newly created ISO file to host (W: drive) with following command:
copy *.iso W:\
Using this method to copy from VM to host is really fast, this won't take long
3.8) When ISO is copied to host, shut down Windows on VM selecting Shut down instead of Update and shut down:
3.9) You can now upgrade your host from ISO, copy it to other machines or burn to a DVD / USB flash drive to upgrade any machine running same edition and bit architecture.
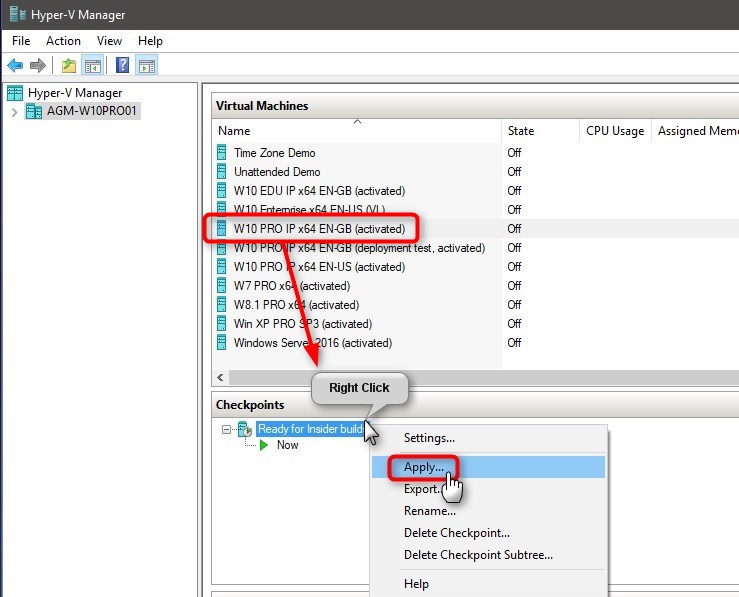
4.1) When next Insider build will be released, select the Insider VM in Hyper-V Manager's Virtual Machines pane, right click the checkpoint you made in step 1.7 in Checkpoints pane and select Apply:
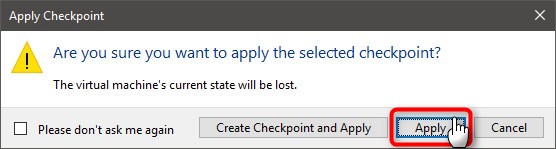
4.2) Click Apply:
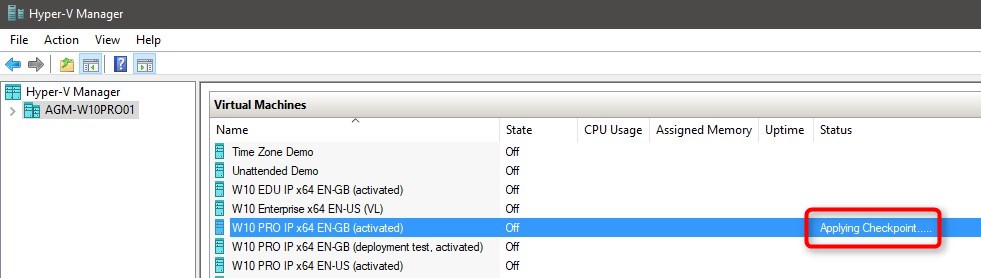
4.3) Wait until checkpoint is applied and virtual machine's status shows Saved:
4.4) Start VM. As we are using Standard checkpoints instead of default Production checkpoints, you will be taken to exact situation when the checkpoint was created in step 1.7:
4.5) Do as told in Part Two and Part Three to get the next Insider build ISO, upgrade will again be immediately found.
That's it geeks!
Kari
Related Tutorials
- How to Download a Windows 10 ISO File
- How to Create a Windows 10 ISO Image File from UUP Upgrade Files
- How to create a Windows 10 ISO image for clean, in-place upgrade and repair install
- How to Get Windows Insider Fast Ring ISO image for latest build
Use Hyper-V virtual machine to get Windows 10 Insider ISO
-
New #1
That note in part 2 is very important!
Microsoft has had some severe issues lately with Insider build upgrade delivery. Even in this example now, Windows being clean installed, all settings and registry default, unmodified, I got a notification about download failing. If this happens simply click Retry, do not edit registry or try any fixes you have heard of or read about!
-
New #2
I assume the checkpoint is simply to avoid starting from scratch i.e. reinstalling 15063 in event an upgrade has failed?
As you say, vmware player free does not support checkpoints or similar, but you could make an Macrium Reflect image backup which would pretty much be same as a checkpoint - slightly more cumbersome as you would need to boot from a Macrium Rescue iso (or install in vm and create boot entry).
Have I understood you correctly, or am I missing something?
-
New #3
Just remember, I am talking about getting upgrade on a VM.
My recommendation not to use any fixes, just click Retry, is based on what is told in rest of that note: I've now used this method to get upgrade ISO images quite extensively, upgrading three editions in several languages per build, upgrade on Hyper-V vm has always worked with one max two Retry clicks.
-
New #4
Yes, you are right. Using a standard checkpoint when next build is released, it takes mere seconds for VM to restore to this point:

Just click Confirm, restart and start downloading the new build.
The point is to eliminate all possible issues preventing an upgrade to be downloaded. Clean install last official release, update fully, create checkpoint before downloading upgrade. When done, when next build is released, apply checkpoint to restore Windows to pristine, fresh condition and repeat.
Every time you download an upgrade it's done on fresh, clean install without any tweaks, edits, registry hacks and such, to guarantee upgrade download.
-
-
New #6
Hyper-V standard checkpoints offer something that a Macrium image cannot do: a standard checkpoint stores and restores current app state. In other words if you have created a checkpoint when you have already gone through opting in, adding an Insider account and are just short of clicking Confirm to get started, when checkpoint is applied you will have exactly the same state, Settings app already open, ring selection prompt open waiting the Confirm button to be clicked.
Not only is a standard checkpoint created in fraction of time needed to make a system image (checkpoint takes 10 to 30 seconds to create, depending on how much stuff you have installed and stored on VM), it is also much faster when applied (compared to restoring an image), less than a minute from clicking Apply to desktop, and when on desktop you are exactly where you left Windows with saved app state, instead of having to boot normally as you must do after restoring an image.
Use Hyper-V virtual machine to get Windows 10 Insider ISO
Set up and use Hyper-V virtual machine to get Windows 10 Insider ISO imagesPublished by Kari "Kalsarikänni" FinnCategory: Virtualization
03 Feb 2019


 Quote
Quote
Tutorial Categories

Related Discussions
