

How to Enable or Disable Secure Boot on Windows 10 PC
Secure Boot is a security standard developed by members of the PC industry to help make sure that your PC boots using only software that is trusted by the PC manufacturer. Support for Secure Boot was introduced in Windows 8, and also supported by Windows 10.
When the PC starts, the firmware checks the signature of each piece of boot software, including firmware drivers (Option ROMs), EFI applications, and the operating system. If the signatures are good, the PC boots, and the firmware gives control to the operating system.
Secure boot prevents a sophisticated and dangerous type of malwarecalled a rootkitfrom loading when you start your device. Rootkits use the same privileges as the operating system and start before it, which means they can completely hide themselves. Rootkits are often part of an entire suite of malware that can bypass local logins, record passwords and keystrokes, transfer private files, and capture cryptographic data.
Secure Boot requires a PC with a UEFI firmware chip that meets the UEFI Specifications Version 2.3.1, Errata C or higher, and has Windows 8.1 or Windows 10 installed with UEFI.
Sometimes you may need to disable Secure Boot to run some PC graphics cards, hardware, or operating systems such as Linux or previous version of Windows. Before disabling Secure Boot, consider whether it is necessary. From time to time, your manufacturer may update the list of trusted hardware, drivers, and operating systems for your PC. To check for updates, go to Windows Update, or check your manufacturer's website.
For more information about Secure Boot, see:
- Windows 11 and Secure Boot
- Secure Boot
- Secure boot - Device protection in Windows Defender Security Center
- Secure the Windows 10 boot process | Microsoft Docs
- Disabling Secure Boot
- Device protection in Windows Defender Security Center - Secure boot | Windows Security Support
This tutorial will show you how to enable or disable Secure Boot on your Windows 10 PC.
The way you enable and disable Secure Boot varies by PC and motherboard manufacturer. You should read your manufacturer's manual or support site for specific instructions.
If you would like to post screenshots below of your specific PC manufacturer Secure Boot settings, then please feel free to do so to help others.
Contents
- Option One: To Enable or Disable Secure Boot on ASRock x79 Motherboard
- Option Two: To Enable or Disable Secure Boot on Acer PCs
- Option Three: To Enable or Disable Secure Boot on HP and Compaq PCs
1 Boot to your UEFI firmware settings.
2 Do step 3 (enable) or step 4 (disable) for what you want to do.
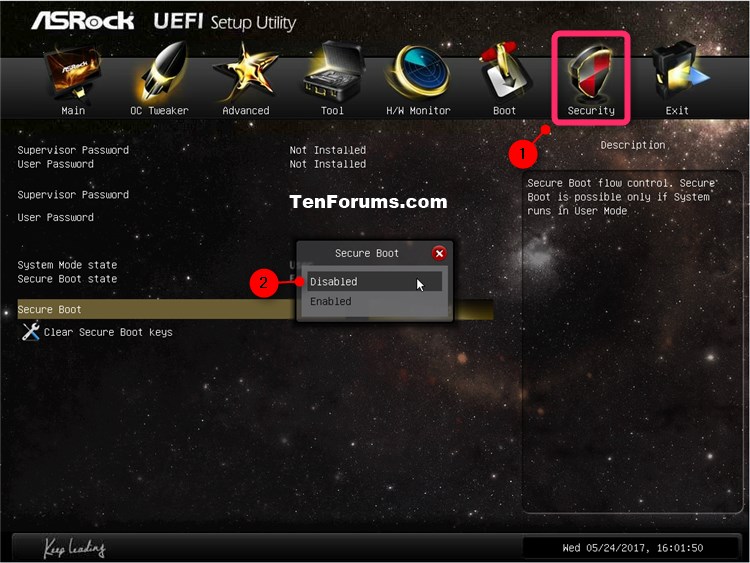
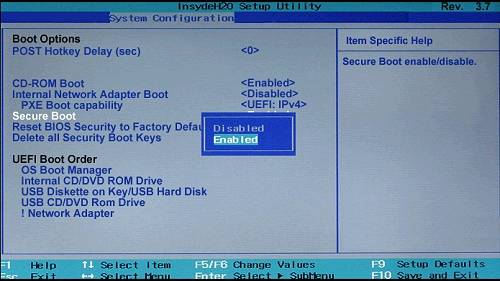
A) Click/tap on the Security menu icon, and select Enabled for the Secure Boot setting. (see screenshot below)
B) If you haven't already, click/tap on the Install default Secure Boot keys link, and click/tap on Yes to confirm. (see screenshots below)
C) Go to step 5 below.
A) Click/tap on the Security menu icon, select Disabled for the Secure Boot setting, and go to step 5 below. (see screenshot below)
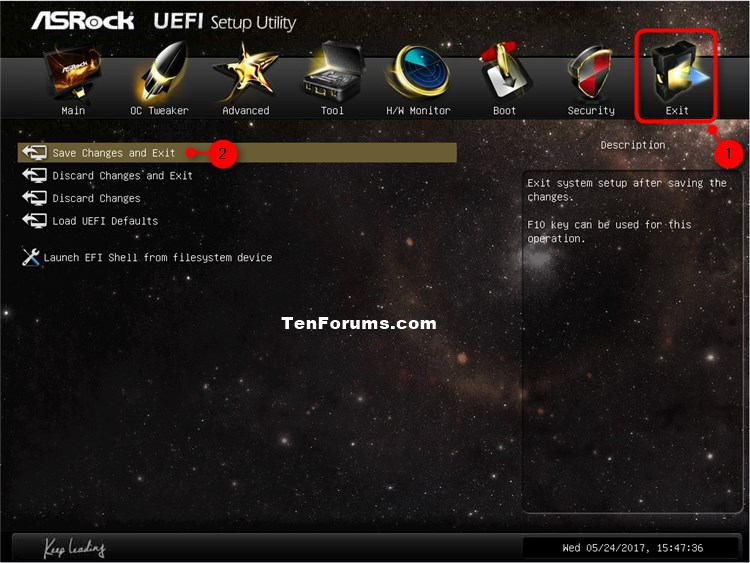
5 Click/tap on the Exit menu icon, and click/tap on the Save Changes and Exit option. (see screenshot below)
6 Click/tap on Yes to confirm. (see screenshot below)
7 Your PC will now reboot.
That's it,
Shawn
Related Tutorials
- How to Check if Secure Boot is Enabled or Disabled in Windows 10
- How to Check if Windows 10 is using UEFI or Legacy BIOS
- How to Boot to UEFI Firmware Settings from inside Windows 10
- How to Convert Windows 10 from Legacy BIOS to UEFI without Data Loss
- How to Configure Early Launch Antimalware Boot-Start Driver Initialization Policy in Windows 8 and 10
Enable or Disable Secure Boot on Windows 10 PC
-
New #1
Hello guys, my Acer laptop have different options in BIOS. I have Windows 10 installed with Ubuntu 16.04, but only Windows boots at startup, and i have no option for Ubuntu. Previous i had Windows 8.1 along Ubuntu, and i haven't this problem. Is there a way to do it, or i have to get back to Windows 8.1?
PS. It seems that i cannot attach files to show you a screenshot with my BIOS (File Upload Manager doesn't work). I have an option called Secure Boot Mode wich is set to Custom, and after i have Erase all Secure Boot Setting, Select an UEFI file as trusted for executing and Restore Secure Boot to Factory Default.
-
New #2
Hello br4to92, and welcome to Ten Forums. :)
The dual boot issue would be a good question to ask in our Installation and Upgrade forum area.
If you're wanting to disable Secure Boot, then the "Erase all Secure Boot Setting" should be the correct option.
-
New #3
Hello and thank you for the warm welcome :) I'll start a new thread at Installation & Upgrade area, at your suggestion. I had some issues with booting (cannot boot into any installed OS) after i've done some changes on the hard-disk with EasyUEFI (i was not knowing what i was doing), but i've reinstalled Windows 10 and now everything's ok, except the part with dual-booting with Ubuntu. I hope i'll find some answers regarding this, because on my old laptop i was able to dual boot Windows 8.1 and Ubuntu very easy. So thanks again and have a nice day!
-
-
New #5
Disable Secure Boot on a Dell Inspiron 7779
Examples were asked for:
This BIOS/UEFI contains 14 sections
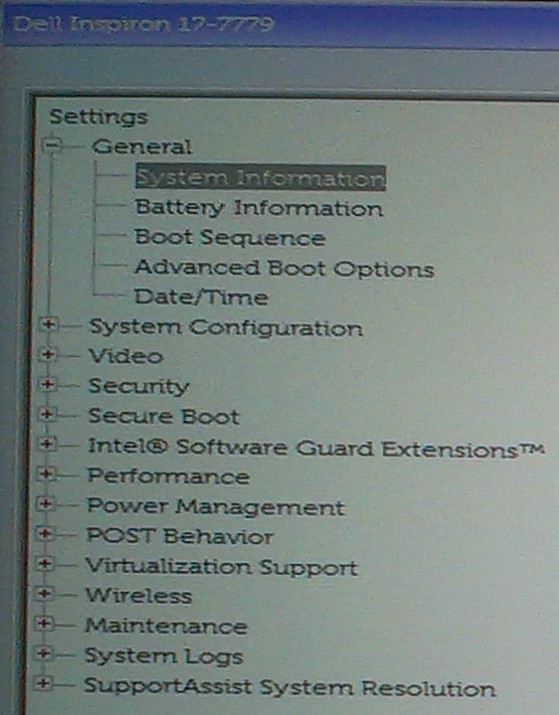
so in the procedure that follows, I refer to them by number to avoid getting lost halfway.
So the General section is referred to as 01 General.
And the sub-sections within each one are also numbered.
So the General section, System information sub-section is referred to as 01.01 General, System information.
Added 24th May 2021 - According to a video identified in a Dell forum thread [found by dalchina] , all I needed to have done in the Bios was go to System configuration, USB configuration and set both Enable boot support and Enable external USB port. I have not yet had a chance to test that suggestion but, if it is correct, you do not need to read the rest of this post.
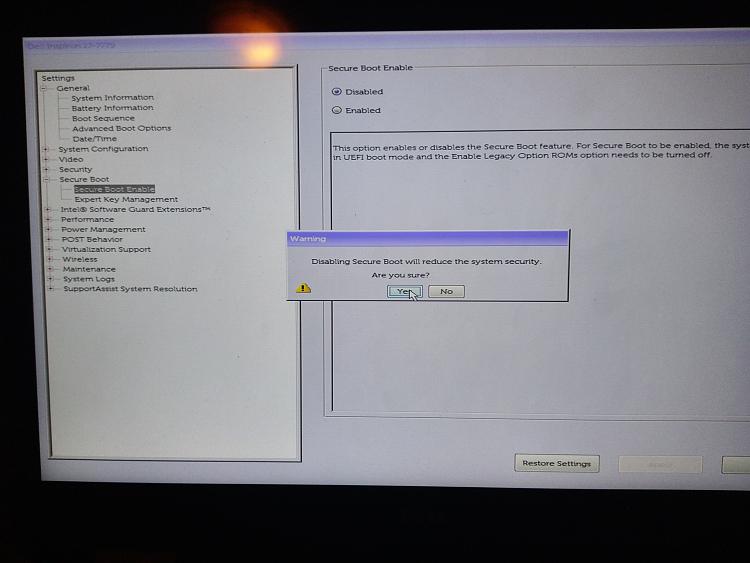
In 05.01 Secure boot, Secure boot enable - select Disabled then click on Yes in the confirmation dialog that appears.
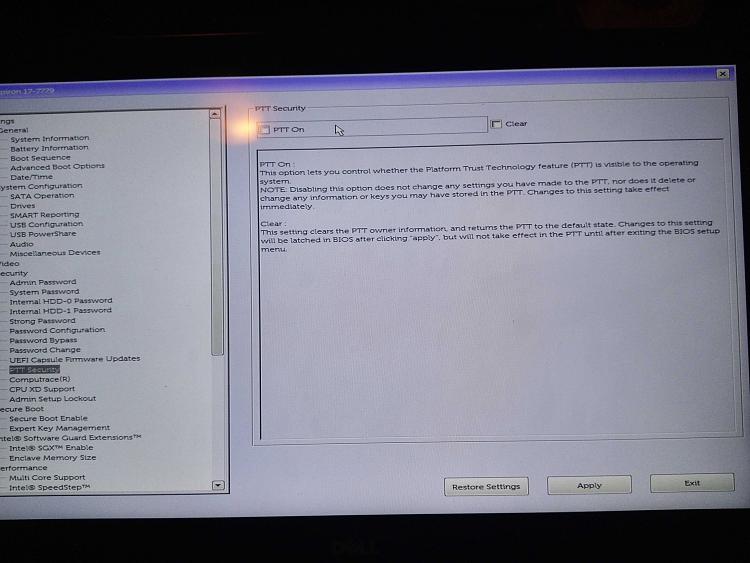
In 04.10 Security, PTT security - clear the checkbox for PTT On. Do not touch the checkbox labelled Clear because that does a lot more as is explained in the description on that screen.
In 01.04 General, Advanced boot options - set the checkbox for Enable legacy option ROMs checkbox then click on OK in the confirmation dialog that appears.

That's it. All done. You can now Exit the BIOS/UEFI and save the new settings.
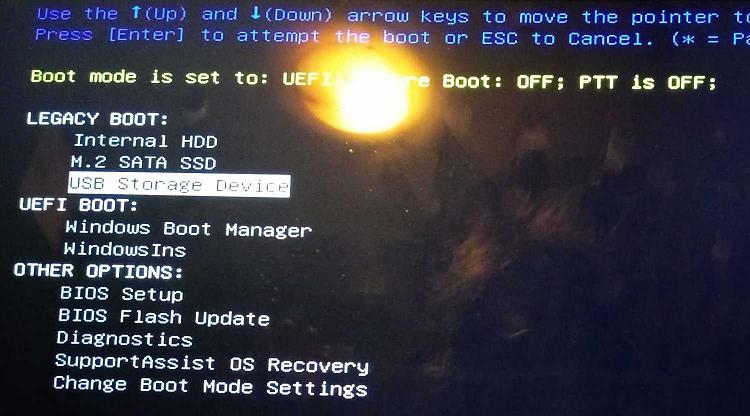
You can check that Secure Boot really is disabled by rebooting & pressing F12 while the Dell logo is onscreen in order to open the Boot options menu. The heading in yellow says Secure boot Off & PTT Off and a Legacy boot section exists. It is in that Legacy boot section that you would be able to select a bootable USB stick that you had connected.
DenisLast edited by Try3; 24 May 2021 at 11:17.
-
-
New #7
The Acer link on Option Two no longer works. looking at the video I see instructions that appear only to be valid for Win 8.
-
-
-
New #9
Hi everyone,
I have read it should be better to have Secure Boot disabled while installing windows.
Is the reason for this recommendation due to possible compatibility problems with older hardware or BIOS versions?
Interestingly I never had any problems - admittedly the hardware was mostly quite recent.
If the setup starts without any problems, there are no disadvantages to having Secure Boot switched on during the installation - right?
Thanks and greetings,
Martin
Enable or Disable Secure Boot on Windows 10 PC
How to Enable or Disable Secure Boot on Windows 10 PCPublished by Shawn BrinkCategory: Security System
29 Aug 2023


 Quote
Quote


Tutorial Categories

Related Discussions
