

Information
The most boring part of computing is waiting operating system to be installed. Installing Windows 10 can take anything from 10 to over 30 minutes (depending on hardware). The low end i5 laptop I am using to write this tutorial with an HDD instead of SSD takes on average of 35 minutes from booting with install USB flash drive to OOBE to start with region selection dialog after last restart required by setup, additional 3 to 4 minutes to get initial user created and wait Windows preparing user profile and getting to desktop.
Of course on state of the art hardware, especially using SSD instead of HDD the time needed to install is only about a third of what I need with this hardware.
Whatever hardware you have, applying Windows install image with DISM (Deployment Image Servicing and Management tool) instead of traditional clean install will significantly reduce the time needed to install Windows. Especially when installing using a customized and personalized Windows image with pre-installed software (see tutorial) you can reduce the time by up to over 50% but even when using a standard Windows install media you get Windows installed at least over 20% faster.
You can use any valid Windows 10 install media, be it made from a self made ISO from Windows Insider or Feature Upgrade (tutorial), a WIM based original ISO Microsoft has available for Windows Insiders (download link in tutorial), or an ESD based ISO made with Media Creation Tool (download link in tutorial).
This tutorial although written for Windows 10 also applies to Windows 7, 8 & 8.1.
1.1) Boot PC from Windows install media (DVD or USB flash drive), continue as in normal clean install until you get to disk options screen. Skip the product key when asked:
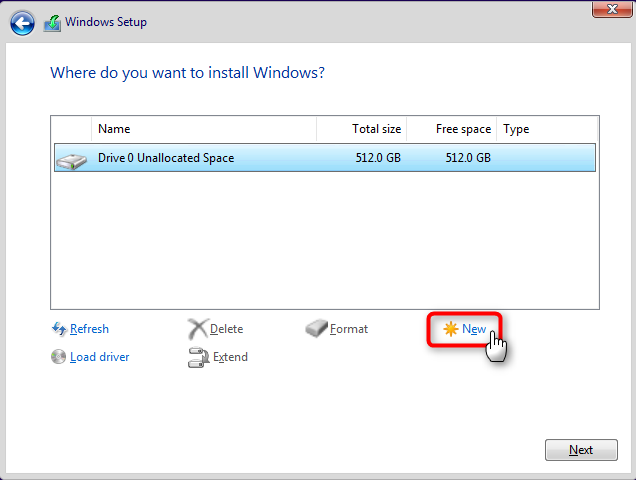
1.2) If disk is unallocated, click New:
(If hard disk is already partitioned as you wish, jump to step 1.5. If you want to wipe an already partitioned disk select existing partitions one by one, select Delete, and when done continue from 1.3.)
1.3) Set the preferred size of Windows partition (#1 in screenshot) and click Apply (#2). If you want to use whole disk for a single Windows partition just accept default value and click Apply:
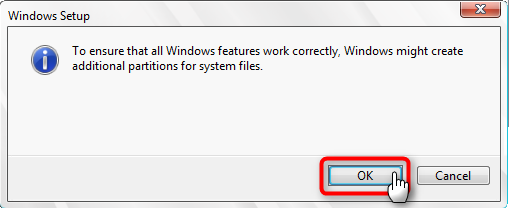
1.4) Click OK:
1.5) On BIOS based machine with MBR disk setup will now create the required System Reserved partition (500 MB) using the rest of allocated space for Windows partition.
On UEFI based machine with GPT disk the Recovery partition (450 MB), EFI System partition (99 MB) and Microsoft Reserved partition (MSR, 16 MB) will be created, rest of the allocated space being used for Windows partition.
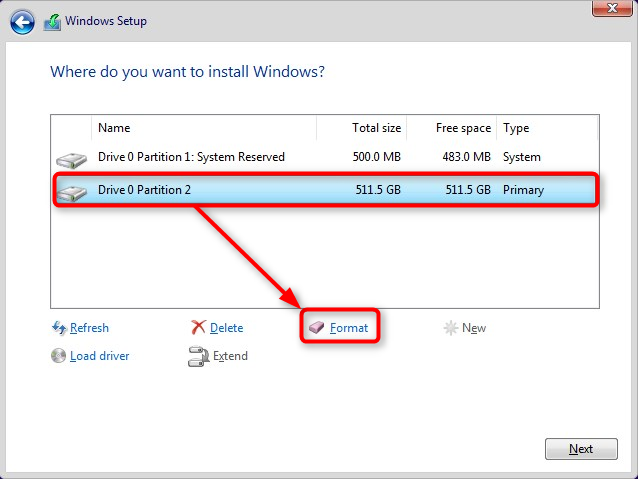
1.6) Select the partition where Windows will be installed (Primary partition) and click Format.
BIOS / MBR:
UEFI / GPT:
1.7) If you did not allocate whole disk for Windows partition, you can leave rest of the disk now unallocated. When Windows has been installed you can use Disk Management to partition remaining space as you wish.
Tip
If you want to allocate a specific amount of space for Windows partition, add 500 MB on BIOS / MBR systems and 565 MB on UEFI / GPT systems.
Example (MBR):
- You want to have a 150 GB Windows partition on a BIOS / MBR system, you should allocate 154,100 MB
(150 * 1024 MB = 153,600 MB = 150 GB plus 500 MB for System reserved partition)
Example (GPT):
- You want to have a 250 GB Windows partition on a UEFI / GPT system, you should allocate 256,565 MB
(250 * 1024 MB = 256,000 MB = 250 GB plus 450 MB Recovery, 99 MB EFI and 16 MB MSR partitions)
1.8) Setup does not show any message when formatting is done. Only indicator of progress is mouse pointer; when formatting, pointer will be an hourglass icon. When ready normal arrow pointer will be shown. Formatting even big hard disks only takes a few seconds.
1.9) When Windows partition has been formatted close Disk Options dialog. This takes you back to Windows Setup screen:
Note
Advanced users can of course use DISKPART to partition HDD / SSD instead of steps told above.
2.1) Back on Windows Setup screen, press SHIFT + F10 to open Command Prompt:
2.2) Typediskpartand press Enter to start Disk Partition Utility (see #1 in screenshot in step 2.5)
2.3) Typelist voland press Enter to see list of volumes / partitions (#2). Note the temporarily assigned drive letters for your newly formatted Windows partition and install media (#3). You recognize Windows partition from its size and install media by its type, Removable if using USB flash drive or DVD-ROM if using a DVD install media
2.4) Typeexitand press Enter to quit Disk Partition Utility (#4)
2.5) Enter following command to check correct index for your preferred Windows 10 edition replacing highlighted drive ID letter with your actual install media ID (#5). Note the index# for edition you want to install (#6):
WIM based install media (Insider or self made ISO):dism /Get-WimInfo /WimFile:D:\Sources\install.wimESD based install media (ISO made using Media Creation Tool):dism /Get-WimInfo /WimFile:D:\Sources\install.esd
2.6) In this example case now the temporary drive ID for partition where I want Windows to be installed is G:, Windows install media (USB drive) is D:, and as I want to install Windows 10 PRO the index# is 1. That's all information I need to apply Windows image (install.wim or install.esd file from Sources folder on install media).
2.7) Enter following command, replacing drive ID letters and Windows edition index# with your actual ones (#1 in screenshot in step 2.9):
dism /Apply-Image /ImageFile:D:\Sources\install.wim /index:1 /ApplyDir:G:\
- ImageFile = Path to install.wim file on install media (install.esd file on media created with Media Creation Tool)
- ApplyDir = temporary drive ID for partition where Windows will be installed followed by :\
2.8) DISM will now apply Windows image to selected partition (G: in this example). This partition will get the correct drive ID C: when image has been applied and Windows restarted. When DISM is ready you can check that Windows system folders have been created withDIR G:command (#2)
2.9) Only one thing missing: we need to create boot records with BCDBOOT command. We can find it on newly created Windows partition, in Windows\System32 folder. Enter following command to write boot records to make hard disk bootable (#3):
G:\Windows\System32\bcdboot G:\Windows
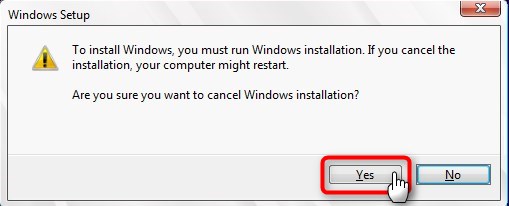
3.1) Close Command Prompt, close Windows Setup:
3.2) Setup thinks now you want to cancel installation, not knowing that Windows has already been installed. Just click Yes to let PC restart:
3.3) Windows will now restart booting from hard disk entering the final phase of setup, Windows Welcome (OOBE) Mode. Select your region, add initial user profile and you are done
That's it!
Kari
Apply Windows Image using DISM Instead of Clean Install
-
New #1
Hi Kari,
Does this tutorial include setting up the Recovery partition?
I wondered if another step was required to copy winre.wim onto there, and then a reagentc step to link to it?
-
-
New #3
-
New #4
I am not sure at which point EFI and WinRE will be populated, can't find any documentation about it.
-
New #5
this nice method works on Hyper-V Virtual Machine also
I attached a Windows ISO 1703 (April 2017) as the first DVD for boot
I put a copy of [ 16299.15.170928-1534.rs3_release_clientconsumer_ret_x64fre_en-us...........esd ] (Sept 2017) on an second ISO DVD with ImgBurn
I followed your instructions above
I now have a clean W10-1709 virtual machine
So simple in fact when you know
thanks Kari
some pictures


Last edited by D4ni3l; 08 Oct 2017 at 08:08.
-
New #6
Hi @Kari,
After todays online forums, I gave this a go (installing as dual boot). I ran into a couple of problems:-
1) I just cannot boot from a 17128 iso no matter what I try. I got round this by booting from a Macrium Reflect Winpe image and running Dism from there, and it worked fine. Hell it is a lot faster!
I then booted into my normal windows, and added a boot entry. Then I ran into next problem.
2) I selected the 17128 installation from the dual boot menu, and it just would not boot into the new installation, just getting into a reboot loop and eventually ending back at dual bot menu after quite some time. I then used the Macrium Deploy option and selected the 17128 installation and BAM - it booted straight to OOBE in seconds.
Running deploy, it complained about the standard SATA controller and let me install the AMD version, which I always had to manually install after a clean install, and worked. So I am guessing there is some incompatibility with the standard windows SATA controller and 17128 (1803 versions) on AMD pc.
Now I know what to do, I can clean install fine on host pc now.
Many thanks for advice and this great guide, even if I do it a little differently.
Thinking about it, I probably do not even need to boot to a winpe drive to run dism if installing a dual boot?
Edit: Indeed, dism can be run from normal windows to clean install a dual boot version. Very nice.
So key steps:-
Create an install.wim using @Kari's uuptoiso tool.
Shrink C drive by say 50GB
Create new partition in newly unallocated space
Deploy image with dism from an admin command prompt
Add boot entry from admin command prompt
Boot pc - select new installation
Beauty of this method is you an carry on using existing windows for most of it.
Obviously, if not dual booting i.e. only single booting, you will have to boot first into a win pe environment to run dism etc.Last edited by cereberus; 24 Mar 2018 at 15:23.
-
-
New #8
You can also use this to install to a virtual hard drive instead of creating a new partition. Using Macrium Reflect Redeploy as I did is a little trickier as you have to attach the virtual disk from the Macrium Reflect Command prompt first using diskpart commands, but only take a minute to do.
-
-
New #9
Today, I tried an experiment - I wanted to clean install Skip Ahead in a hyper-v vm, and normally it takes ages on my laptop. I followed the guide booting from skippy iso up to point of having created all the required partitions, and then shutdown VM.
I then went to host, and attached vhd as a drive using disk management, and used dism from host to deploy OS instead.
I then detached vhd from host, and booted to skippy iso, and created boot entry, booted vm and it went as I hoped straight to oobe.
Doing dism on host rather than in vm is much quicker on my laptop.
I then made a copy of vhd, mounted as drive in host, made a boot entry. I tried rebooting to host but it failed as cases in previous post. I rebooted into Macrium Reflect, added vhd using diskpart and ran Macrium Redeploy, and as before BAM on rebooting, straight to oobe.
Doing it this way, means I can install on vm and dual boot on host with essentially only one main installation phase. You have to do it via vm first to ensure drive has all the partitions needed to boot in vm.
Apply Windows Image using DISM Instead of Clean Install
How to Apply Windows Image using DISM Instead of Clean Install to Reduce TimePublished by Kari "Kalsarikänni" FinnCategory: Installation & Upgrade
13 May 2017


 Quote
QuoteTutorial Categories

Related Discussions
