

How to Calibrate Display Color in Windows 10
Windows comes with the Display Color Calibration wizard tool.
You can improve the color on your display by using Display Color Calibration to make sure that colors appear accurately on your screen.
This tutorial will show you how to calibrate a monitor using the Display Color Calibration wizard tool in Windows 10.
You must be signed in as an administrator to use the Display Color Calibration wizard.
Here's How:
1 Press the Win + R keys to open Run, type dccw into Run, and click/tap on OK to open the Display Color Calibration wizard.
2 If you have more than one display, move the Display Color Calibration window onto the display you want to calibrate, and click/tap on Next. (see screenshot below)
If you only have one display, then you would just need to click/tap on Next.
3 If your display has a menu option, then return your display to the factory default color settings before you click/tap on Next. If your display (ex: on laptop) doesn't have a menu option, then you can just click/tap on Next. (see screenshot below)
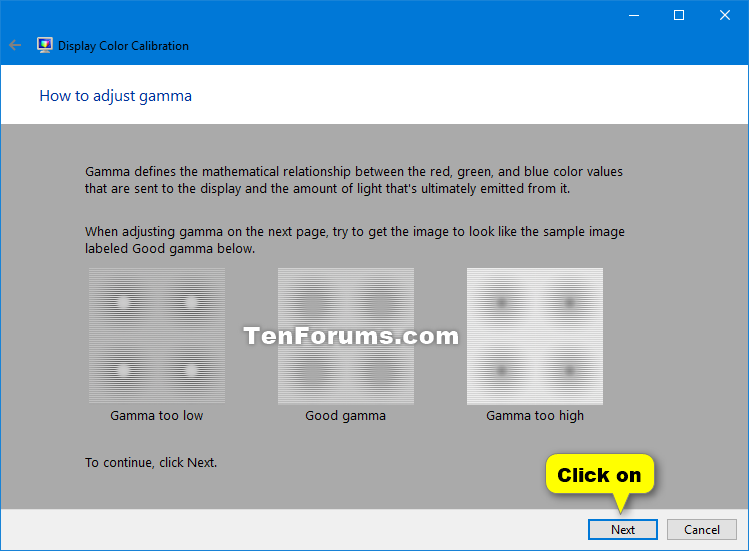
4 Look at the gamma examples, and click/tap on Next to adjust gamma in the next step. (see screenshot below)
5 Move the slider to adjust gamma to minimize the visibility of the small dots in the middle of each circle, and click/tap on Next when it looks like the good example in step 4. (see screenshot below)
6 Find the brightness and contrast controls for your display, and click/tap on Next to continue. (see screenshot below)
If you don't have brightness and contrast controls for your display (ex: laptop), then click/tap on the Skip brightness and contrast adjustment button, and go to step 11 below.
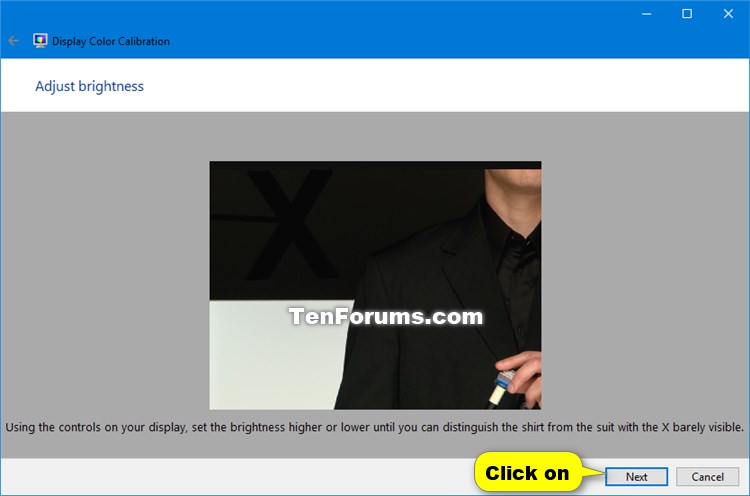
7 Look at the brightness examples, and click/tap on Next to adjust brightness in the next step. (see screenshot below)
8 Adjust the brightness control on your display until you can distinguish the shirt from the suit with the X barely visible, and click/tap on Next when it looks like the good example in step 7. (see screenshot below)
9 Look at the contrast examples, and click/tap on Next to adjust contrast in the next step. (see screenshot below)
10 Adjust the contrast control on your display to set the contrast as high as possible without losing the ability to see wrinkles and buttons on the shirt, and click/tap on Next when it looks like the good example in step 9. (see screenshot below)
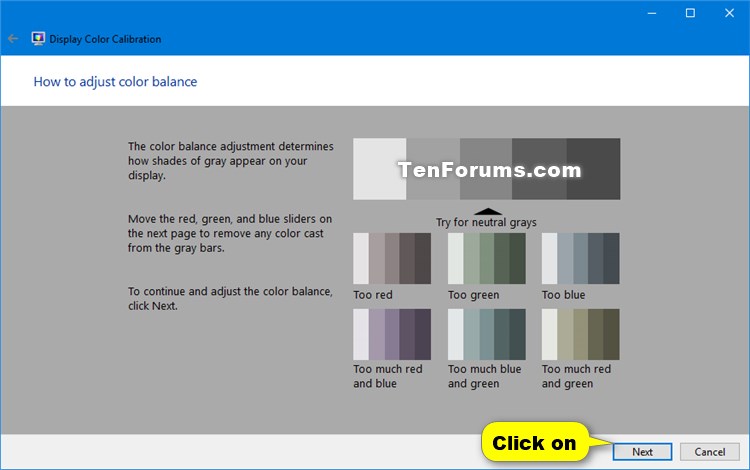
11 Look at the color balance examples, and click/tap on Next to adjust color balance in the next step. (see screenshot below)
12 Move the red, green, and blue sliders to remove any color cast from the gray bars, and click/tap on Next when it looks like the top good example in step 11. (see screenshot below)
13 Check or uncheck the Start ClearType Tuner when I click Finish to ensure that text appears correctly box for what you want, and click/tap on Finish to save and use this new calibration for this specific display. (see screenshot below)
That's it,
Shawn
Related Tutorials
- How to Create a Display Color Calibration shortcut in Windows 10
- How to Turn On or Off ClearType in Windows 10
- How to Adjust Screen Brightness in Windows 10
- How to Change Screen Resolution of Displays in Windows 10
- How to Calibrate Built-in Display for HDR Video in Windows 10
- How to Turn On or Off HDR and WCG Color for a Display in Windows 10
- How to Remove Display from Desktop in Windows 10
- How to Run VESA Certified DisplayHDR Tests on Display in Windows 10
Calibrate Display Color in Windows 10
-
-
-
New #3
I used to use this, long ago, but now I prefer to use AVS HD 709 - Version 2c MP4 download: AVS HD 709 - Blu-ray & MP4 Calibration - AVS Forum | Home Theater Discussions And Reviews
Link to PDF Manual on how to use AVS HD 709: http://w6rz.net/avshd709/Patterns-Manual.pdf
Better is if you can get your hands on a colorimeter(my friend that has one moved away some time ago, but I got awesome results on my LG HDTV with it, using the Blu Ray version).
 InformationThings to remember when calibrating a monitor or HDTV used as a montior:
- Turn off all dynamic picture settings. Things such as Dynamic Contrast, for example, should be disabled. Also, any picture tweaks such as Black Tone, Skin Tone, Edge Enhancement, noise filters, energy saving features, etc. should be disabled
- Set your color gamut to BT709(if possible)
- Set your color temperature to 6700K or D65. If your display has a Color Temperature or Color Tone setting, it is generally best to set this to a Warm setting which will hopefully get the display reasonably close to D65.
- Let your monitor warm up for a half hour or longer first.
- You should be calibrating the display in your typical viewing environment. Daylight/Night, or in the cellar at your gaming battle station, with your lights off, where ever.
- Lastly check your calibration after a week the first time, then recheck every 6 months to a year, because the settings will "drift" no matter how good a screen you have.
Last edited by Cliff S; 28 Apr 2017 at 14:27. Reason: Added PDF link
Calibrate Display Color in Windows 10
How to Calibrate Display Color in Windows 10Published by Shawn BrinkCategory: Customization
22 May 2020


 Quote
Quote
Tutorial Categories

Related Discussions
