
New
#660
No folder is still there but is quite smaller; now only 2.38 gb as opposed 12+gb. Ran it a second time and still there, now 2.28gb.
No folder is still there but is quite smaller; now only 2.38 gb as opposed 12+gb. Ran it a second time and still there, now 2.28gb.
Here is an article on how to take ownership using File Explorer.
Change Owner of File, Folder, Drive, or Registry Key in Windows 10
Used another prgm and took owner with a reg entry and was able to move all but 25 mb to another drive, so now maybe I can delete it now. Will keep posted.
Was able to finally get rid of all the pro folder thru deletes and cut/paste to other drive and then deleted it. Gonna stop any more repairs for now, since I have enough working to do what I need to do on pc. Thanks all.
Hi, sorry that I'm somehow off topic but it seems to me that DISM was the only tool that will make that Win10 Pro of mine to work again but haven't enough time to "play" with it.
I booted from a Windows 10 x86 edition (I have upgraded from a Windows 7 Pro x86, EN, to Windows 10 Pro) and I saw that now my system partition is (in cmd) E:\. I gived (without much hope) the command that you show me above and here it was:
Windows Resource Protection could not start the repair service.
What now? I will try to reboot and chose another option... Don't know anymore... I'm somehow stuck. Anyone can help?
My BIOS is non-UEFI (classic one ;-) ).
===========
I'm interested in saving ALL the programms or MOST of them, more than other things, because I have apps that I don't have anymore the installation kit or the sn.
My Documents are saved on a separate partition from SYSTEM.
Maybe a I can make portable all installed apps? How I do that?
I will follow your advices zbook
You can run DISM repair commands if sfc is unable to repair Windows. So if you do need to repair Windows with DISM, it is not off-topic after all.
The command syntax is similar, but using /Image:E:\ instead of /Online.
You might also consider at some point switching to a 64-bit Windows 10 but that would require a clean install.
For DISM repair in Windows RE (I will use E: for your Windows drive letter):
DISM /Image:E:\ /Cleanup-Image /RestoreHealth
See how that works out. If necessary, you can also enable networking or point to install.wim on your Windows install USB as a source for DISM.
With DISM I often use the /? to get help, as you can easily copy and paste from the help screen to your command line, using the mouse. Left-click and drag to select text. Right-click to copy selected text, and then right-click again to paste to your command line.
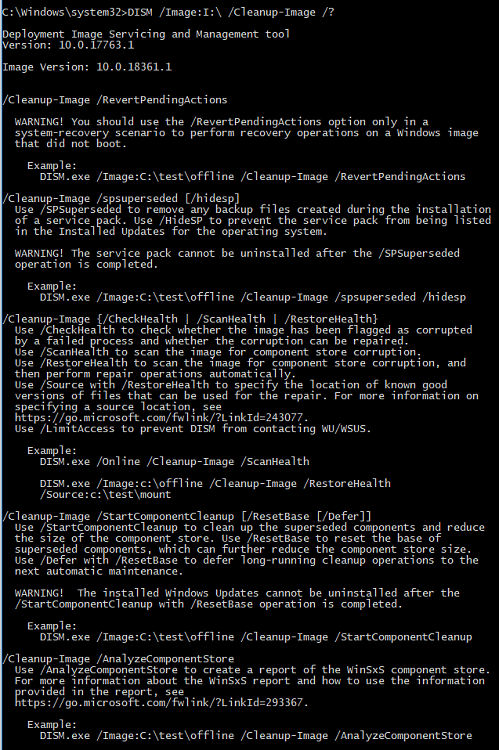
Here is the help screen for DISM repair of an offline Windows image. Note that there is also a command relevant to a failed upgrade:
"/Cleanup-Image /RevertPendingActions
WARNING! You should use the /RevertPendingActions option only in a system-recovery scenario to perform recovery operations on a Windows image that did not boot.
Example: DISM.exe /Image:C:\test\offline /Cleanup-Image /RevertPendingActions"
Last edited by DonCuthbert; 20 Mar 2019 at 12:07.
Can use DISM for. ESD(windows is compressed) repair below without converting to .WIM:
I extracted information from Brink and others to develop a scheme to repair window .ESD file using DISM. If you patiently read below you will find the source easy to paste and accomplish the repair.
---
Run as admin & fix # of OS and letter of installation flash drive:
! Be sure to use the right Drive letter so likely replace the E.
1-inset OS flash,2- copy 1st string to Word doc if letter not same as your flash; otherwise just run to see number, 3-change the letter of OS flash if necessary, in Word then 4-copy corrected string and paste into cmd as admin. 5-when know letter and number = run second string
Get OS # with 1st string = dism /get-wiminfo /wimfile:E:\sources\install.esd
2nd string Get DISM fix for ESD from flash drive = Dism /Online /Cleanup-Image /RestoreHealth /Source:esd:E:\Sources\Install.esd:6 /limitaccess
Hi Shawn
I was following the tutorial to check for errors and I noticed that in OPTION TWO in steps 6 and 7 you repeat the respective steps of OPTION ONE.
Maybe you could make a couple of changes, if you deem it necessary:
In step 6
Repair-WindowsImage -Online -RestoreHealth -Source "Full Path to install.wim file:<Index Number>"
Repair-WindowsImage -Online -RestoreHealth -Source "Full Path to install.wim file:<Index Number>" -LimitAccess
In step 7
Repair-WindowsImage -Online -RestoreHealth -Source "Full Path to install.esd file:<Index Number>"
Repair-WindowsImage -Online -RestoreHealth -Source "Full Path to install.esd file:<Index Number>" -LimitAccess
Take care mate!


 Quote
Quote


