

How to Add or Remove Edit with Paint 3D context menu in Windows 10
The Paint 3D UWP (Universal Windows Platform) app has been included in Windows 10 starting with Windows 10 build 14971.
It has also added a new Edit with Paint 3D context menu item for images that will open the image in the Paint 3D app when used.
This tutorial will show you how to add or remove the Edit with Paint 3D context menu for all users in Windows 10.
While you must be signed in as an administrator to add or remove the context menu, all users will be able to use the context menu if added.
Windows 10 Tip: Use Paint 3D to edit your snips - Windows Experience Blog
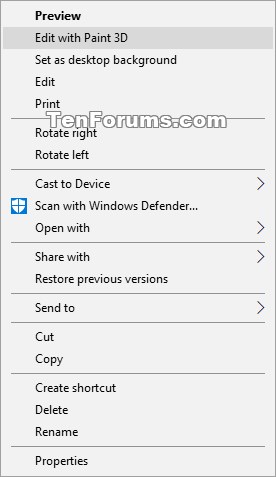
EXAMPLE: "Edit with Paint 3D" context menu
Here's How:
1 Do step 2 (add-right click), step 3 (add-Shift+right click) , or step 4 (remove) below for what you would like to do.
This is the default setting.
A) Click/tap on the Download button below to download the file below, and go to step 5 below.
Add_Edit_with_Paint_3D_to_context_menu.reg
Download
A) Click/tap on the Download button below to download the file below, and go to step 5 below.
Add_Shift+_Edit_with_Paint_3D_to_context_menu.reg
Download
A) Click/tap on the Download button below to download the file below, and go to step 5 below.
Remove_Edit_with_Paint_3D_from_context_menu.reg
Download
5 Save the .reg file to your desktop.
6 Double click/tap on the downloaded .reg file to merge it.
7 When prompted, click/tap on Run, Yes (UAC), Yes, and OK to approve the merge.
8 You can now delete the downloaded .reg file if you like.
That's it,
Shawn
Related Tutorials
- How to Restore Classic Paint App in Windows 10
- How to Add or Remove Edit with Photos context menu in Windows 10
- How to Add or Remove Create a New Video context menu in Windows 10
Add or Remove Edit with Paint 3D context menu in Windows 10
-
-
-
New #3
Reappeared with "Creators Update" from Windows 10.
Re-Deleted with your nice *.reg-file.
Thank you!
-
-
New #5
I came here looking for exactly this, but I wanted to remove both the context-menu entries "3D Print" and "3D Edit". At the same time, I wasn't exactly sure I wanted to delete all these keys, in case I ever want to undo this tweak.
So I made my own using a special string "LegacyDisable", which Windows recognizes as a flag meaning 'hide this context-menu entry.' This way, all I'd need to do is remove these flags and everything goes back to normal.
I created a .reg file containing the removal tweak and I uploaded it to Pastebin, if anyone wants to use it, feel free.
Remove/Disable "3D Print / Edit" from Windows Context-menu - Pastebin.com
...and thanks, your downloadable version pointed me in the right registry location.
-
-

Add or Remove Edit with Paint 3D context menu in Windows 10
How to Add or Remove Edit with Paint 3D context menu in Windows 10Published by Shawn BrinkCategory: Customization
22 May 2020

 Quote
Quote
Tutorial Categories

Related Discussions
