

How to Install or Uninstall Windows PowerShell ISE in Windows 10
The Windows PowerShell Integrated Scripting Environment (ISE) is a host application for Windows PowerShell. In the ISE, you can run commands and write, test, and debug scripts in a single Windows-based graphic user interface. The ISE provides multiline editing, tab completion, syntax coloring, selective execution, context-sensitive help, and support for right-to-left languages. Menu items and keyboard shortcuts are mapped to many of the same tasks that you would do in the Windows PowerShell console. For example, when you debug a script in the ISE, you can right-click on a line of code in the edit pane to set a breakpoint.
For more details about Windows PowerShell ISE, see:
- Introducing the Windows PowerShell ISE | Microsoft Docs
- Exploring the Windows PowerShell ISE | Microsoft Docs
Starting with Windows 10 build 19037.1, Windows PowerShell ISE is now a Feature on Demand (installed by default), and you will see it in the list in Optional Features Settings.
This tutorial will show you how to install or uninstall the Windows PowerShell ISE (Integrated Scripting Environment) app for all users in Windows 10.
Contents
- Option One: Install or Uninstall Windows PowerShell ISE in Optional Features
- Option Two: Install or Uninstall Windows PowerShell ISE in Command Prompt
EXAMPLE: Windows PowerShell ISE (Integrated Scripting Environment)
1 Open Settings, and click/tap on the Apps icon.
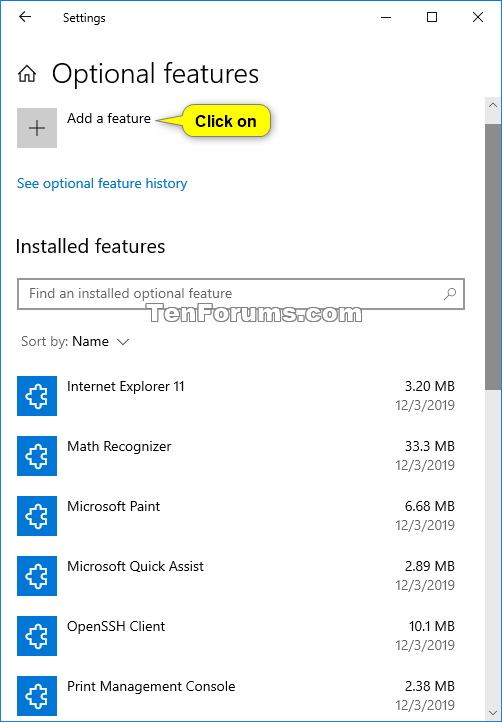
2 Click/tap on Apps & features on the left side, and click/tap on the Optional features link on the right side. (see screenshot below)
3 Do step 4 (install) or step 5 (uninstall) below for what you would like to do.
This is the default setting.
A) Click/tap on Add a feature. (see screenshot below)
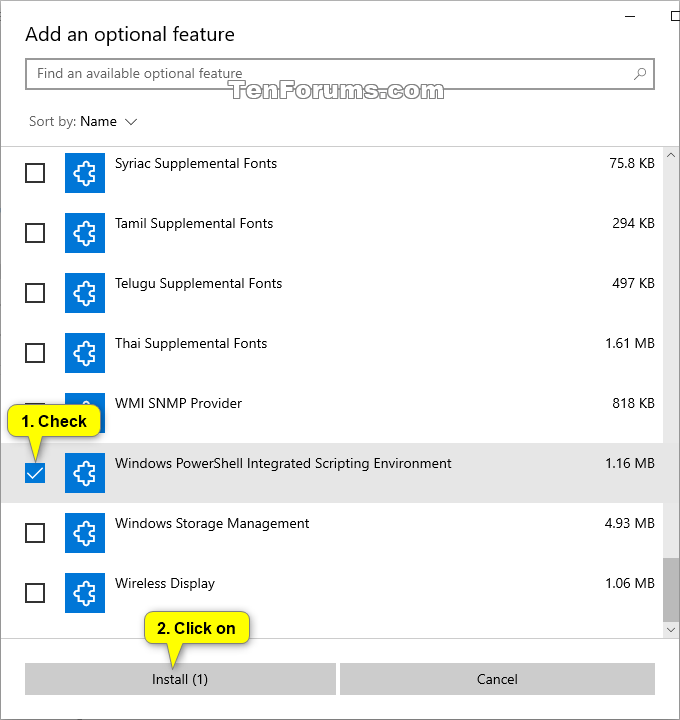
B) Scroll down, check Windows PowerShell Integrated Scripting Environment, click/tap on Install, and go to step 6 below. (see screenshot below)
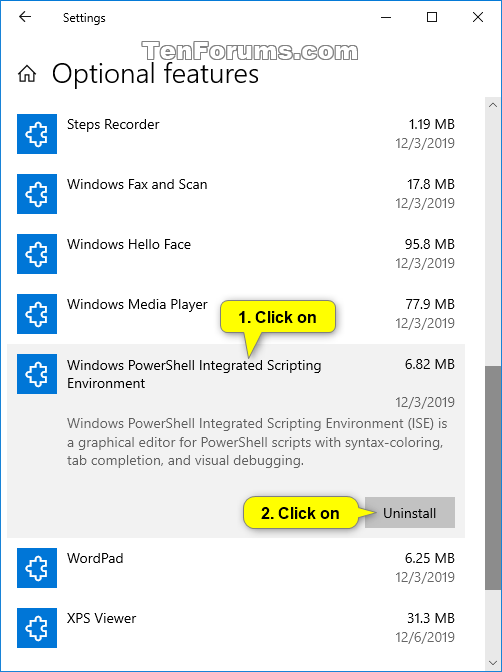
A) Scroll down, click/tap on Windows PowerShell Integrated Scripting Environment under Installed features, click/tap on the Uninstall button, and go to step 6 below. (see screenshots below)

6 You can now close Settings if you like.
You must be signed in as an administrator to do this option.
1 Open an elevated command prompt.
2 Do step 3 (install) or step 4 (uninstall) below for what you would like to do.
This is the default setting.
A) Copy and paste the command below into the elevated command prompt, press Enter, and go to step 5 below. (see screenshot below)
DISM /Online /Add-Capability /CapabilityName:Microsoft.Windows.PowerShell.ISE~~~~0.0.1.0
A) Copy and paste the command below into the elevated command prompt, press Enter, and go to step 5 below. (see screenshot below)
DISM /Online /Remove-Capability /CapabilityName:Microsoft.Windows.PowerShell.ISE~~~~0.0.1.0
5 You can now close the elevated command prompt if you like.
That's it,
Shawn
Related Tutorials
- How to Manage Optional Features in Windows 10
- How to Add Edit with PowerShell ISE as administrator context menu in Windows 10
- How to Add Edit with PowerShell ISE x86 as administrator in Windows 10
How to Install or Uninstall Windows PowerShell ISE in Windows 10

How to Install or Uninstall Windows PowerShell ISE in Windows 10
Published by Shawn BrinkCategory: Apps & Features06 Dec 2019


Tutorial Categories

Related Discussions
