

How to Manage Windows Backup Disk Space in Windows 10
The Backup and Restore (Windows 7) feature (aka: Windows Backup) was originally included in Windows 7. It was deprecated in Windows 8 and removed in in Windows 8.1, but has been included in Windows 10.
While you can use Backup and Restore (Windows 7) to restore any Windows 7 backups on your Windows 10 PC, you can also use it to back up and restore files on your Windows 10 PC.
Windows Backup will backup all files in the libraries, folders, and drives you choose or let Windows choose. You will have a choice to include a system image in the backup. You can also choose to have these items be backed up on a regular schedule.
After you have set up Windows Backup, you can manage how disk space is used by Windows Backup as needed. You can free up disk space by deleting previously created data file backups and system images.
This tutorial will show you how to manage how disk space is used by Windows Backup for data file backups and system images on your Windows 10 PC.
You must be signed in as an administrator to be able to manage Windows Backup disk space.
Data file backups are created in sets also known as backup periods.
When a backup is created the first time after you set up Windows Backup, Windows will create a full backup of all files in the folders you selected into the drive:\computer name\Backup Set YYYY-MM-DD HHMMSS\Backup Files YYYY-MM-DD HHMMSS folder location. The Backup Files YYYY-MM-DD HHMMSS folder contains Backup files #.zip folders that are your actual backed up files for that date and time period.
When you create a differential backup, it will create a new full backup saved into a new Backup Set YYYY-MM-DD HHMMSS folder.
When you create an incremental backup, it will create a backup all of the files that have changed since the last backup, and saved in a new Backup Files YYYY-MM-DD HHMMSS folder in the current Backup Set YYYY-MM-DD HHMMSS folder.
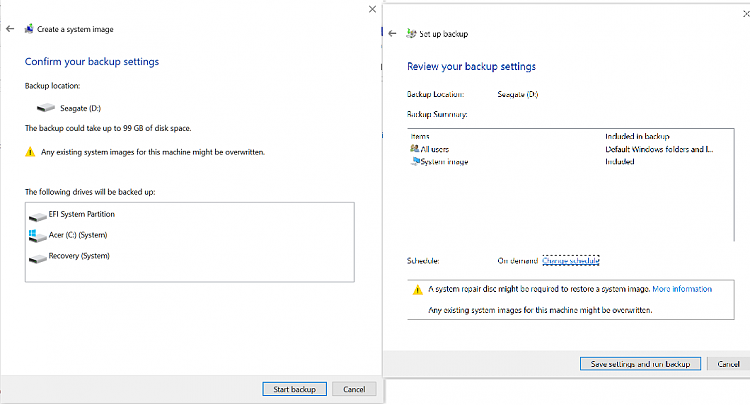
System images are saved in this format:
drive letter:\WindowsImageBackup\computer name\Backup YYYY-MM-DD HHMMSS
EXAMPLE: If your computer name is Brink-W10PC, your backup location is on hard drive (network or local) E: and you backed up on January 23rd 2017 at 5:01:54 PM (it will use 24 hour time), then your system image would be located in the folder below.
E:\WindowsImageBackup\Brink-W10PC\Backup 2017-01-23 190154
Here's How:
1 Open Settings, click/tap on the Update & security icon, click/tap on Backup on the left side, and click/tap on the Go to Backup and Restore (Windows 7) link under Looking for and older backup on the right side. (see screenshot below)
You can also open Backup and Restore (Windows 7) by opening the Control Panel (icons view), and click/tap on the Backup and Restore (Windows 7) icon.
2 Click/tap on the Manage space link. (see screenshot below)
3 Do step 4 (data file backup) and/or step 5 (system image) below for what you want to manage space for. When finished, go to step 6 below.
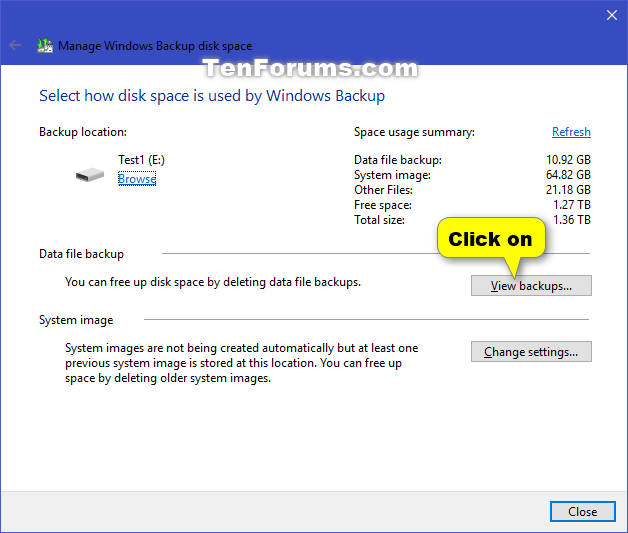
A) Click/tap on the View backups button. (see screenshot below)
If the View backups button is grayed out, then it means that you do not have any date file backups available.
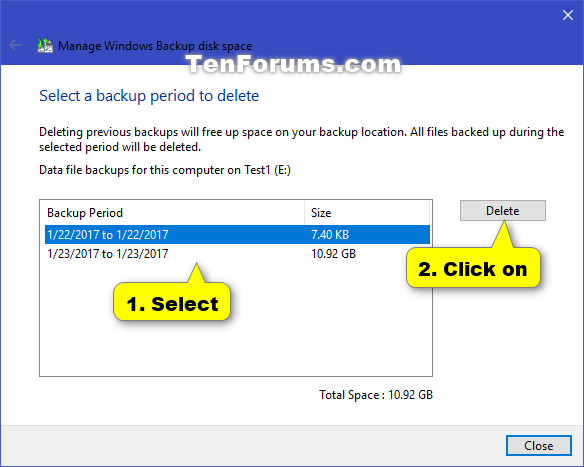
B) Select a backup period you want to delete, and click/tap on the Delete button. (see screenshot below)
C) Click/tap on Delete to confirm. (see screenshots below)
If you delete the only data file backup for this computer, then you will also have a Delete and run backup now option.
D) Click/tap on Close, and go to step 3 above. (see screenshot below)
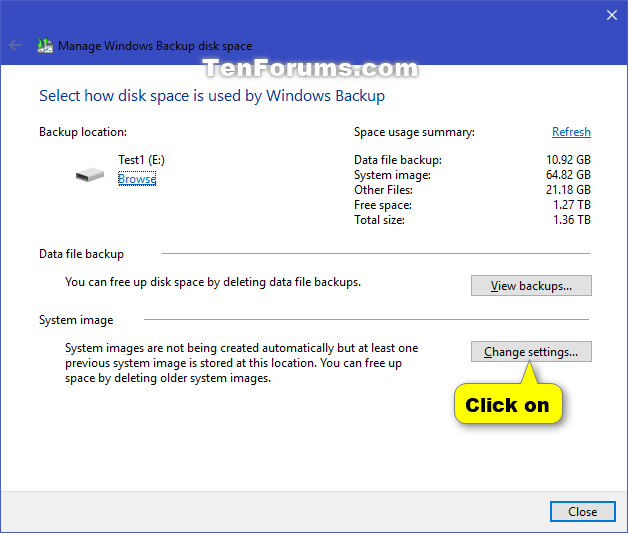
A) Click/tap on the Change settings button. (see screenshot below)
If the Change settings button is grayed out, then it means that you do not have any system images available.
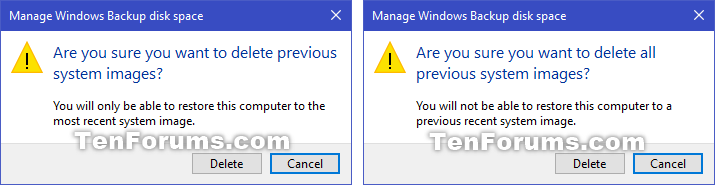
B) Select (dot) what you want for how Windows retains older system images, and click/tap on OK. (see screenshots below)
If you turned off the schedule for automatic backups, then you will see the left screenshot above.
If you turned on the schedule for automatic backups that include a system image, then you will see the right screenshot above. You can change the maximum space used by Windows for storing system images on a disk by adjusting the Max Usage slider for the disk (ex: "E" ) in the System Protection settings like below.
C) Click/tap on Delete to confirm, and go to step 3 above. (see screenshots below)
6 When finished, click/tap on Close. (see screenshots below)
7 You can now close Backup and Restore (Windows 7) if you like.
That's it,
Shawn
Related Tutorials
- How to Enable or Disable User Files Backup in Windows Backup in Windows 10
- How to Set Up Windows Backup in Windows 10
- How to Create a Windows Backup in Windows 10
- How to Enable or Disable Create a System Image in Windows 10
- How to Create a System Image in Windows 10
- How to Make a 'Create a System Image' Shortcut in Windows 10
- How to Change Settings for Windows Backup in Windows 10
- How to Add or Remove a Windows Backup and Restore context menu in Windows 10
- How to Turn On or Off Windows Backup Schedule in Windows 10
- How to Restore Files from Windows Backup in Windows 10
- How to Reset Windows Backup to Default in Windows 10
Manage Space for Windows Backup in Windows 10
-
New #1
Thanks Shawn!!!
-
-
New #3
I seem to have two backup processes running
On the (external USB) backup drive I have one directory called "ComputerName" which I don't want, and another called FileHistory which I do want, both dated now
Inside "ComputerName" there is a directory called Backup Set 2020-05-03 030013, then down a level various Backup Files date also Catalogs and then a load of zip files
I'm quite happy with FileHistory, but I can't see what to do to stop the "ComputerName" backup from running
Thanks
-
New #4
Hello shimself,
It sounds like you have both Windows Backup and File History creating scheduled backups. These are of course separate backup features with File History being the newest.
To stop Windows Backup, you can turn off the scheduled backup using option 1 in the tutorial below.
Turn On or Off Schedule for Windows Backup in Windows 10
Afterwards, you could reset Windows Backup to default if wanted using the method in the tutorial below, and then delete the "ComputerName" folder containing the Windows Backup if wanted.
Reset Windows Backup to Default in Windows 10Last edited by Brink; 23 May 2020 at 10:39.
-
New #5
@Brink
I was going to delete some old BU images on my external HDD following this tutorial but cannot find the "Manage Space" and "Select how Windows retains older....... " screens. It looks like this has been "depreciated" by MSFT in my version 1909 build 18363.959. I am pretty sure I have seen those screens in earlier builds but not anymore, if I click Next it starts the BU/Image, how to delete my old BU images? I can see my old Image Backup files but there is no way to delete those.
-
-
New #7
@ Brink
Those screens/options are no longer there Shawn, there is no Step 2 on my system, all I see are those 3 screens I show
-
New #8
That is odd. Which one do you see immediately after opening the Control Panel (icons view) and clicking on the Backup and Restore (Windows 7) icon?
-
-
New #9

Manage Space for Windows Backup in Windows 10
How to Manage Windows Backup Disk Space in Windows 10Published by Shawn BrinkCategory: Backup & Restore
04 Mar 2020


 Quote
Quote

Tutorial Categories

Related Discussions
