

How to Set Up Windows Backup in Windows 10
The Backup and Restore (Windows 7) feature (aka: Windows Backup) was originally included in Windows 7. It was deprecated in Windows 8 and removed in in Windows 8.1, but has been included in Windows 10.
While you can use Backup and Restore (Windows 7) to restore any Windows 7 backups on your Windows 10 PC, you can also use it to back up and restore files on your Windows 10 PC.
Windows Backup will backup all files in the libraries, folders, and drives you choose or let Windows choose. You will have a choice to include a system image in the backup. You can also choose to have these items be backed up on a regular schedule.
It's always good to have a backup. Keep copies of your files on another drive in case something happens to the originals.
After you have set up Windows Backup, you can make changes to these settings as needed.
This tutorial will show you to set up Windows Backup to backup and restore files on your Windows 10 PC.
You must be signed in as an administrator to be able to setup and use Windows Backup.
Windows Backup event logs are stored in the .evtx file below. It will open in Event Viewer when double clicked/tapped on.
C:\Windows\System32\winevt\Logs\Microsoft-Windows-Backup.evtx
Backups are created in sets also known as backup periods.
When a backup is created the first time after you set up Windows Backup, Windows will create a full backup of all files in the folders you selected into the drive:\computer name\Backup Set YYYY-MM-DD HHMMSS\Backup Files YYYY-MM-DD HHMMSS folder location. The Backup Files YYYY-MM-DD HHMMSS folder contains Backup files #.zip folders that are your actual backed up files for that date and time period.
When you create a differential backup, it will create a new full backup saved into a new Backup Set YYYY-MM-DD HHMMSS folder.
When you create an incremental backup, it will create a backup all of the files that have changed since the last backup, and saved in a new Backup Files YYYY-MM-DD HHMMSS folder in the current Backup Set YYYY-MM-DD HHMMSS folder.
System Image Backup (SIB) Solution
We recommend that users use full-disk backup solutions from other vendors.
For example: How to Create and Restore a System Image Backup with Macrium Reflect
Here's How:
1 Open Settings, click/tap on the Update & security icon, click/tap on Backup on the left side, and click/tap on the Go to Backup and Restore (Windows 7) link under Looking for and older backup on the right side. (see screenshot below)
You can also open Backup and Restore (Windows 7) by opening the Control Panel (icons view), and click/tap on the Backup and Restore (Windows 7) icon.
2 Click/tap on Set up backup. (see screenshot below)
3 Windows Backup will now start. (see screenshot below)
4 Do step 5 (local drive) or step 6 (network location) below for where you want to save your backup.
A) Select a drive (ex:"Test1 (E:)" ), click/tap on Next, and go to step 7 below. (see screenshot below)
A) Click/tap on the Save on a network button. (see screenshot below)
B) Click/tap on Browse, browse to and select the network location (ex: "\\BRINK-ROUTER\MyBook"), and click/tap on OK. (see screenshot below)
If you like, you could manually enter the network location path instead of browsing to and selecting it.
C) Enter your username and password credentials for this network location, and click/tap on OK. (see screenshot below)
D) Select this network location (ex: "\\BRINK-ROUTER\MyBook"), click/tap on Next, and go to step 7 below. (see screenshot below)
7 Select (dot) Let me choose, and click/tap on Next. (see screenshot below)
If you do not want to choose what to back up, then you could select (dot) Let Windows choose and go to step 9 below instead.
8 Select the check boxes of the items you want to include in the backup, select if you want to include a system image or not, and click/tap on Next. (see screenshot below)
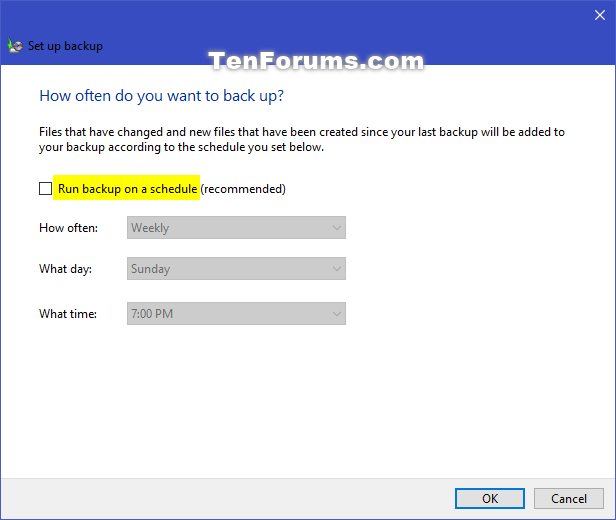
9 Click/tap on the Change schedule link. (see screenshot below)
10 Do step 11 (on) or step 12 (off) below for if you want to automatically run this backup on a schedule or not.
You will always be able to turn on or off the schedule as needed.
A) Check the Run backup on a schedule box. (see screenshot below)
B) Select How often, What day, and What time you want for the backup schedule.
C) Click/tap on OK, and go to step 13 below.
A) Uncheck the Run backup on a schedule box, click/tap on OK, and go to step 13 below. (see screenshot below)
13 When ready, click/tap on the Save settings and run backup button. (see screenshot below)
14 Windows Backup will now create a backup based on what you set above. (see screenshots below)
15 When the backup has finished, you will be able to click/tap on the Back up now button to manually create an incremental backup on demand whenever you want. (see screenshot below)
16 You can now close Backup and Restore (Windows 7) if you like.
That's it,
Shawn
Related Tutorials
- How to Enable or Disable User Files Backup in Windows Backup in Windows 10
- How to Create a Windows Backup in Windows 10
- How to Add or Remove a Windows Backup and Restore context menu in Windows 10
- How to Change Settings for Windows Backup in Windows 10
- How to Turn On or Off Windows Backup Schedule in Windows 10
- How to Manage Windows Backup Disk Space in Windows 10
- How to Restore Files from Windows Backup in Windows 10
- How to Reset Windows Backup to Default in Windows 10
- How to Turn On or Off File History in Windows 10
- How to Create a System Image in Windows 10
Setup Windows Backup in Windows 10
-
New #1
Backup notification and schedule backup
Dear all,
Hi i'm using windows 10 professional x64, i have two questions.
1. is it possible after the backup is finished sending notification via email?
2. do a backup on a certain day?
Best regards,
Favha
-
New #2
Hello Favha, and welcome to Ten Forums. :)
Q1) I'm afraid that Windows Backup doesn't include an option to send an email notice.
Q2) You can change your Windows Backup settings to check the Run backup on a schedule box and set the schedule for when you like at step 11 below.
Change Windows Backup Settings in Window 10 Windows 10 Backup Restore Tutorials
-
New #3
Hi Brink,
I read somewhere that this app would be discontinued in a future update, do you have any knowledge of that to be true?
Many thanks for this forum.
-
New #4
Hello Richard, :)
A new "Timeline" feature was suppose to replace the "File History" feature in the Windows 10 Fall Creators Update in September, but it has been delayed until sometime after that.
I haven't seen any information if Windows Backup will be removed at that time, or just buried and still usable.
Timeline feature will not make Windows 10 Fall Creators Update - Windows 10 Forums
-
New #5
Soo...
I have a question regarding the Win10 Backup...
Call it an o(l)dd habit but I like to install my Games and Programs on D:\ especially these days because stuff tends to get quite large and reinstalling/redownloading it is one of the last things I want to do after having been forced to reinstall Win10 and all the drivers.
Most Games and Programs I have work quite well with this approach - Steam games will only require for Steam to be repaired to work again - Not having themselves to be redownloaded. Photoshop, I believe, was similar the last time - Just reinstall Adobe CC on top of itself and it should just download some configs that are missing on C:\...
That Approach obviously hasn't worked with Microsoft Store Apps/Games - As soon as I define D:\ as the installation location for such files, Win10 will wipe that area with like 300GB of content clean and I'll have to start all over again...
...which brings me to my question regarding Win10 Backup:
If I make a Backup of C:\, with stuff pointing towards D:\, and I recover the Backup after reinstalling Win10, but not yet having made any changes that would point to D:\, would said Backup get me back to a functional Win10 with the Games, Programms and Apps on D:\ working like they did before?
-
-
New #7
Thank-you for the WISE advice Brink. After losing everything and having to reinstall Windows-10 this week from the original 2015 ISO (followed by installing 5 years of Windows updates!) I've learned my lesson. Will use the Macrium Reflect software that everyone seems to label as a favorite and create an image of the computer right now.
Appreciatively,
Allen in Chicago
-
New #8
Hello @AllenChicago,
I thought this might help you . . .
A trusted and recommended source used in this forum is => Macrium Reflect - FREE Edition
Quote from their website . . .
FREE Edition
A free back up, disk imaging, and cloning solution capable of meeting the needs of both commercial and personal users.
Protect your data, upgrade your hard disk or try new operating systems safe in the knowledge that everything is securely saved in an easily recovered backup file. Macrium Reflect supports back up to local, network, and USB drives, and is licensed for both home and business use.
These Tutorials are listed in alphabetical order as opposed to relevance order.
Information & Tutorials:
> How to Create and Restore a System Image Backup with Macrium Reflect - TenForums Tutorial
> How to Use Macrium Reflect Rescue Media to Fix Windows Boot Issues
> Macrium Reflect KnowledgeBase
Videos:
> How to Backup and Restore a Hard Drive Image
> How to Clone a Disk Drive using Macrium Reflect and Resize the Partition
> How to Clone Windows With Macrium Reflect Free - HDD to SSD Upgrade 2020 [ In Depth Tutorial ]
> How to Clone your HDD to SSD With Macrium Free Software
> How to Create a Backup Image with Macrium Reflect - Britec
> How to Create a Macrium Reflect Bootable Drive with Backup Image Partition - @Spartan [ Member ]
> How to Create a Macrium Reflect Bootable Rescue CD/USB - Britec
> How to Create a Macrium Reflect Rescue Media Boot USB Disk Drive with Storage Partition
> How to Image a Disk with Macrium Reflect - Part 1 The Basics - Webinar
> How to Restore Backup Image with Macrium Reflect - Britec
Other Instructions and Videos are available if needed!
NOTE: The FREE version also provides the ability to Mount the image file and Explore the contents.
I hope this helps!
-
-

Setup Windows Backup in Windows 10
How to Set Up Windows Backup in Windows 10Published by Shawn BrinkCategory: Backup & Restore
22 Dec 2020


 Quote
Quote

Tutorial Categories

Related Discussions
