

How to Add Permanently Delete to Context Menu in Windows 10
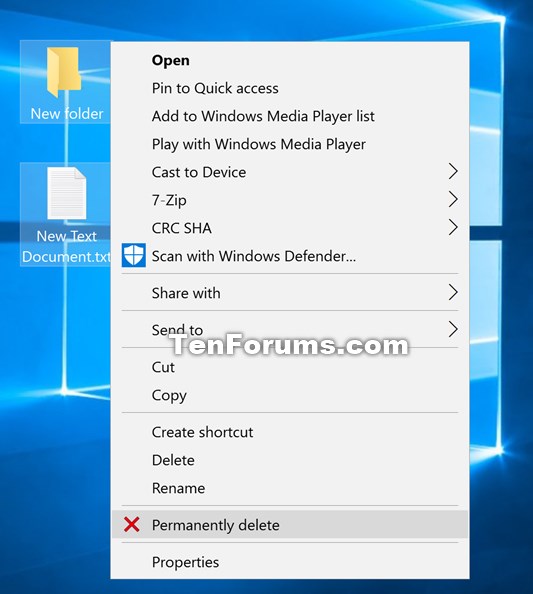
When you delete a file or folder in Windows, the item(s) get placed in the Recycle Bin by default until you empty the Recycle Bin to permanently delete them if you didn't want to restore them.
If you permanently delete a file or folder, the item(s) will bypass the Recycle Bin and be immediately permanently deleted instead.
This tutorial will show you how to add Permanently delete to the context menu of files and folders for all users in Windows 10.
While you must be signed in as an administrator to add or remove the context menu, all users will be able to use the context menu.
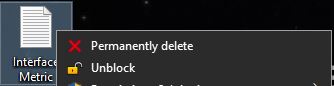
When you right click on one or more selected files and/or folders and click/tap on Permanently delete, you will be prompted like below to confirm before the item(s) are permanently deleted.
EXAMPLE: "Permanently delete" context menu
Here's How:
1 Do step 2 (add) or step 3 (remove) below for what you would like to do.
A) Click/tap on the Download button below to download the file below, and go to step 4 below.
Add_Permanently_delete_to_context_menu.reg
Download
This is the default setting.
A) Click/tap on the Download button below to download the file below, and go to step 4 below.
Remove_Permanently_delete_from_context_menu.reg
Download
4 Save the .reg file to your desktop.
5 Double click/tap on the downloaded .reg file to merge it.
6 When prompted, click/tap on Run, Yes (UAC), Yes, and OK to approve the merge.
7 You can now delete the downloaded .reg file if you like.
That's it,
Shawn
Related Tutorials
- How to Set Recycle Bin to Permanently Delete Files Immediately in Windows 10
- How to Turn On or Off Recycle Bin Delete Confirmation in Windows 10
- How to Add Secure Delete to Context Menu in Windows 10
- How to Add Secure Delete to Recycle Bin Context Menu in Windows 10
- How to Add or Remove Empty Folder context menu in Windows 10
- How to Delete a Folder in Windows 10
- How to Delete a File in Windows 10
Add Permanently Delete to Context Menu in Windows 10
-
New #1
Hello @Brink ,
,
I have the following . . .
Code:[HKEY_CLASSES_ROOT\AllFilesystemObjects\shell\Windows.PermanentDelete] "CommandStateSync"="" "ExplorerCommandHandler"="{E9571AB2-AD92-4ec6-8924-4E5AD33790F5}" "MUIVerb"="Permanently Delete" "Icon"="shell32.dll,-240" "Position"="Top"
I particularly want the text to showPermanently Delete, with a capitalD.
Besides the above, I have searched theRegistry Editor, but toNOavail.
Is this even possible please, or has that been superseded by => SDelete v2.04 - docs.microsoft
Thanks.

-
New #2
Hello @Paul Black,
This context menu using the built-in shell command of Windows located below instead of SDelete.
HKEY_LOCAL_MACHINE\SOFTWARE\Microsoft\Windows\CurrentVersion\Explorer\CommandStore\shell
I also looked, and couldn't find a way to specify a name you want instead to show on the context menu.
-
-
New #4
Not sure if it’s been mentioned before but the excellent CCleaner has a option to disable delete or enable context menu entries, I had dozens I didn’t need, when I right clicked I had to scroll all the way off screen to find properties, now it’s all tidy…

Add Permanently Delete to Context Menu in Windows 10
How to Add Permanently Delete to Context Menu in Windows 10Published by Shawn BrinkCategory: Customization
09 Dec 2019


 Quote
QuoteTutorial Categories

Related Discussions
