Create Windows 10 ISO image from Existing Installation  

Page 36 of 50 FirstFirst ... 26343536373846 ... LastLast

  1. Posts : 1,602
    W10 Enterprise
       #350

    Just need to understand a few things for the sake of clarity.

    I created a install.wim file using Kari’s DISM - Add or Remove Drivers on an Offline Image tut. In 6.2 of that tut it tells you create an updated ISO image following the steps in this tut, Create Windows 10 ISO image from Existing Installation.

    Now in this tut using the cmdlet:

    Code:
    dism /capture-image /imagefile:E:\install.wim /capturedir:C:\ /ScratchDir:E:\Scratch /name:" W10Entx64" /compress:maximum /checkintegrity /verify /bootable

    I have created the new install.wim file by the capture of my C: drive, with no issues, save that I needed to create the directory E:\Scratch before the capture otherwise it fails.

    The question I have is does this capture contain all the drivers? If so why was there a need to carry out the process in the other tut? I now have a new install.wim with the capture, 15GB and an install.win with the drivers, 4.9GB. What am I missing/not understanding?

    - - - Updated - - -

    Thought I would be a little proactive and use the stuff learned from Kari's last tut DISM - Add or Remove Drivers on an Offline Image and try to find out if the drivers are in the iso.

    So mounted the iso and copied the contents across to a folder M:\TestMount and checked that the files are there.

    Ran the cmdlet:

    Code:
    dism /Get-WimInfo /WimFile:M:\TestMount\sources\install.wim /Index:1
    and this returns the correct information.

    So I checked the properties of the install.wim file to make sure full control was granted, by adding permissions under the security tab.

    Assuming I can get the driver information for the offline install.wim file I Ran the cmdlet:

    Code:
    dism /Image:M:\TestMount\sources\install.wim /Get-Drivers
    But the return is:

    Error: 267

    Unable to access the image.
    Make sure that the image path and the Windows directory for the image exist and you have Read permissions on the folder.

    Is my assumption wrong, you are supposed to be able to get the driver information from an offline image, as the last tut states, so why is this error occurring with the new image ?

    - - - Updated - - -


    Okay so I have now confirmed that the drivers are all in the capture of my C: drive. I found this out, as having had no response to my questions, I decided to use the USB stick to reinstall the system.

    The interesting thing now is Rufus, which I used to create the USB stick, has added a new H: UEFI_NTFS drive to my system. Also when I boot I have the choice of two W10 Volume 4 choices to boot from, from which the system is fully restored.

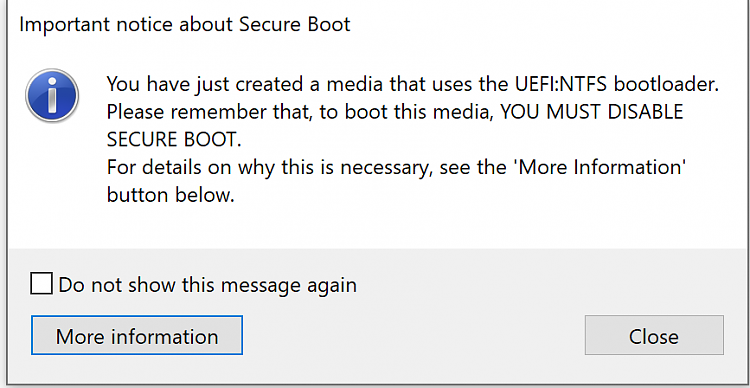
    This is the message I got from Rufus when it had created the USB. I read the article it referred to in “more information”, and that seemed to suggest that Microsoft’s policy on secure boot was “Bullsh*t”, the words from Rufus, not mine.

    Create Windows 10 ISO image from Existing Installation-capture-secure-boot-rufus.png

    From what I understood it was down to, FAT32 v NTFS partitions, Rufus not supporting booting from NTFS, in pure UEFI mode, through iUEFI:NTFS and Microsoft not liking and signing GPLv3.

    I looked into this further and got the SHA1’s rufus provided from my captured iso’s and went to the MSDN Files Info by WZT to see what would happen. Obviously it was not a genuine iso as I had created it from my capture. I then decided to look at the iso’s I have, downloaded, from what I assumed to be official MS downloads, but it appears that only 2 of them are genuine.

    The remaing questions I have are:

    Should I be concerned about the secure boot issue or not?

    Should I be concerned about the iso’s?

    Was the exercise of the DISM - Add or Remove Drivers on an Offline Image tut, good learning though it was, needed as this tut - Create Windows 10 ISO image from Existing Installation does it for you?

    Meantime my thanks to Kari for the excellent tuts and learning curve they provided.

    - - - Updated - - -

    An observation, having gone through the tut and obtained the capture, put it onto USB stick and then using the stick to rebuild the system:

    The system does rebuild, but on boot goes to the login screen but fails if the machine is set to secure boot in bios.

    I don't see anywhere in the tut mentioning this. But as far as I can see using the modified iso created, indeed any modified iso, will force this action and therefore maybe it should be mentioned in this tut. Don't get my intention wrong here, I'm not saying the tut is wrong, just that an important piece of information, in my opinion, is not mentioned, is missing. Having read loads of info on this issue elsewhere I know why this happens, but haven't found any information as to a way around it, that is using the modified iso with secure boot enabled.

    The remaining question I have is:

    Should I be concerned about the secure boot issue or not?

    It would be good to get an opinion on this. Thanks
      My Computer


  2. Posts : 17
    Win 10
       #351

    Would this tutorial also work with a Windows 7 VM on a Windows 10 host? I'm thinking about the section..."Capture Windows image (create custom install.wim)" using DISM to capture the Windows 7 VM but interested if other parts will not work correctly also.
      My Computer


  3. Posts : 17,661
    Windows 10 Pro
    Thread Starter
       #352

    rick99 said:
    Would this tutorial also work with a Windows 7 VM on a Windows 10 host? I'm thinking about the section..."Capture Windows image (create custom install.wim)" using DISM to capture the Windows 7 VM but interested if other parts will not work correctly also.
    Capturing WIM image is done exactly the same way in Windows 7 than in Windows 10. I see no reason why this method shouldn't work in Windows 7.

    Kari
      My Computer


  4. Posts : 51
    Win 10
       #353

    I'm trying to get an understanding of the basic concepts of what I need to do.
    1. I currently have 4 identical laptops.
    2. I have one of the 4 that I booted into normal mode, I installed all the programs I need and it has one user.
    I need to understand how I can start from this setting and use sysprep to copy this image to the other 3 laptops.
    When I do run sysprep on this machine I think it removes the user information.

    I think I need to:
    1. Image the one laptop and save it to restore after I do the sysprep.
    2. Turn on the other 3 laptops and get the windows key from them.
    3. Follow the sysprep instructions in this thread. I'm not sure if I should follow Part 2 and change the user names after I restore the image or follow Part 3.
    4. For each laptop I would change the windows key and the user name in the autounattend.xml file.
    5. Install the Antivirus software on each laptop.

    Please help clarify this so I can get the overall picture of what I have to do.

    Thanks,
    Docfxit
      My Computer


  5. Posts : 1,602
    W10 Enterprise
       #354

    Docfxit said:
    I'm trying to get an understanding of the basic concepts of what I need to do.
    1. I currently have 4 identical laptops.
    2. I have one of the 4 that I booted into normal mode, I installed all the programs I need and it has one user.
    I need to understand how I can start from this setting and use sysprep to copy this image to the other 3 laptops.
    When I do run sysprep on this machine I think it removes the user information.

    I think I need to:
    1. Image the one laptop and save it to restore after I do the sysprep.
    2. Turn on the other 3 laptops and get the windows key from them.
    3. Follow the sysprep instructions in this thread. I'm not sure if I should follow Part 2 and change the user names after I restore the image or follow Part 3.
    4. For each laptop I would change the windows key and the user name in the autounattend.xml file.
    5. Install the Antivirus software on each laptop.

    Please help clarify this so I can get the overall picture of what I have to do.

    Thanks,
    Docfxit


    1. Yes you only need to fully set up , fully update, and image 1 laptop.

    2. Yes get windows key from other lappy's if not on the base.

    3. If generic names, such as User 1 User 2 ,then you can follow P2. If not then follow P3 and onwards.

    4. You could carry out the sysprep detailed in P1 but imho that's maybe overcomplicating the process for you, but it's your call.

    5. You could just do P2 or P3 then P 4 and onwards. Then with the captured install.wim of P4 use the iso, you created in P1, set on USB device formatted using rufus , to deploy to the other 3 machines as they are identical. Then change the windows key in the other 3 machines in the activation settings of W10.


    6. So are these 4 laptops going to be used by different users, for personal or business use, with generic names or different account names, with or without admin privileges?

    7. Are the laptops UEFI capable?

    8. Are you installing 3rd party AV or intending to use MS Windows Security, which is pretty good these days?

    9. Assume 3rd party software is going to be common on all 4 machines?

    10. Are you intending to manage what goes on the machines ongoing?
      My Computer


  6. Posts : 2
    Windows 7
       #355

    So I have been following this tutorial on a real machine but I've come to some problems:

    1) After running sysprep (and dism), my start menu tiles were default again, main panel aswell, setting tiles in action manager weren't as I set them aswell - while the tutorial claimed everything (implying start menu) would stay.

    2) The image I did with my custom install.wim file seems not to be bootable.

    3) And one more which is just something I'd like to get solved before deploying the image, I made a registry tweak so Edge would stop setting itself as the default browser, it had been working during all the restarts and logins in audit mode, but as soon as I finished the installation, that registry would get ignored and Edge would be the default browser again. The entry is still there in "HKEY_CURRENT_USER".

    Help is greatly appreciated, I haven't done this before.
      My Computer


  7. Posts : 1,602
    W10 Enterprise
       #356

    ronneycz said:
    So I have been following this tutorial on a real machine but I've come to some problems:

    1) After running sysprep (and dism), my start menu tiles were default again, main panel aswell, setting tiles in action manager weren't as I set them aswell - while the tutorial claimed everything (implying start menu) would stay.

    2) The image I did with my custom install.wim file seems not to be bootable.

    3) And one more which is just something I'd like to get solved before deploying the image, I made a registry tweak so Edge would stop setting itself as the default browser, it had been working during all the restarts and logins in audit mode, but as soon as I finished the installation, that registry would get ignored and Edge would be the default browser again. The entry is still there in "HKEY_CURRENT_USER".

    Help is greatly appreciated, I haven't done this before.

    1. Did you set sysprep as generalize? If so selecting this option removes all unique system information and anything you set will be removed from the Windows installation. This might also be why your regedit changed, though I believe edge is set as the default by windows in the setup and that is more likely why it changed.

    2. Was your image set to boot from a USB flash drive ? If so the flash drive has to be formatted correctly, which rufus will do for you, creating a fat32 partition 1st which W10 will then boot from to perform the setup.

    Rufus
    Last edited by techquest; 29 May 2019 at 13:04.
      My Computer


  8. Posts : 2
    Windows 7
       #357

    techquest said:
    1. Did you set sysprep as generalize? If so selecting this option removes all unique system information and anything you set will be removed from the Windows installation. This might also be why your regedit changed, though I believe edge is set as the default by windows in the setup and that is more likely why it changed.

    2. Was your image set to boot from a USB flash drive ? If so the flash drive has to be formatted correctly, which rufus will do for you, creating a fat32 partition 1st which W10 will then boot from to perform the setup.

    Rufus
    Yes, I set setup as generalize, I thought it would be better for various PCs setups, which I had concluded from point 4.2 here. The word "generalize" is anything but self-explanatory, especially in Czech, but that might be just my personal opinion. Also I am pretty sure at least my start menu stayed after the install in previous install shots which should've had generalize command turned on. I used the command from the reference above.

    Well, you're right with the USB stick, it stayed NTFS, I used Windows Creation Tool, maybe Microsoft wants you to use a different program to burn your custom system with? Stupid if you ask me.

    Is there a way to return to my audit mode setup from this new iso and get my stuff fixed? I am not confident with WinAIO. Also, all the other default programs (like VLC Media Player for music and movies) stayed default, it was just Edge that had to force itself back probably because of ignored registry. With Firefox previously being set as default, it throws 2 error messages right after the system setup that it had to change html and pdf default program to Edge.

    Thank you
      My Computer


  9. Posts : 1,602
    W10 Enterprise
       #358

    ronneycz said:
    Yes, I set setup as generalize, I thought it would be better for various PCs setups, which I had concluded from point 4.2 here. The word "generalize" is anything but self-explanatory, especially in Czech, but that might be just my personal opinion. Also I am pretty sure at least my start menu stayed after the install in previous install shots which should've had generalize command turned on. I used the command from the reference above.

    Well, you're right with the USB stick, it stayed NTFS, I used Windows Creation Tool, maybe Microsoft wants you to use a different program to burn your custom system with? Stupid if you ask me.

    Is there a way to return to my audit mode setup from this new iso and get my stuff fixed? I am not confident with WinAIO. Also, all the other default programs (like VLC Media Player for music and movies) stayed default, it was just Edge that had to force itself back probably because of ignored registry. With Firefox previously being set as default, it throws 2 error messages right after the system setup that it had to change html and pdf default program to Edge.

    Thank you


    1. In 4.2 you used Kari stated "As rule of thumb: You can customize everything related to themes, fonts, colors, sounds, icons, desktop and IE. You cannot customize anything on Start Menu and Taskbar."

    2. I can imagine sysprep/generalize is difficult to understand in Czech, it's difficult to understand in English too.

    Microsoft's explanation:

    "sysprep /generalize: If generalize option is checked, all unique system information is removed from the Windows installation. The security ID (SID) resets, any system restore points are cleared and event logs are deleted.

    The next time the computer starts, the specialize configuration pass runs. A new security ID (SID) is created, and the clock for Windows activation resets, if the clock has not already been reset three times.

    Limits on how many times you can run Sysprep
    You can run the Sysprep command up to 8 times on a single Windows image. After running Sysprep 8 times, you must recreate your Windows image. "

    On networked computers generalize must be checked otherwise you get duplicate SID’s on the network.

    3. As far as I'm aware you can only use the media creation tool to create the USB if you have a UEFI capable PC, otherwise, as mentioned, you will need to use something like rufus. If not, I stand corrected.

    4. I guess the your html and pdf issues are because edge is MS's default choice of browser, which in turn decides the pdf and html choices as default in edge. Take a look at this to see how you can stop edge hijacking your html and pdf issue:

    How to Stop Edge From Hijacking Your PDF or HTML Associations?

    Though I'm not sure this would not be altered by the generalize setting.

    Don't understand how VLC stayed default as Windows Media is the MS default player. Though, unlike edge, this is a choice a user has to select and set up so I think it is only then that the choices of media it will open are set.

    5. Take a look at this link which, I think, suggest you can get back to your audit mode.

    https://docs.microsoft.com/en-us/win...t-mode-or-oobe

    Taking a look at WinAOI to see what it's all about.
      My Computer


  10. Posts : 6
    Windows 10 LTSC 2019
       #359

    Awesome tutorial! Just registered to say thanks :)

    If I did not want to have any customization of tiles, themes etc can I omit steps 3.4 & 3.5?

    I will be installing some software.

    Many thanks!
      My Computer


Tutorial Categories

Create Windows 10 ISO image from Existing Installation Tutorial Index Network & Sharing Instalation and Upgrade Browsers and Email General Tips Gaming Customization Apps and Features Virtualization BSOD System Security User Accounts Hardware and Drivers Updates and Activation Backup and Restore Performance and Maintenance Mixed Reality Phone


  Related Discussions
Our Sites
Site Links
About Us
Windows 10 Forums is an independent web site and has not been authorized, sponsored, or otherwise approved by Microsoft Corporation. "Windows 10" and related materials are trademarks of Microsoft Corp.

© Designer Media Ltd
All times are GMT -5. The time now is 10:47.
Find Us


Windows 10 Forums