

How to Change Wireless Network Connection Priority Order in Windows 10
Windows will usually automatically connect to networks in this priority order:
- Ethernet
- Wi‑Fi (wireless)
- Mobile broadband (cellular)
When you connect to a new wireless network, Windows will create a profile for the wireless network. A wireless (Wi-Fi) network profile contains the SSID (network name), password key, and security information to be able to connect to a wireless network.
Windows will automatically connect to your wireless network profiles based on a priority order when the wireless network is in range, and an Ethernet connection is not available.
If you check "Connect automatically" while connecting to a wireless network, it will be placed at the top of the priority list.
If you have multiple wireless network connections, you can change the priority so the network profile you prefer will be the first one to use instead when in range.
This tutorial will show you how to change the connection priority order of wireless network profiles to your preference in Windows 10.
Contents
- Option One: To Change Wireless Network Connection Priority while Connecting to Wireless Network
- Option Two: To Change Wireless Network Connection Priority Order in Command Prompt
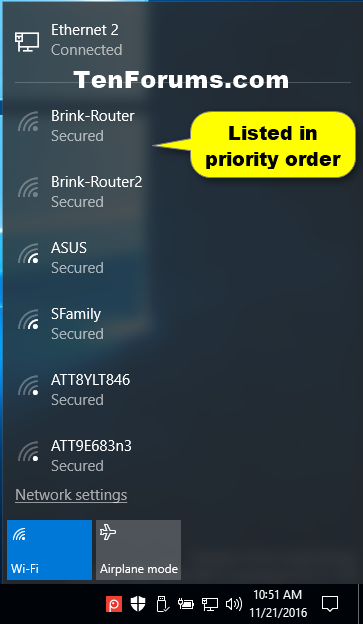
EXAMPLE: Available network connections
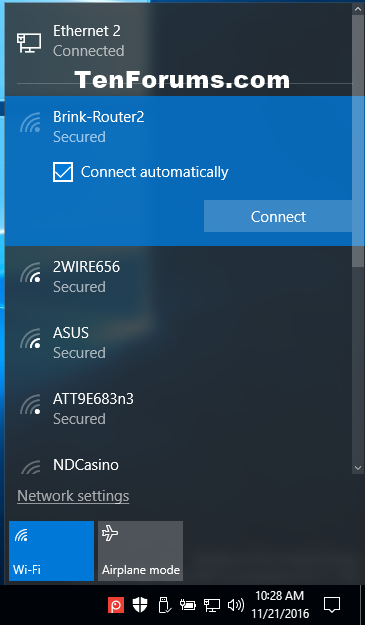
1 While connecting to a wireless network, check the Connect automatically box, and click/tap on Connect to place this wireless network profile at the top of the priority order list. (see screenshot below)
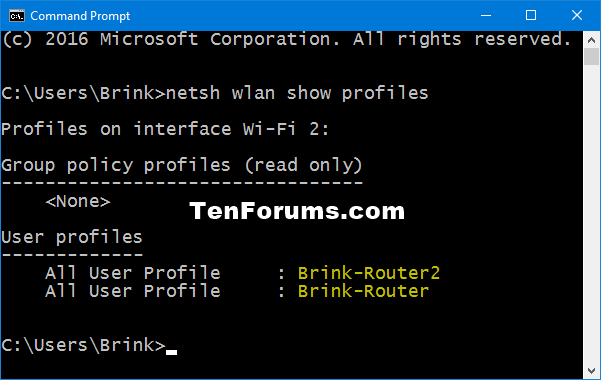
1 Open a command prompt.
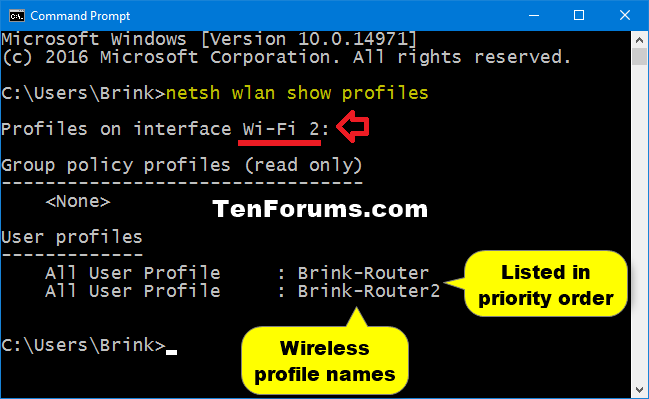
2 Type thenetsh wlan show profilescommand into the command prompt, and press Enter. (see screenshot below)
The wireless network profiles will be listed in priority order to connect to when in range.
Make note of the wireless network profile name (ex: "Brink-Router2") you want to change the priority order of.
Make note of the interface name (ex: "Wi-Fi 2") this wireless network profile (ex: "Brink-Router2") is on.
3 Type the command below into the command prompt, and press Enter. (see screenshot below)
netsh wlan set profileorder name="WirelessProfileName" interface="InterfaceName" priority=#
Substitute WirelessProfileName in the command above with the actual wireless network profile name (ex: "Brink-Router2") from step 2.
Substitute InterfaceName in the command above with the actual interface name (ex: "Wi-Fi 2") from step 2.
Substitute # in the command above with a number (ex: "1") you want the wireless network profile to be listed as in the priority order list. For example, I have 2 wireless network profiles listed in step 2, so I can set to have the profiles listed in priority order between 1-2.
For example:
To set the "Brink-Router2" profile on the "Wi-Fi 2" interface first (top) in the connection priority order list.
netsh wlan set profileorder name="Brink-Router2" interface="Wi-Fi 2" priority=1
OR
To set the "Brink-Router" profile on the "Wi-Fi 2" interface second (bottom) in the connection priority order.
netsh wlan set profileorder name="Brink-Router" interface="Wi-Fi 2" priority=2
4 Repeat step 3 until you have all your wireless profiles listed in the priority order you want.
5 When finished, repeat step 2 to confirm the priority order. (see screenshot below)
6 When completely finished, you can close the command prompt if you like.
That's it,
Shawn
Related Tutorials
- How to Change Network Adapter Connection Priorities in Windows 10
- How to Add a Wireless Network Profile in Windows 10
- How to Connect To a Wireless Network in Windows 10
- How to Turn On or Off Connect Automatically to Wireless Network in Windows 10
- How to Turn On or Off AutoSwitch for Wireless Network Connection in Windows 10
- How to Disconnect from a Wireless Network in Windows 10
- How to See List of Wireless Network Profiles in Windows 10
- How to Automatically Turn Off Wi-Fi Upon Ethernet Connect in Windows
- How to Connect to and Disconnect from a Cellular Data Network in Windows 10
- How to Change When to Use Cellular Instead of Wi-Fi Network in Windows 10
- How to Change Preferred Band for Wireless Network Adapter in Windows
Change Wireless Network Connection Priority Order in Windows 10
-
New #1
Shawn,
Do you know how to use netsh to retrieve the priority setting in order to check it?
- I am seeing strange behaviour and want to find out what is going on.
- I have played around with netsh wlan a lot but cannot find any method for getting WiFi network priority out of the profile.
- My previous method of showing relative priorities does not show any change so it does not seem to be valid any more - the command netsh wlan show profiles used to list profiles in their priority order but it currently shows the expected sequence even though the wrong network has been chosen.
Earlier today, two computers connected to the lower priority network even though there did not seem to be any interruption to the higher priority one. Furthermore, they did not switch back automatically even though the lower priority network also has the look for other networks whilst connected to this one ["AutoSwitch"]setting checked [the main network does not have this setting].
Denis
-
New #2
Hello Denis, :)
The command in step 2 of Option Two should show your wireless networks listed in priority order. Top of the list is higher.
-
New #3
Shawn,
"My previous method of showing relative priorities does not show any change so it does not seem to be valid any more - the command netsh wlan show profiles used to list profiles in their priority order but it currently shows the expected sequence even though the wrong network has been chosen."
That's why I hoping to find a direct method of retrieving the priority.
Denis
-
New #4
The higher priority connection sounds to be correct then since it's listed above the lower priority one.
Have you already checked to see if the higher priority connection has "connect automatically" turned on for it?
 Turn On or Off Connect Automatically to Wireless Network in Windows 10 Windows 10 Tutorials
Worse case, you should be able to remove the networks from the computers, and then set them back up again to sort it.
-
New #5
Shawn,
Yes, sorry - I had connect automatically set but forgot to mention it.
By the way, the priority order is also shown in Settings, Networks, WiFi, Manage known networks, Sort by - Preference. [Ver 1709, I don't know when this was introduced] It's nice to have an MS confirmation of the relative priorities instead of just concluding it from observations of netsh results.
On one computer, I forgot all my wifi networks [and manually deleted what appeared to be remnant entries in the Registry profile list**] then set them up again.
** When I bought a new phone last Summer, I re-used the WiFi hotspot name ["Fred"] & security key from my old phone. In addition to the expected entry in the Registry profiles I also found an entry [that was actually the one in use] with the profile name Fred 2 & Description Fred yet that profile name was not reported by Netsh / Settings, they only reported Fred. Fred 2 was only shown in the tooltip as I hovered over the network icon in the TaskBar-SystemTray. It is possible that this is the root cause of my problem.
If the problem reoccurs on the other computer but not this one then I will have a decent basis for investigating exactly what is happening.
All the best,
Denis
-
-
New #7
Thank you very much for this guide, it is very helpful. I successfully changed the order in commandline. But I really miss the GUI option. They had it in old Windows 7, now they removed it in Windows 10.
You know, they are finally retiring the old control panel and they did not migrate this setting option to the new control panel. Which is a shame. I filed a feedback for this, can you all please upvote it so they see? Just search for wifi priority in the feedback hub. Or click direct here: https://aka.ms/AAb2su2
-
Posts : 11,062 Windows 10 Pro version 22H2 0n one desktop and running Window 11 Pro 22H2 on unsupported desktopNew #8
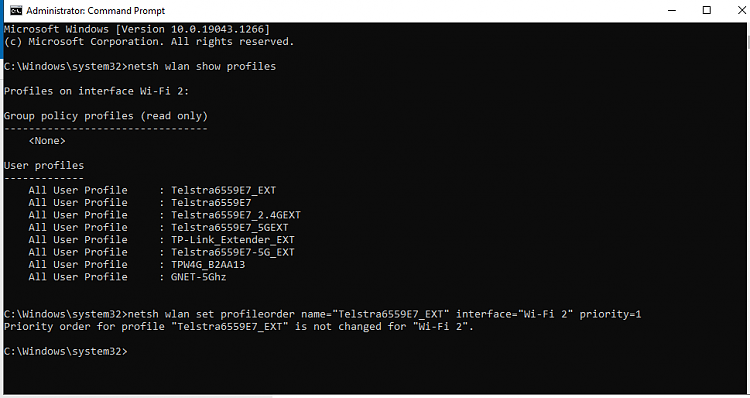
Hello Shawn my net connection keeps swapping around even though I set the one connection I want (the fastest one) as Connect automatically so I tried the command prompt method and came up with the following end line - the pic will not attach.
Prioty order for "Telstra6559E7_EXT" is not changed for "WI-FI 2" .
This is the profile which is at the top of the listings of connections
Last edited by Brink; 12 Oct 2021 at 18:48. Reason: attached uploaded file
-
-

Change Wireless Network Connection Priority Order in Windows 10
How to Change Wireless Network Connection Priority Order in Windows 10Published by Shawn BrinkCategory: Network & Sharing
10 Feb 2021


 Quote
Quote

Tutorial Categories

Related Discussions
