

How to Add or Remove Drives in Send to Context Menu in Windows 10
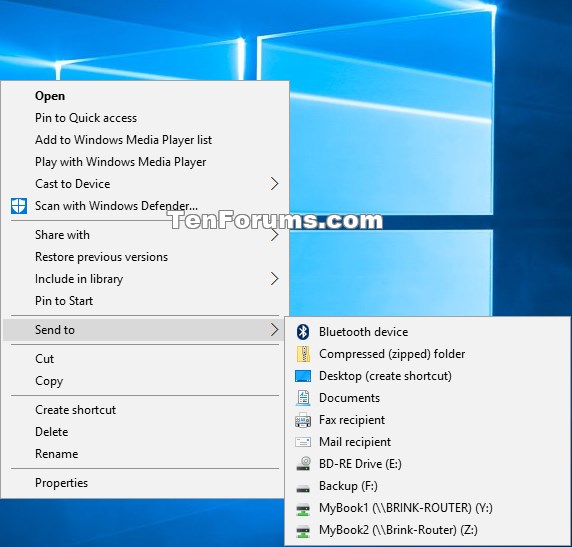
The Send to context menu makes it easy for you to quickly send a copy of items (ex: files, folders, libraries) to Bluetooth device, Compressed (zipped) folder, Desktop (create shortcut), Documents, Fax recipient, Mail recipient, and removable and network drives.
Sometimes drives may cause a delay when trying to open the Send to context menu while you are waiting on them to connect or spin back up if turned off after being idle.
This tutorial will show you how to add or remove drives in the Send to context menu for only you or all users in Windows 10.
Contents
- Option One: To Not See Drives by using Extended Send to Context Menu
- Option Two: To Add or Remove Drives in Send to Context Menu for Current User using a REG file
- Option Three: To Add or Remove Drives in Send to Context Menu for All Users using a REG file
EXAMPLE: Send to context menu
1 Select the file(s) you want to open the Send to context menu for, and perform one of the actions below:
- Press and hold the Shift key, right click or press and hold on the selected file(s), release the Shift key, and click/tap on Send to.
- Press the Shift+F10 keys, and click/tap on Send to.
- Press the Shift+F10 keys, and press the N key.
The downloadable .reg files below will add and modify the DWORD value in the registry key below.
HKEY_CURRENT_USER\Software\Microsoft\Windows\CurrentVersion\Policies\Explorer
NoDrivesInSendToMenu DWORD
(delete) = Add drives
1 = Remove drives
1 Do step 2 (add) or step 3 (remove) below for what you would like to do.
This is the default setting.
A) Click/tap on the Download button below to download the file below, and go to step 4 below.
Add_drives_to_SendTo_context_menu_for_current_user.reg
Download
A) Click/tap on the Download button below to download the file below, and go to step 4 below.
Remove_drives_from_SendTo_context_menu_for_current_user.reg
Download
4 Save the .reg file to your desktop.
5 Double click/tap on the downloaded .reg file to merge it.
6 When prompted, click/tap on Run, Yes (UAC), Yes, and OK to approve the merge.
7 Restart explorer or sign out and sign in to apply.
8 You can now delete the downloaded .reg file if you like.
You must be signed in as an administrator to be able to do this option.
Removing drives using this option will override Option One and Option Two above.
The downloadable .reg files below will add and modify the DWORD value in the registry key below.
HKEY_LOCAL_MACHINE\SOFTWARE\Microsoft\Windows\CurrentVersion\Policies\Explorer
NoDrivesInSendToMenu DWORD
(delete) = Add drives
1 = Remove drives
1 Do step 2 (add) or step 3 (remove) below for what you would like to do.
This is the default setting.
A) Click/tap on the Download button below to download the file below, and go to step 4 below.
Add_drives_to_SendTo_context_menu_for_all_users.reg
Download
A) Click/tap on the Download button below to download the file below, and go to step 4 below.
Remove_drives_from_SendTo_context_menu_for_all_users.reg
Download
4 Save the .reg file to your desktop.
5 Double click/tap on the downloaded .reg file to merge it.
6 When prompted, click/tap on Run, Yes (UAC), Yes, and OK to approve the merge.
7 Restart explorer or sign out and sign in to apply.
8 You can now delete the downloaded .reg file if you like.
That's it,
Shawn
Related Tutorials
- How to Add or Remove Send to Context Menu in Windows 10
- How to Add or Remove Items in Send To context menu in Windows 7, Windows 8, and Windows 10
- How to Restore Default Send to Context Menu Items in Windows 10
- How to Add or Remove Quick Launch from Send to Context Menu in Windows 10
- How to Add or Remove Duplicate Drives in Navigation Pane of File Explorer in Windows 10
- How to Enable or Disable Delay Send to Context Menu Build in Windows 10
- How to Add Printer to Send To Context Menu in Windows 10
Add or Remove Drives in Send to Context Menu in Windows 10
-
New #1
I have no "Send To Option" in Send To Menu
Hi I did all the above I have the "Add and Remove Drives and Add Remove Files from the Context Send to menu" Regedit files in a folder on my Desktop, after following this tutorial" and Now I cannot even get any "Choice" Send To Menu in The Right Click Doc, Folder I wanted to place Google Drive in the Send to so I can Shorten the Trip I have Google Sync But I do not Like it or understand it I have 200 GB of storage in GD Can you help me out, Not the Tutorials fault' Just me, If you can just tell me how to Reverse the Process so I go back and I can try again I would be grateful
-
New #2
Hello @Dasha,
The add .reg files will restore the default setting. They remove the DWORD value from the registry key.
However, this is intended for physical hard drives instead. Google Drive wouldn't be included since it's basically just a folder.
You can use an option in the tutorial below instead to add a shortcut of your Google Drive folder to the Send To context menu.
Add or Remove Items in Send To context menu in Windows
-
New #3
Thanks, Brinks I did as you suggested Mate and in File Explorer > Send To' the Google Shortcut is there now but I still have no Send To option in the right-click menu under my DAZZLER Main Admin / Admin Account? I have restarted the PC twice made no difference. Should I just delete the folder on the Desktop with the 4 Add - Remove Reg Files in the folder on my Desktop?
-
New #4
Odd only that account doesn't have a Send To context menu and the others do.
You might see if using the tutorial below may add the Send To context menu back.
Send to Context Menu - Add or Remove in Windows 10
There's no need to keep the .reg files unless you just want to.
-
New #5
Should I Close the Original Thread and Move to a Dedicated WEX HDD Bah
Thanks, Brink' I' know I should not post here but My PC is a Mess, I have been trying to do a complete clean Install since Dec 2019 (Caledon Ken) every time I plan and get ready, something happens?
I did a Complete Backup using AOMEI onto my WD Passport on 26- 04-20 and the WD hard drive whilst still working stationary LED cannot be Read except after a Week I got (Fluked) GGGG Partition at [E] & GGGG & FFF Partitions the HDD is only 18 months OLD. WD Forum and Support don't answer.
Is there someone in this forum who specializes in EX HDD and Backups I can approach who can assist please WD Forum is No Reply after a week?
I posted here at: Installation and Upgrade_Dasha _WD Ext HDD Not Recognised (incorrect drive Path and Letter) there is a lot of Screen Clips and the full story I just need to get to the right Category Sorry Brink but I have tried everything I even messaged Kari, I just need to close the other post and move it to the right forum
WD MY Cloud would set up out of the box? And it still won't accept any Password or Create New Password through GMail, Lost Password I have tried at least 12 times Basically Brink I cannot go any further my experience does not go that far thanks and I confess age is catching up with me, thanks for all your help, not just now but over the years my Kindest Regards Dasha
-
-
New #7
Okay Brink I will do just that thanks Dasha
Sorry Brink I forgot to explain that it worked Thank,ms Send To is back in the Context Menu thank you it's appreciated
DashaLast edited by Dasha; 08 May 2020 at 21:22. Reason: Forgot to Thank and Explain that Brinks Suggestion Worked
-
New #8
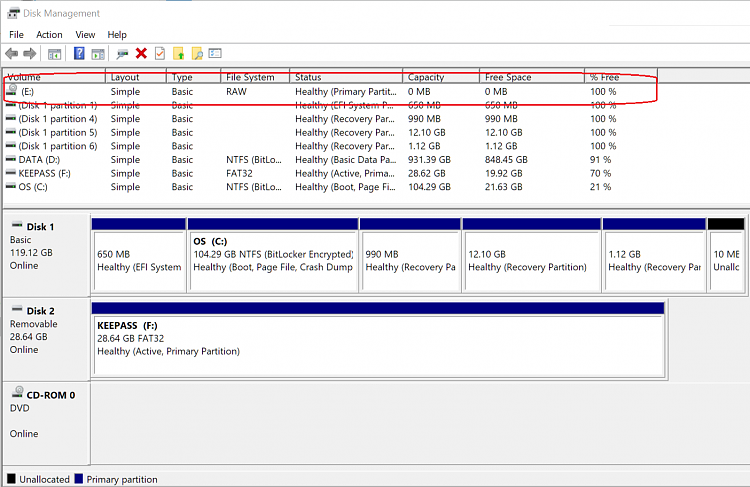
My daily rider lappy does not have Send to DVD RW Drive (E:)?
My dust collector lappy has Send to DVD RW Drive (E:).
Does Option 2 or 3 work for W10 Home 22H2.
I've run reg fix several times w Restart (not Shut down) machine.
I do not find > NoDrivesInSendToMenu DWORD
I've uninstalled DVD driver.
File Explorer sees DVD RW Drive (E:)
Disk Management sees CD ROM-0 DVD Online Capacity 0 MB | Free Space 0 MB
(new DVD+R RW 4.7GB in tray)
Context Menu see (F:) flash drive.
Context Menu does not see (E:) dvd drive.
-
-
New #9
Hello @blm,
A CD/DVD drive is considered a media drive, so it will not show up in the context menu until the drive contains media which would be a writable CD/DVD.
The NoDrivesInSendToMenu DWORD is not there by default when set to show these drives.

Add or Remove Drives in Send to Context Menu in Windows 10
How to Add or Remove Drives in Send to Context Menu in Windows 10Published by Shawn BrinkCategory: Customization
28 Feb 2020


 Quote
Quote
Tutorial Categories

Related Discussions
