

How to Enable or Disable Device Guard in Windows 10
Device Guard is a combination of enterprise-related hardware and software security features that, when configured together, will lock a device down so that it can only run trusted applications that you define in your code integrity policies. If the app isnt trusted it cant run, period. With hardware that meets basic requirements, it also means that even if an attacker manages to get control of the Windows kernel, he or she will be much less likely to be able to run malicious executable code. With appropriate hardware, Device Guard can use the new virtualization-based security in Windows 10 (available in Enterprise and Education desktop SKUs and in all Server SKUs) to isolate the Code Integrity service from the Microsoft Windows kernel itself. In this case, the Code Integrity service runs alongside the kernel in a Windows hypervisor-protected container.
Device Guard references: (recommend to read)
- Device Guard hardware requirements | Microsoft Docs
- Device Guard deployment guide (Windows 10)
- Introduction to Device Guard - virtualization-based security and code integrity policies (Windows 10)
- Requirements and deployment planning guidelines for Device Guard (Windows 10)
- Planning and getting started on the Device Guard deployment process (Windows 10)
- Deploy Device Guard - deploy code integrity policies (Windows 10)
- Deploy Device Guard - enable virtualization-based security (Windows 10)
- Windows 10 Enterprise Security: Credential Guard and Device Guard | Dell US
- ThinkPad support for Device Guard and Credential Guard in Microsoft Windows 10 - ThinkPad
- HP Manageability Integration Kit Supported Platforms | HP Client Management Solutions
- Windows 10 Device Guard and Credential Guard Demystified
This tutorial will show you how to enable or disable Device Guard virtualization-based security on Windows 10 Enterprise and Windows 10 Education PCs.
You must be signed in as an administrator to enable or disable Device Guard.
Here's How:
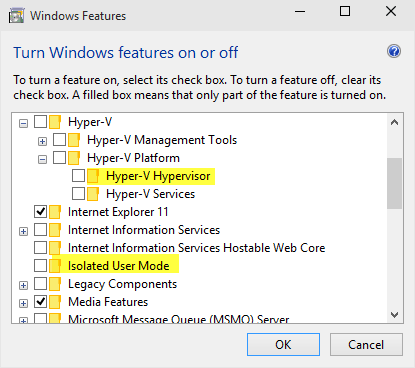
1 Open Windows Features, and:
In Windows 10 Enterprise/Education version 1607 and newer, check Hyper-V Hypervisor under Hyper-V, and click/tap on OK. (see left screenshot below)
OR
In Windows 10 Enterprise/Education versions earlier than 1607, check Hyper-V Hypervisor under Hyper-V, check Isolated User Mode, and click/tap on OK. (see right screenshot below)

2 Open the Local Group Policy Editor.
3 Navigate to the key below in the left pane of Local Group Policy Editor. (see screenshot below)
Computer Configuration\Administrative Templates\System\Device Guard
4 In the right pane of Device Guard in Local Group Policy Editor, double click/tap on the Turn On Virtualization Based Security policy to edit it. (see screenshot above)
5 Do step 6 (enable) or step 7 (disable) below for what you would like to do.
A) Select (dot) Enabled. (see screenshot below step 7)
B) Under Options, select Secure Boot or Secure Boot and DMA Protection in the Select Platform Security Level drop menu for what you want.
The Secure Boot (recommended) option provides secure boot with as much protection as is supported by a given computers hardware. A computer with input/output memory management units (IOMMUs) will have secure boot with DMA protection. A computer without IOMMUs will simply have secure boot enabled.
The Secure Boot with DMA will enable secure bootand VBS itselfonly on a computer that supports DMA, that is, a computer with IOMMUs. With this setting, any computer without IOMMUs will not have VBS (hardware-based) protection, although it can have code integrity policies enabled.
C) Under Options, select Enabled with UEFI lock or Enabled without lock in the Virtualization Based Protection of Code Integrity drop menu for what you want.
The Enabled with UEFI lock option ensures that Virtualization Based Protection of Code Integrity cannot be disabled remotely. In order to disable the feature, you must set the Group Policy to "Disabled" as well as remove the security functionality from each computer, with a physically present user, in order to clear configuration persisted in UEFI.
The Enabled without lock option allows Virtualization Based Protection of Code Integrity to be disabled remotely by using Group Policy.
D) If you like, you could also enable Credential Guard by selecting Enabled with UEFI lock or Enabled without lock in the Credential Guard Configuration drop menu for what you want.
The Enabled with UEFI lock option ensures that Credential Guard cannot be disabled remotely. In order to disable the feature, you must set the Group Policy to "Disabled" as well as remove the security functionality from each computer, with a physically present user, in order to clear configuration persisted in UEFI.
The Enabled without lock option allows Credential Guard to be disabled remotely by using Group Policy. The devices that use this setting must be running at least Windows 10 (Version 1511).
E) Go to step 8 below.
A) Select (dot) Not Configured or Disabled, click/tap on OK, and go to step 8 below. (see screenshot below)
Not Configured is the default setting.
8 Close the Local Group Policy Editor.
9 Restart the computer to apply.
That's it,
Shawn
Related Tutorials
- How to Verify if Device Guard is Enabled or Disabled in Windows 10
- How to Enable or Disable Credential Guard in Windows 10
- How to Enable or Disable Secure Boot in UEFI
- How to Turn On or Off Microsoft Defender Antivirus in Windows 10
Enable or Disable Device Guard in Windows 10
-
New #1
I am running VMWare Workstation Pro 15. Since updating to Windows 10 Pro 1904, whenever I attempt to start a VM, a dialog box informs me that VMWare is incompatible with Device Guard/Credential Guard. I have followed all the steps from this site to disable and verify, rebooted each time, and msinfo says that Virtualization based security is running. Apparently it is no longer called Device/Credential guard? At any rate, I still cannot boot any VM in VMWare. Any advice would be greatly appreciated.
-
New #2
Hello Stuart, and welcome to Ten Forums.
Do you have any 3rd party security software installed?
-
New #3
Thank you for your quick response. And no, I only have Windows Defender running.
-
-
-
New #6
I have the same issue, VM Ware 15, done all the changes to disable Device Guard, still WMWare will not run. The only way I can get this running is to turn off hyperviser at boot via bcdedit. Windows Build 1903, so painful.
-
New #7
Please be sure to send feedback about this issue to VMWare and Microsoft to hopefully help get it fixed in a future update.
-
New #8
Hey! I've been searching and this worked for me:
Download this script from Microsoft.
Run Powershell as administrator and follow this steps:
To verify DG/CG is enabled: DG_Readiness_Tool_v3.6 -Ready
To disable DG/CG: DG_Readiness_Tool_v3.6 -Disable
and restart the PC.
If Powershell can't execute the script, first try to set the execution policies unrestricted with this just typing:
Set-ExecutionPolicy Unrestricted
Try again to execute the script and restart the PC. It works fine to me.
-
-
New #9
Is Device Guard available in Windows 10 Pro? I have Device Guard in Group Policy.

Enable or Disable Device Guard in Windows 10
How to Enable or Disable Device Guard in Windows 10Published by Shawn BrinkCategory: Security System
23 Jun 2020


 Quote
QuoteTutorial Categories

Related Discussions
