

How to Custom Install Windows 10
When you perform a custom install of Windows 10, a clean install of Windows 10 is performed only on the same partition as the previous installation of Windows to replace it, and the previous installation is moved into the C:\Windows.old folder as a backup. Once the custom install has finished, you will be able to copy any files you want back from the C:\Windows.old folder.
A custom install of Windows 10 can be useful if you are unable to start Windows for whatever reason, need to reinstall Windows, but do not want to lose any files in your current installation by doing a full clean install.
This tutorial will show you step by step on how to do a custom install of Windows 10 with UEFI or Legacy BIOS on your PC.
You will need to be connected to the Internet while performing a custom install.
Here's How:
1 Temporarily disconnect all non OS hard drives until Windows installation has finished. This is to avoid Windows Setup from installing files or partitions on other hard drives by mistake.
2 Do the step below depending on how you want to do a custom install of Windows 10.
- step 3: To Custom Install Windows 10 with bootable USB
- step 4: To Custom Install Windows 10 with an ISO file
This option is good to use if you are unable able to boot into Windows.
A) If you haven't already, you will need to create a bootable Windows 10 installation USB.
The USB you use must be created for the same UEFI or Legacy BIOS currently used by Windows.
B) Boot from the USB flash drive on your computer.
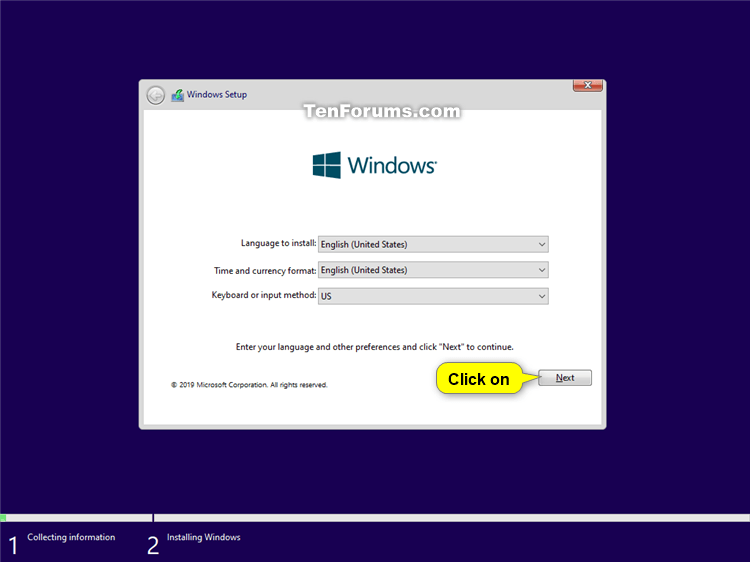
C) Select your language, time and currency, and keyboard or input method preferences, and click/tap on Next. (see screenshot below)
D) Click/tap on the Install Now button to start the installation, and go to step 5 below. (see screenshot below)
You must be signed in to Windows as an administrator to do this option.
A) If you haven't already, you will need to download a Windows 10 ISO file.
The ISO file you use must be created for the same UEFI or Legacy BIOS currently used by Windows.
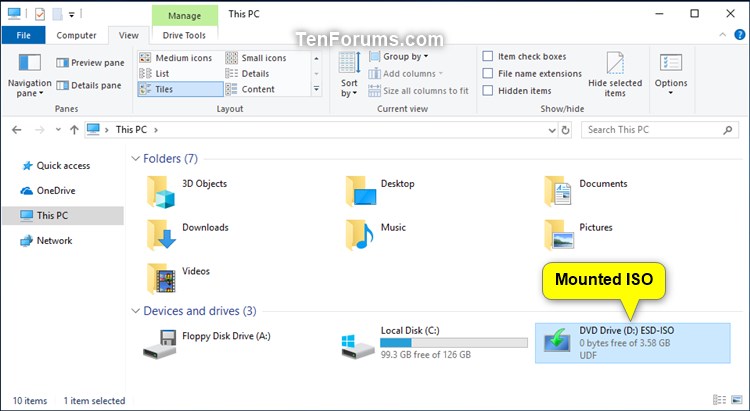
B) Mount the ISO file. (see screenshot below)
C) Open the drive (ex: "D") for the mounted ISO file, open the Sources folder, and run the setup file. (see screenshot below)
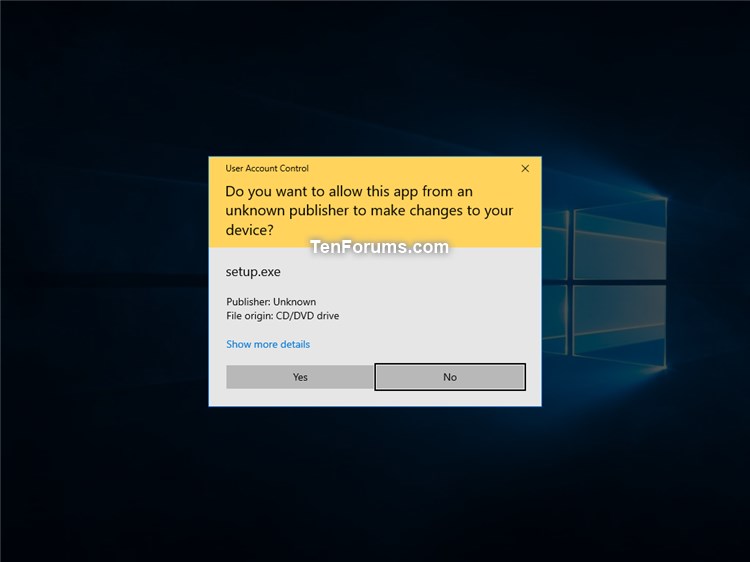
D) If prompted by UAC, click/tap on Yes to approve. (see screenshot below)
E) Select your language, time and currency, and keyboard or input method preferences, click/tap on Next, and go to step 5 below. (see screenshot below)
5 Enter the product key for the Windows 10 edition (ex: Home or Pro) you want installed and activated, and click/tap on Next. (see screenshot below)
If you do not have a product key available right now, then you can click/tap on the I don't have a product key link to be able to manually activate Windows 10 later when you do have a product key.
If you want to activate with a digital license linked to your Microsoft account, then click/tap on the I don't have a product key link, and be sure to set up your Microsoft account at step 20 below.
You will not be asked to enter a product key if installing Windows 10 Enterprise. You will need to activate later after installation has finished.
If you took advantage of the free Windows 10 offer, then you can enter the Windows 7 or Windows 8 product key that you upgraded to Windows 10 from.
If this is an OEM PC that has a valid product key embedded in its UEFI firmware chip, then you will not be prompted to enter a product key. Windows 10 will automatically use the embedded product key if its valid for the edition being installed. If needed, you can change the product key after installation has finished.
6 If you clicked on I don't have a product key in step 5 above, then you will need to select the edition that you want to install, and click/tap on Next. (see screenshot below)
7 Check the I accept the license terms box, and click/tap on Next. (see screenshot below)
8 Click/tap on the Custom: Install Windows only (advanced) option. (see screenshot below)
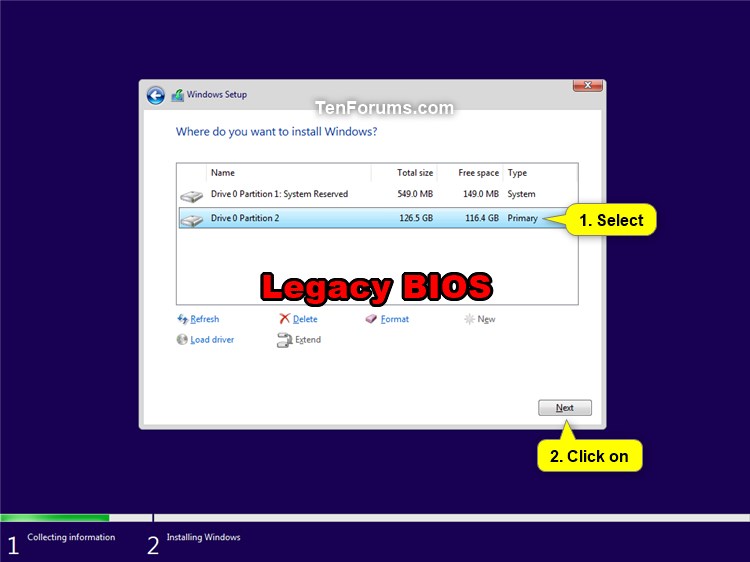
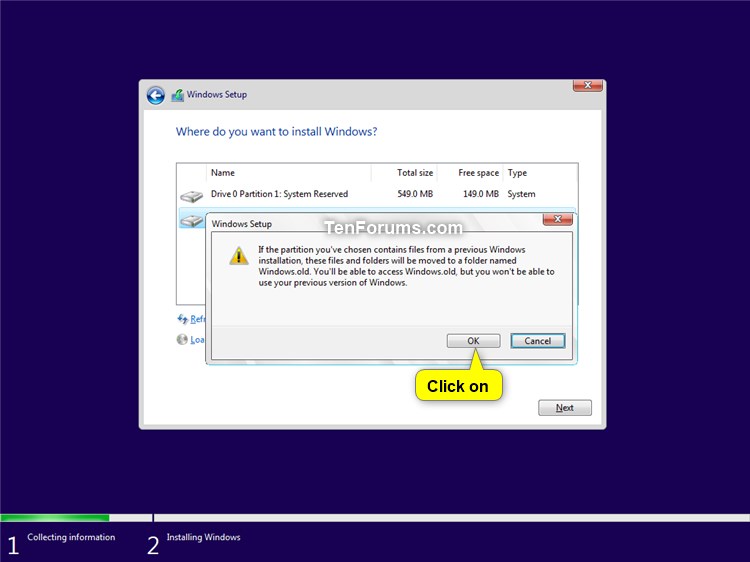
9 Select the Primary partition that Windows is installed on, and click/tap on Next. (see screenshots below)
10 Click/tap on OK. (see screenshot below)
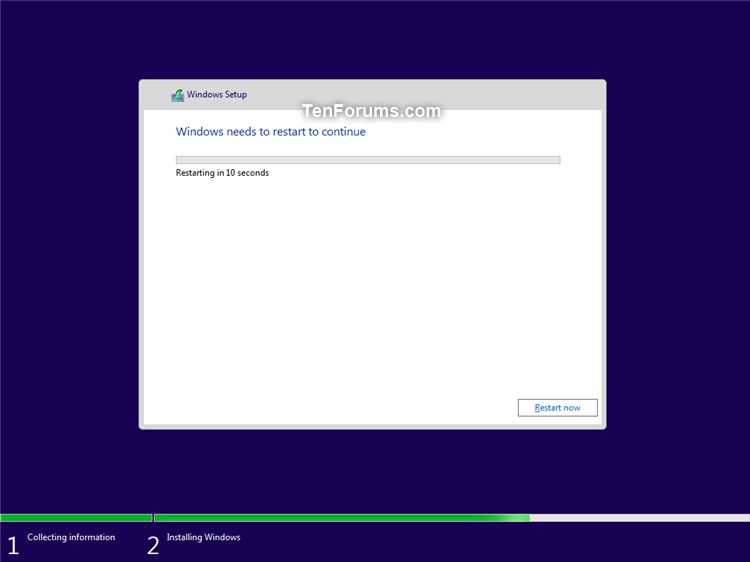
11 The installation of Windows 10 will now begin. (see screenshots below)
During the installation, your screen may flash and computer will restart a few times.

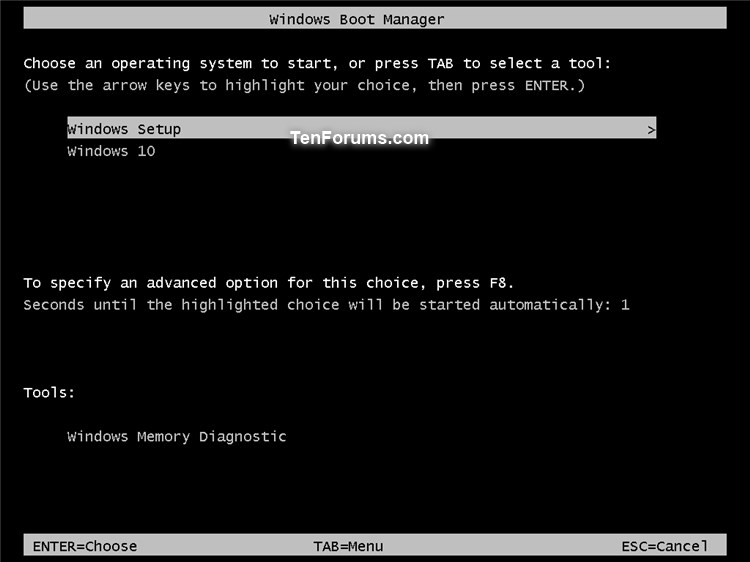
12 During restarts, ignore the Choose an operating system or Windows Boot Manager screens. You do not need to do anything on them since the installation will automatically continue. (see screenshots below)

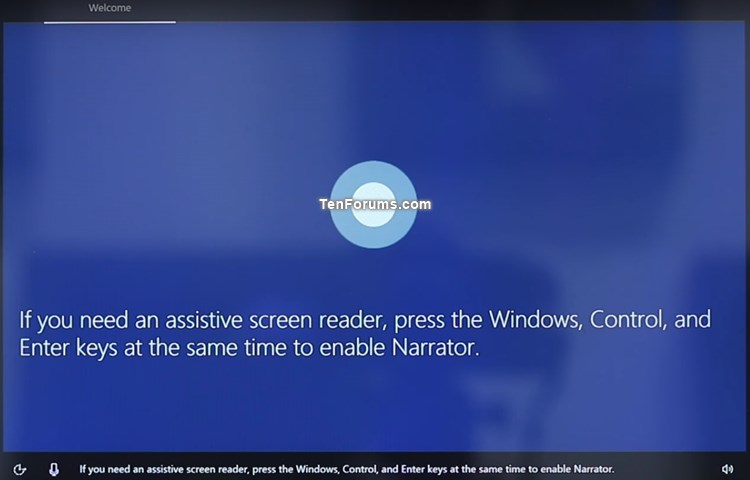
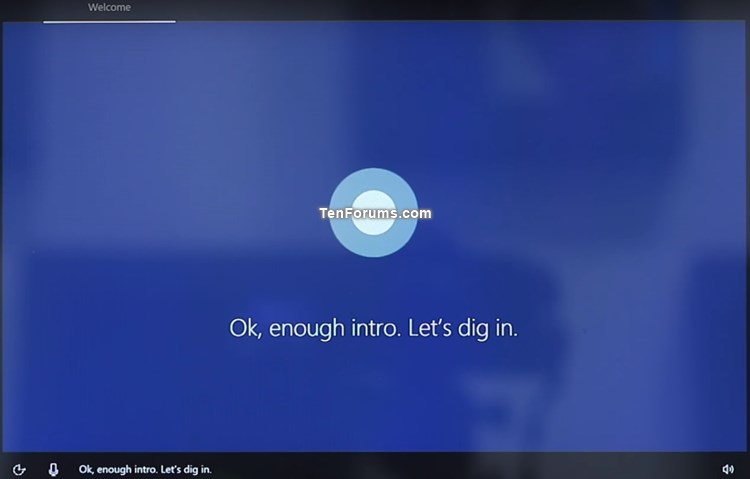
13 When installing Windows 10 has finished, you will now be greeted by Cortana (if supported) to assist in setting up Windows 10. (see screenshots below)
You can click/tap on the microphone icon at the bottom at anytime to toggle voice mode on and off as needed or wanted.


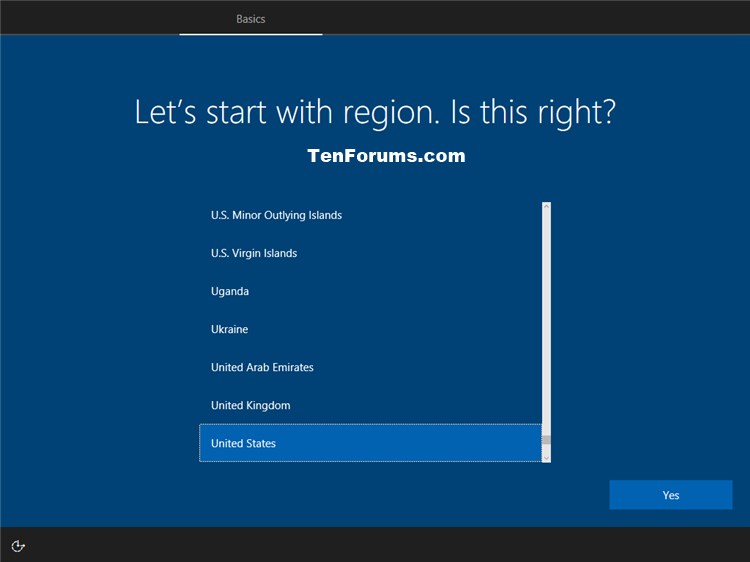
14 Select your region (ex: "United States"), and click/tap on Yes. (see screenshot below)
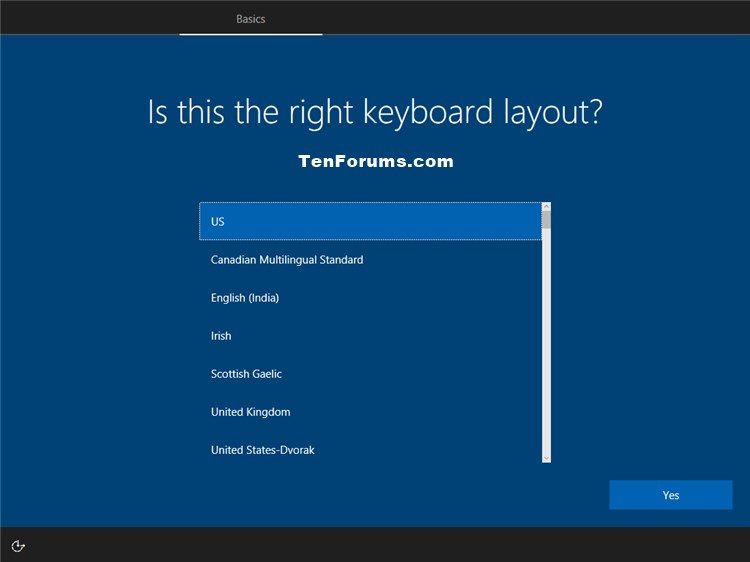
15 Select your keyboard layout (ex: "US"), and click/tap on Yes. (see screenshot below)
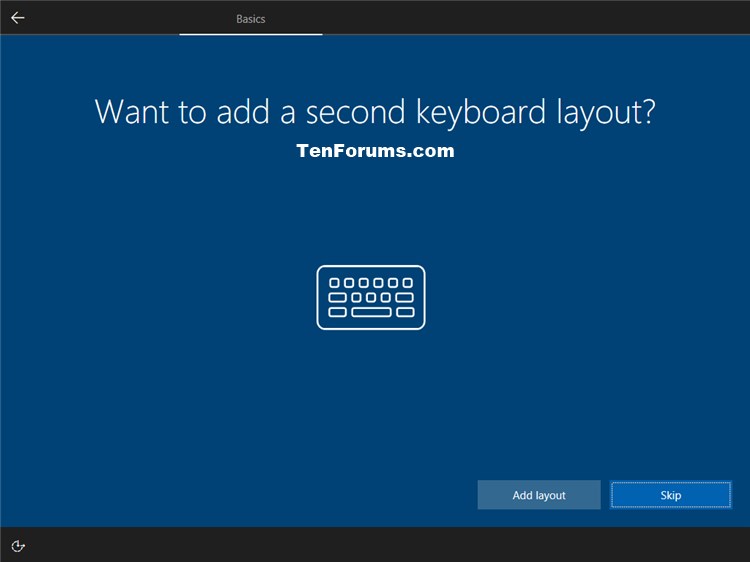
16 Select Add layout or Skip depending on if you want to add a second keyboard layout. (see screenshots below)
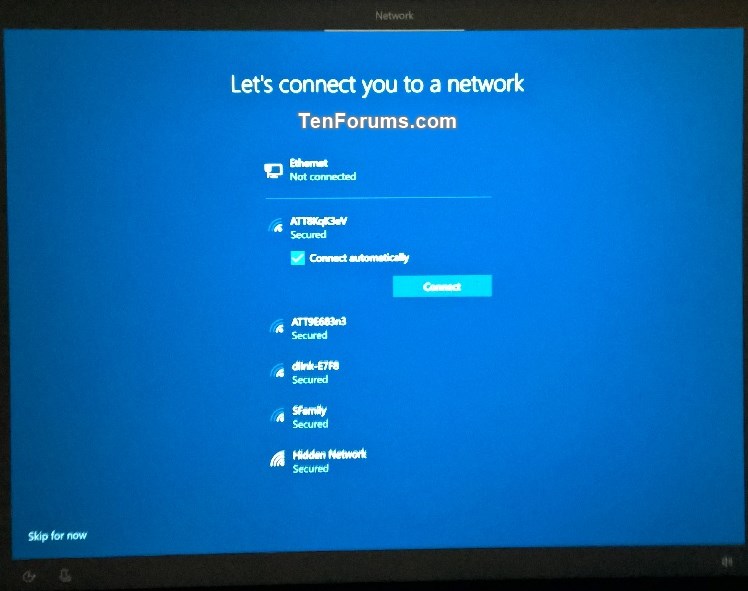
17 Windows Setup will now check for an Internet connection. If an Internet connection is not detected, it will prompt you to select an Ethernet network or setup and connect to your wireless network, and click/tap on Next. (see screenshots below)
If you currently do not have an Internet connection available, then you can click/tap on the Skip for now link at the bottom left, and go to step 21C below.
18 Select How would you like to set up (Pro) or Choose how you'll connect (Enterprise or Education), and click/tap on Next. (see screenshots below)
You will not see this if installing a Windows 10 Home edition.
For Windows 10 Pro:
Set up for an organization = Domain
Set up for personal use = Local home PC
For Windows 10 Education and Enterprise:
Join Azure Active Directory = Choose this option if your organization uses Office 365 or other business services from Microsoft. Your organization might collect info about you, install or remove apps, change settings or disable features, delete content, or reset your device. Talk to your support staff to learn more. This will let you setup Windows with a work or school account now.
Join a local Active Directory domain = This will let you setup Windows with a local account now. When setup is finished, you can join a domain, or switch to a Microsoft account. Go to step 23C below after selecting this option.
19 Do the step below depending on if your would like to set up Windows 10 to sign you in with a local account or Microsoft account.
- step 20: Set up Windows 10 with a Microsoft account
- step 21: Set up Windows 10 with a local account
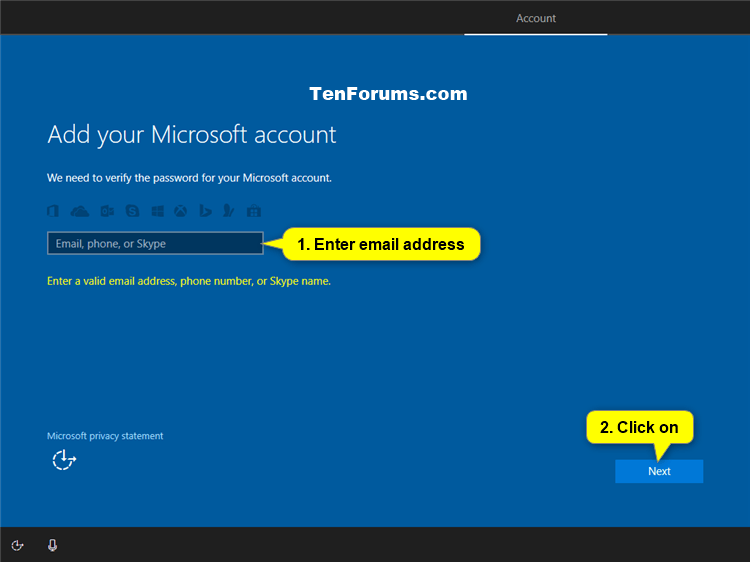
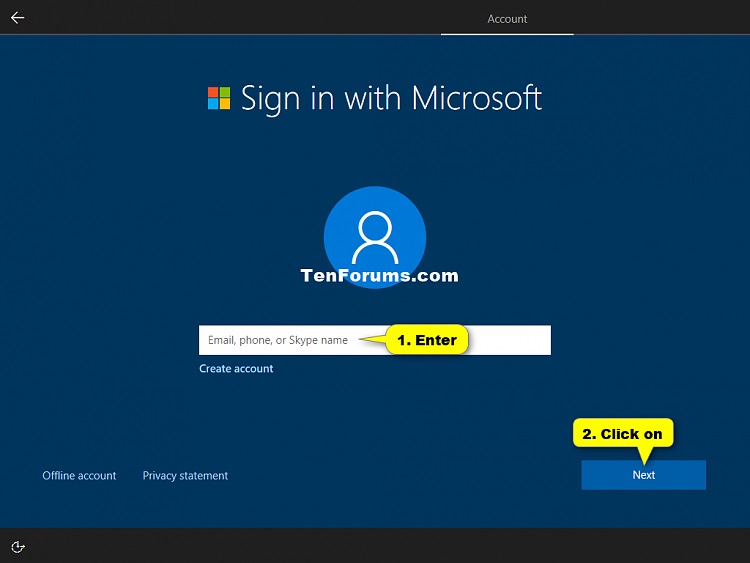
A) Type in the email address, phone number, or Skype name you have registered for your Microsoft account, and click/tap on Next. (see screenshot below)
If you do not have a Microsoft account and would like to use one, then click/tap on the Create account link to create a new Microsoft account.
B) Enter the password for your Microsoft account, and click/tap on Next. (see screenshot below)
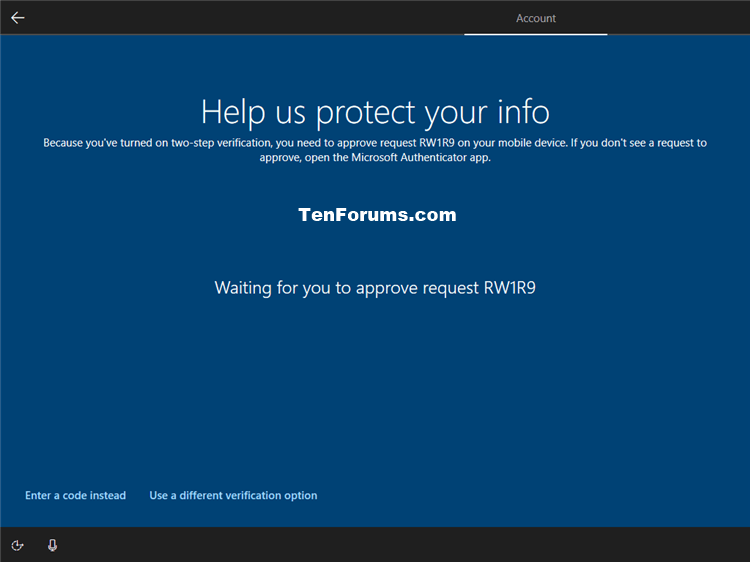
C) If you used the Microsoft Authenticator app to secure your Microsoft account, then approve this request when notified on your Android or iOS mobile device, and go to step 23F below. (see screenshot below)
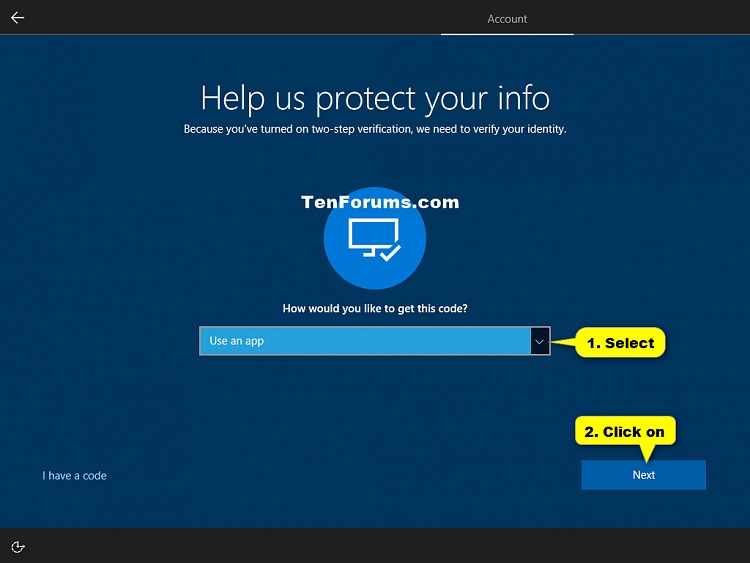
D) If you have two-step verification turned on for your Microsoft account without using the Microsoft Authenticator app, then select how you would like to get your code, and click/tap on Next. (see screenshots below)
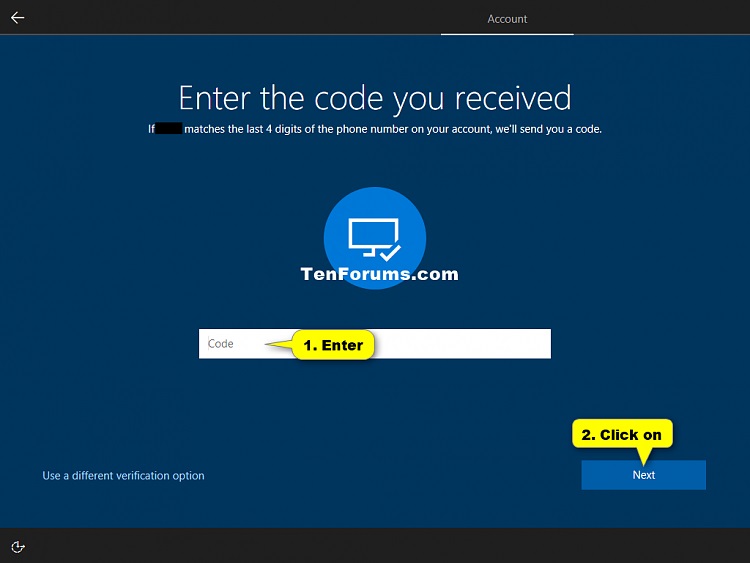
E) Enter the code you received from Microsoft, and click/tap on Next. (see screenshot below)
F) If your PC has a camera that supports Windows Hello, then you can click/tap on Set up to use your face to sign in to Windows 10. If you do not want to, then click/tap on Skip for now. (see screenshot below)
You will always be able to add a face later if you like in Windows 10.
G) Click/tap on Create PIN to add a PIN for your Microsoft account in Windows 10. (see screenshot below)
You will not be able to avoid creating a PIN, but you will always be able to add a PIN, change your PIN, or remove your PIN later if you like in Windows 10.
H) If prompted to verify the password for your Microsoft account, then: (see screenshots below)
- Enter the email address for your Microsoft account again, and click/tap on Next.
- Enter the password for your Microsoft account, and click/tap on Sign in.
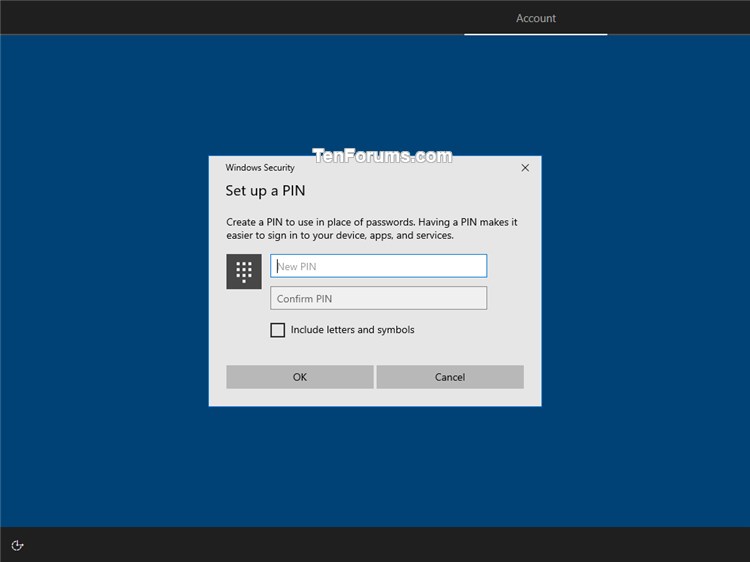
I) Enter a PIN you want to use, and click/tap on OK. (see screenshot below)
You will always be able to add a PIN, change your PIN, or remove your PIN later if you like in Windows 10.
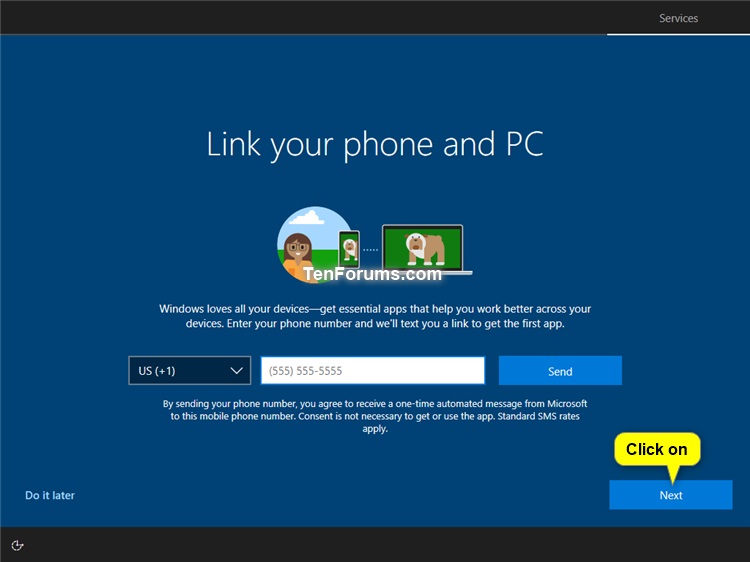
J) If you wanted to link your iPhone or Android and this PC, then you could enter your phone number and click/tap on Send to have an app link sent to your phone to do so. Otherwise, just click/tap on Next to skip this. (see screenshot below)
You will always be able to add a phone at anytime from within Settings > Phone.
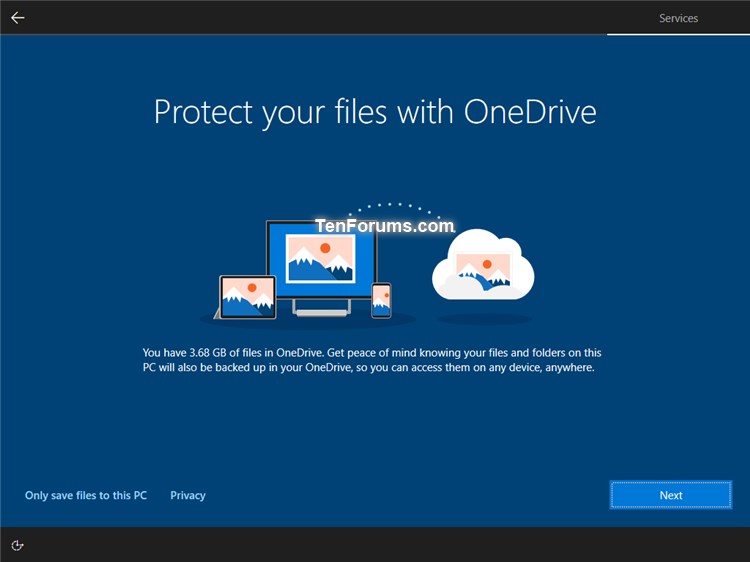
K) You will now be prompted if you would like Protect your files with OneDrive. Click/tap on Next if yes, or click/tap on Only save file to this PC if no. Go to step 22 below. (see screenshot below)
You will always be able to turn on or off folder protection with OneDrive at anytime in Windows 10.
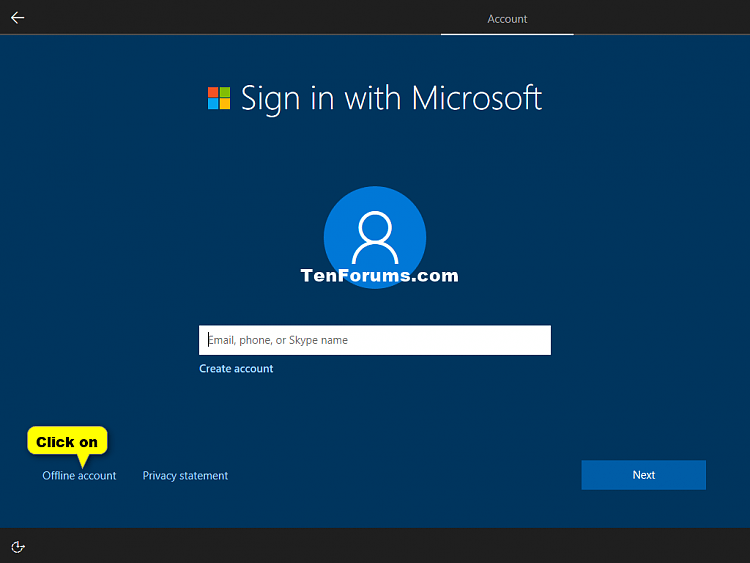
A) Perform one of the following actions depending on which Windows 10 edition you are installing: (see screenshots below)
- If Windows 10 Home, type the bogus phone number 1234567890 into the phone/email address field, click/tap on Next, click/tap on the Offline account link at the bottom left of the Confirm your phone number screen.
- If Windows 10 Pro, click/tap on the Offline account link at the bottom left.
- If Windows 10 Enterprise, click/tap on the Domain join instead link at the bottom left, and go to step 24C below.

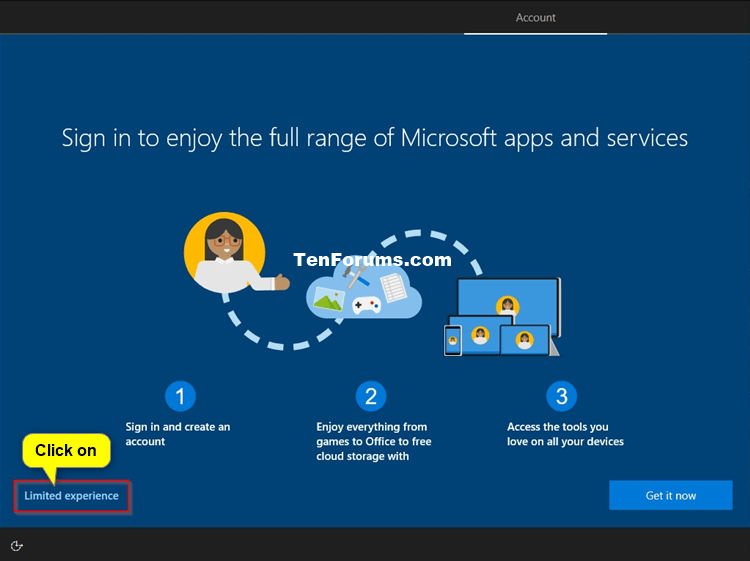
B) Click/tap on No or the Limited experience link. (see screenshots below)

C) Enter a user name you want for the local account, and click/tap on Next. (see screenshot below)
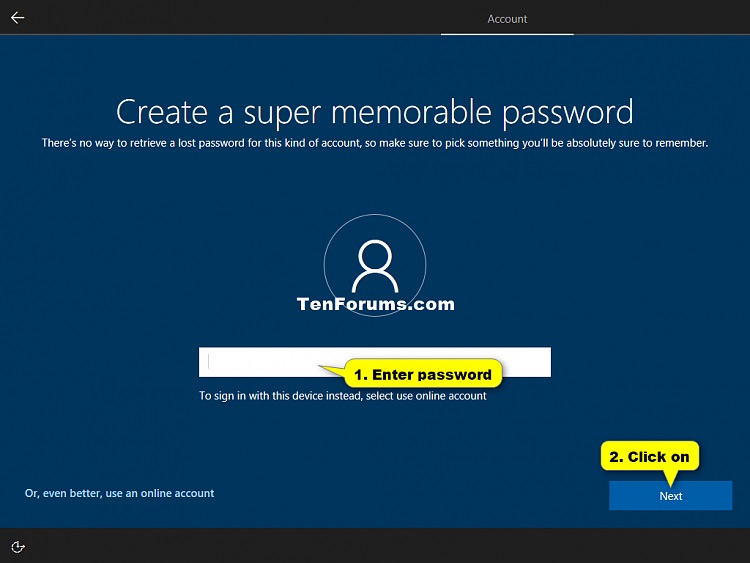
D) Enter a password you want for the local account, and click/tap on Next. (see screenshot below)
If you do not want this local account to have a password, then leave this field empty instead, click/tap on Next, and go to step 22 below.
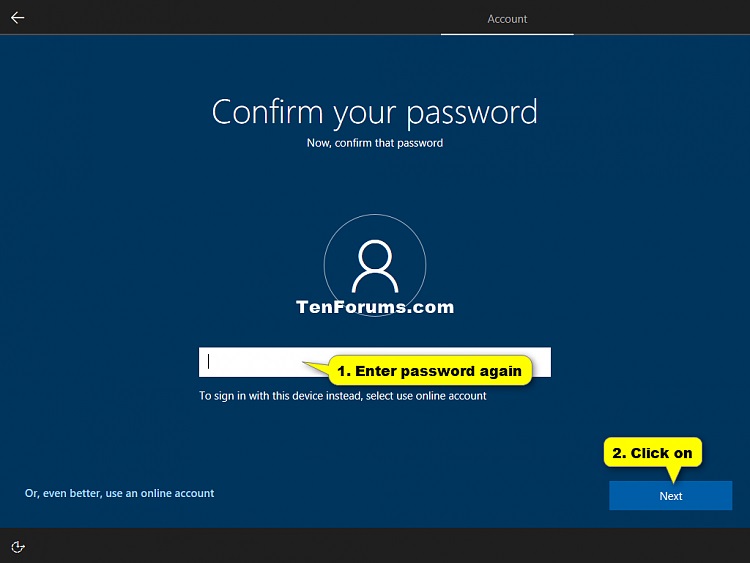
E) Enter the password again to confirm, and click/tap on Next. (see screenshot below)
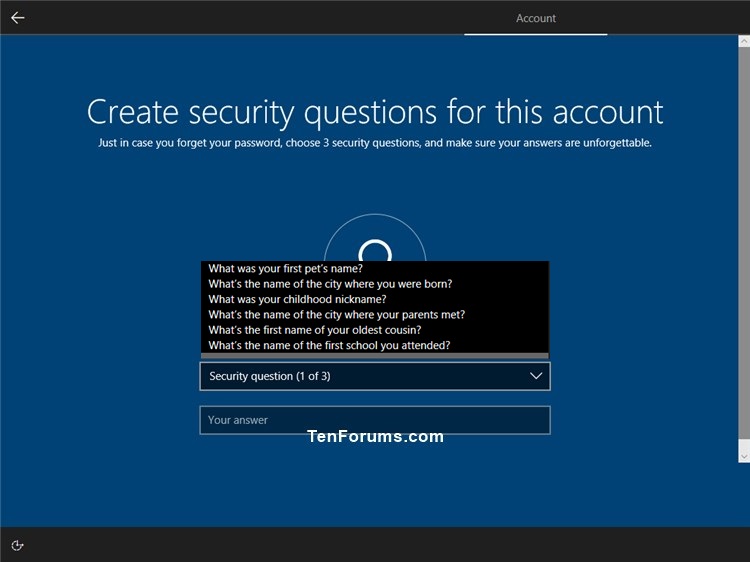
F) Select a security question (1 of 3) you want from the drop menu, type your answer, and press Enter. (see screenshot below)
G) Select a security question (2 of 3) you want from the drop menu, type your answer, and press Enter. (see screenshot below)
H) Select a security question (3 of 3) you want from the drop menu, type your answer, press Enter, and go to step 23 below. (see screenshot below)
22 Click/tap on Decline or Accept depending on if you want to use Cortana with your account in Windows 10. (see screenshot below)
You will be able to turn Cortana on or off at anytime in Windows 10.
23 Click/tap on No or Yes depending on if you want to turn on Activity History for your account in Windows 10. (see screenshot below)
You will be able to turn Activity History on or off at anytime in Windows 10.
24 Turn on or off the privacy settings you want, and click/tap on Accept when finished. (see screenshots below)
You will be able to change all of these privacy settings at anytime in Windows 10.
- How to Turn On or Off Online Speech Recognition in Windows 10
- How to Turn On or Off Location Service in Windows 10
- How to Turn On or Off Find My Device in Windows 10
- How to Change Diagnostic and Usage Data Settings in Windows 10
- How to Turn On or Off Improve Inking & Typing Recognition in Windows 10
- How to Turn On or Off Tailored experiences with diagnostic data in Windows 10
- How to Enable or Disable Let Apps use Advertising ID for Relevant Ads in Windows 10

25 Windows Setup will now start getting things ready you.
26 If prompted, click/tap on Yes (on) or No (off) for network discovery. (see screenshot below)
You will always be able to turn on or off network discovery at anytime in Windows 10.
27 When the custom install has finished, you will be on your desktop in Windows 10. (see screenshot below)
28 Make sure that you have the correct time zone, date, and time set.
29 Install any needed drivers for your devices.
30 If you like, you can now open the C:\Windows.old folder to copy back any files you may want from your previous installation. (see screenshots below)
If you already had a Windows.old folder when you performed a custom install, then it will be renamed to say Windows.old.000, Windows.old.001, etc... (older previous installations). The most recent previous installation will always be in the C:\Windows.old folder.
The previous installation contents in the Windows.old folder will be automatically deleted in 10 days by default.


That's it,
Shawn
Related Tutorials
- How to Clean Install Windows 10
- How to Start Fresh with Clean up-to-date Installation of Windows 10
- How to Do a Repair Install of Windows 10 with an In-place Upgrade
- How to Directly Clean Install Windows 10 without having to Upgrade First
- How to Refresh Windows 10
- How to Reset Windows 10
- How to Reinstall Windows 10 with this media
- How to 'Recover from a drive' to Reset Windows 10
- How to Clean Install Windows 10 without any External Installation Media
- How to Restore Files from Windows.old Folder in Windows 10
Custom Install Windows 10
-
New #1
nice, this looks like a new clean install of windows
I understand that previous "drivers, apps, documents, etc.." are NOT copied in the new windows install but kept in windows.old, but does it keep the complete previous C: drive contents or selective docs and apps ?
thanks for the tuto / it may be useful for the coming 1809 upgrade
-
New #2
Hello D4ni3l,
Yep, it's basically still just a clean install, but it will not wipe the whole disk like a clean install. It only wipes the Windows partition, and creates a complete copy of the previous Windows installation into the Windows.old folder.
You would still be starting over from scratch, but with the added bonus of the Windows.old folder as a backup. You could copy files back from it, or use it to go back to previous version.
-
New #3
If the Windows advanced troubleshooting menu option reset save files fails this is an additional option to fix Windows (replaces the operating system, registry, boot sector, etc.) and allows the end user to keep files.
For those that had not backed up files, made a backed up image, or for failure of the backup image this method will be useful.
Shawn,
Thanks again for creating this tutorial with the phenomenal response time.Last edited by zbook; 25 Oct 2018 at 00:54.
-
-
New #5
Shawn, one suggestion. For Step 7, make the default I don't have a product key, since this will always be a reinstall, never a new install of Windows 10. There should never be a need to enter the installation key since Windows 10 was already installed on this PC, right?
If it doesn't activate after the install completes that's a problem then the key can be entered.
-
New #6
Hey Rich,
Unfortunately, you would need to enter the product key during a custom install the same as in a clean install.
Exception being if you setup a Microsoft account during the custom install that the digital license of the PC is linked to. It should then activate afterwards,
-
New #7
Umm, I've done clean installs on PCs that I've previously installed Win 10 on and only created a local account. When the clean install completed, Windows 10 was activated. I'll have to try that again as soon as I can. I know it should work the way you said. I'll post my results (and probably my mea cupla's) here when I'm done.
Thanks Shawn.
Excellent tutorial by the way!!!!
-
New #8
I have a question: Can I use Windows PE to install a fresh Windows 10?
I mean can I boot Windows PE from an USB, then use Explorer of Windows PE to open the Windows 10 .iso file and run setup.exe ?
I have used this method a lot because I can have multiple Windows iso files (7x86, 7x64, 10x86, 10x64) on just one USB and run for many kind of PCs. I'm not sure if it's good, but running installation in this way is quite fast since the data transfer speed from USB is much more faster and I don't need to extract .iso file nor re-format the whole USB each time I have a Windows big update (1709, 1803, 1809,...).
-
-
New #9
Custom Install Windows 10
How to Custom Install Windows 10Published by Shawn BrinkCategory: Installation & Upgrade
26 Sep 2023


 Quote
QuoteTutorial Categories

Related Discussions
