

How to Turn On or Off Automatically Expand to Current Folder in Navigation Pane in Windows 10
You can use the navigation pane to browse locations such as Quick access, OneDrive, Libraries, This PC, Network, and Homegroup. You can also move or copy items directly to a destination in the navigation pane.
As you open folders in the right pane of File Explorer, the navigation pane will not automatically expand to the current open folder by default.
This tutorial will show you different ways on how to turn on or off having the navigation pane automatically expand to current folder for your account in Windows 10.
If you already have "This PC" expanded open and clicked on a drive to open it, it will then highlight the drive in the navigation pane as expected.
However, from this point on, it will automatically expand "This PC" to the opened drive even if "This PC" currently is not expanded open and "Expand to current folder" is turned off.
To stop this when it happens, you could either close and reopen File Explorer OR unexpand "This PC" and toggle Show all folders on and off to force a refresh.
Contents
- Option One: To Turn On or Off Automatically "Expand to current folder" from Navigation Pane
- Option Two: To Turn On or Off Automatically "Expand to open folder" from File Explorer Ribbon
- Option Three: To Turn On or Off Automatically "Expand to open folder" from File Explorer Options
- Option Four: To "Expand to current folder" using Keyboard Shortcut
- Option Five: To Turn On or Off Automatically "Expand to current folder" using a VBS file
1 Open File Explorer (Win+E).
2 Right click or press and hold on an empty area in the navigation pane, and click/tap on Expand to current folder to check (on) or uncheck (off -default) it for what you want. (see screenshot below)
1 Open File Explorer (Win+E).
2 Click/tap on the View tab, click/tap on the Navigation pane button in the ribbon, and click/tap on Expand to open folder to check (on) or uncheck (off - default) it for what you want. (see screenshot below)
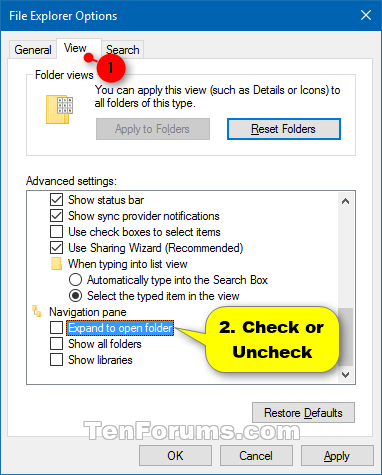
1 Open Folder Options.
2 In the View tab under the Navigation pane section, check (on) or uncheck (off - default) Expand to open folder for what you want set, and click/tap on OK. (see screenshot below)
1 While you have a folder open in File Explorer, press the Ctrl + Shift + E keys. (see screenshots below)
The downloadable .vbs files below modify the DWORD value in the registry key below, then send a refresh (F5) command to apply.
HKEY_CURRENT_USER\Software\Microsoft\Windows\CurrentVersion\Explorer\Advanced
NavPaneExpandToCurrentFolder DWORD
0 = Off
1 = On
1 Do step 2 (off) or step 3 (on) below for what you want.
This is the default setting.
A) Click/tap on the Download button below to download the file below, and go to step 4 below.
Turn_Off_Expand_to_Current_Folder_in_Navigation_Pane.vbs
Download
A) Click/tap on the Download button below to download the file below, and go to step 4 below.
Turn_On_Expand_to_Current_Folder_in_Navigation_Pane.vbs
Download
4 Save the .vbs file to your desktop.
5 Unblock the .vbs file.
6 Run the .vbs file to apply.
That's it,
Shawn
Related Tutorials
- How to Show or Hide Navigation Pane in File Explorer in Windows 10
- How to Turn On or Off Navigation Pane 'Show all folders' in Windows 10
- How to Add Navigation pane to Context Menu in Windows 10
- How to Reset Navigation Pane Width Size to Default in Windows
- How to Turn On or Off OneDrive Cloud States for Navigation Pane in Windows 10
- How to Reset Navigation Pane Expanded State in Windows 10 File Explorer
Turn On or Off Navigation Pane Expand to Open Folder in Windows 10
-
New #1
Is it possible to make "Expand to current folder" work in File Explorer only and not in Open / Save as windows?
-
-
-
-
-
-
-
-
-
New #9
Thank you this works all great, except for the Onedrive. This keeps on auto expanding whenever a folder is opened that is inside of the Onedrive Folder. (Have not tried the scripts though)
Bug or intended?

Turn On or Off Navigation Pane Expand to Open Folder in Windows 10
How to Turn On or Off Automatically Expand to Current Folder in Navigation Pane in Windows 10Published by Shawn BrinkCategory: Customization
22 Aug 2020


 Quote
Quote


Tutorial Categories

Related Discussions
