

How to Automatically Create System Restore Point on Schedule in Windows 10
System protection (if turned on) is a feature that allows you to perform a system restore that takes your PC back to an earlier point in time, called a system restore point. This can be handy if your PC isn't working well and you recently installed an app, driver, or update.
Each restore point contains the necessary information needed to restore the system to the chosen state. Restore points are automatically generated when you install a new app, driver, or Windows update, and generated when you create a restore point manually. Restoring wont affect your personal files in your %UserProfile% folder, but it will remove apps, drivers, and updates installed after the restore point was created.
See also:
- System Restore | Microsoft Docs
- Monitored File Name Extensions | Microsoft Docs (Files with these extensions are monitored by System Restore.)
- Restoring the System | Microsoft Docs ("To restore a system, System Restore undoes file changes made to monitored files, recapturing the file state at the time of the selected restore point.")
This tutorial will show you how to create an elevated task to automatically create a system restore point on schedule in Windows 10 and Windows 11.
You must be signed in as an administrator with a password to be able to create the elevated task in Task Scheduler.
System protection must be turned on for your Windows drive (ex: C: ) for this task to work.
You must have UAC set to its default setting for this task to work.
Here's How:
1 If you haven't already, you will need to change the SystemRestorePointCreationFrequency DWORD value to 0 in Registry Editor for this task to work properly.
2 Press the Win + R keys to open the Run dialog, type taskschd.msc into Run, and click/tap on OK to open Task Scheduler.
3 Click/tap on Task Scheduler Library in the left pane of Task Scheduler, and click/tap on Create Task in the right Actions pane. (see screenshot below)
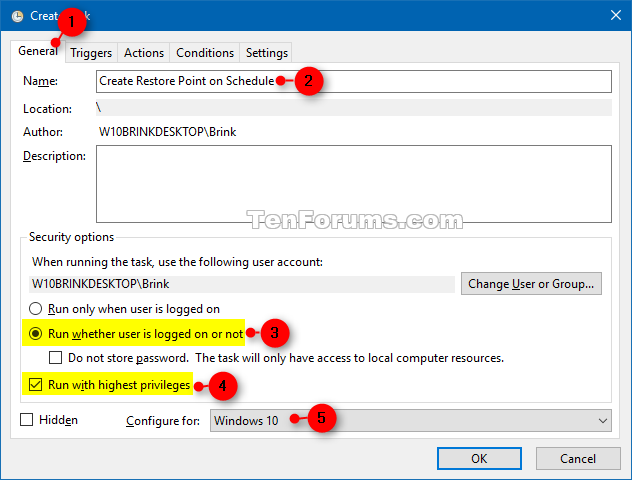
4 In the Create Task wizard: (see screenshot below)
A) Click/tap on the General tab.
B) Type a Name (ex: "Create Restore Point on Schedule") you want for this task.
C) Select (dot) Run whether user is logged on or not.
D) Check the Run with highest privileges box.
E) Select Windows 10 in the Configure for drop down menu.
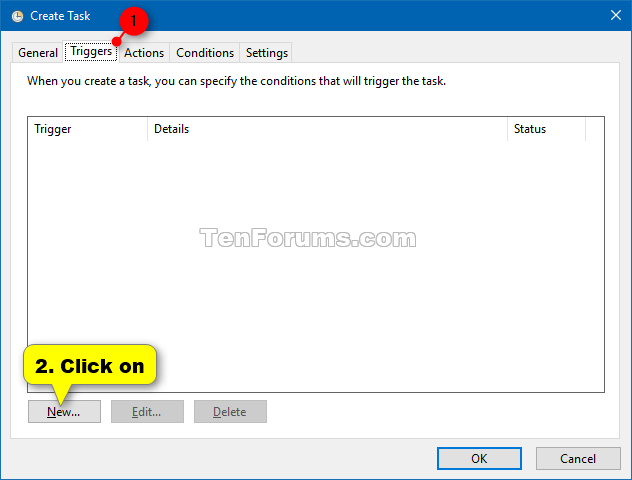
5 Click/tap on the Triggers tab, and click/tap on the New button. (see screenshot below)
6 Select On a schedule in the Begin the task drop down menu, select a Daily, Weekly, or Monthly schedule you want, fill out the settings you want for the schedule, and click/tap on OK. (see screenshots below)
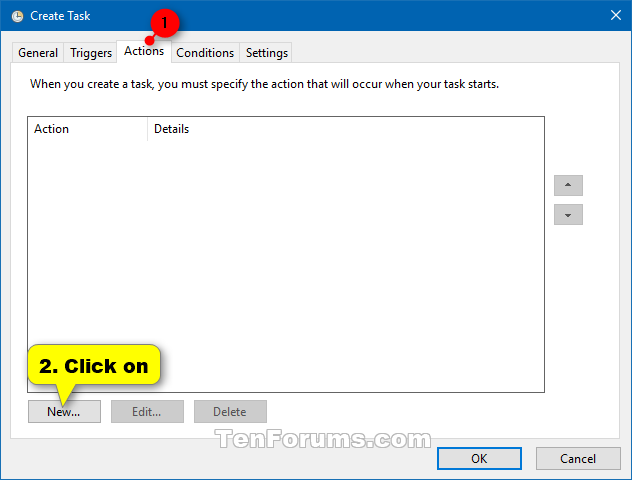
7 Click/tap on the Actions tab, and click/tap on the New button. (see screenshot below)
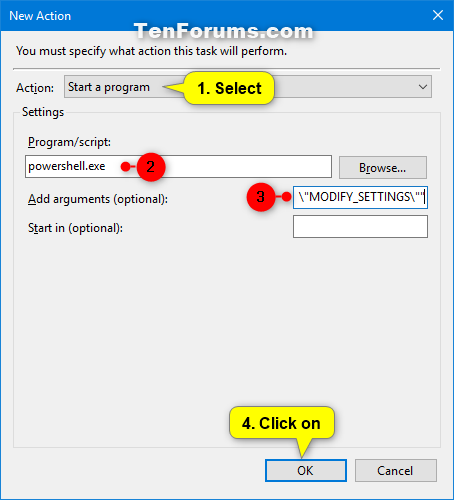
8 In the New Action wizard: (see screenshot below)
A) Select Start a program in the Action drop down menu.
B) Type powershell.exe in the Program/script field.
C) Copy and paste the command below into the Add arguments field.
-ExecutionPolicy Bypass -Command "Checkpoint-Computer -Description \"Automatic Restore Point\" -RestorePointType \"MODIFY_SETTINGS\""
D) Click/tap on OK.
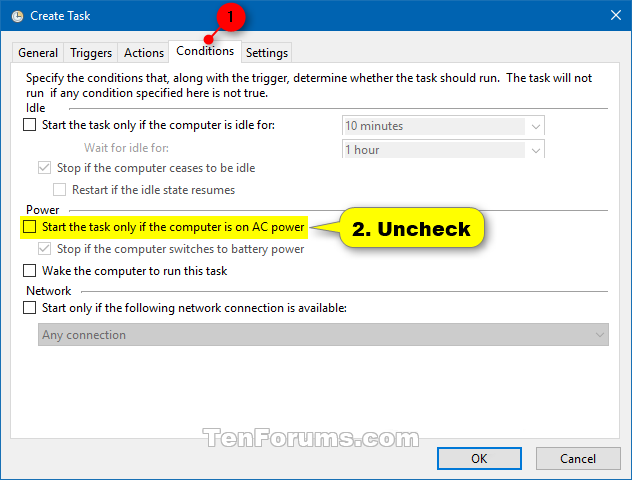
9 Click/tap on the Conditions tab, and uncheck the Start the task only if the computer is on AC power box. (see screenshot below)
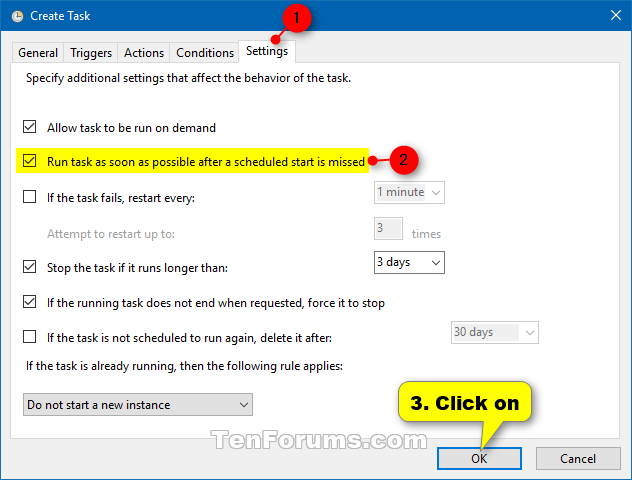
10 Click/tap on the Settings tab, and check the Run task as soon as possible after a scheduled start is missed box, and click/tap on OK. (see screenshot below)
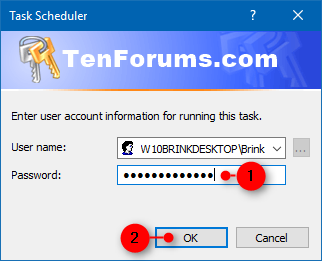
11 Enter your account's password, and click/tap on OK. (see screenshot below)
12 You will now see this new task (ex: "Create Restore Point on Schedule") listed in the Task Scheduler Library. You can now close Task Scheduler if you like. (see screenshot below)
You can right click on this task (ex: "Create Restore Point on Schedule"), click/tap on Delete, and click/tap on Yes to approve to remove this task and no longer automatically create a restore point on schedule.
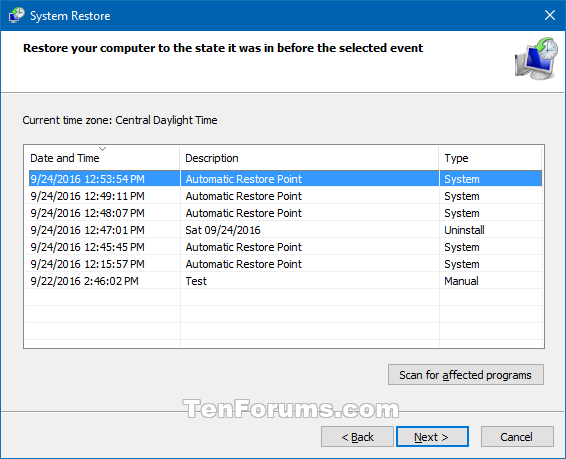
13 A new restore point named Automatic Restore Point will now automatically be created on the schedule you set. (see screenshot below)
That's it,
Shawn
Related Tutorials
- How to Enable or Disable System Restore in Windows 7, Windows 8, and Windows 10
- How to Enable or Disable System Restore Configuration in Windows 7, Windows 8, and Windows 10
- How to Turn On or Off System Protection for Drives in Windows 10
- How to Do a System Restore of Windows 10
- How to Undo a System Restore in Windows 10
- How to Automatically Create System Restore Point at Startup in Windows 10
- How to Create a System Restore Point in Windows 10
- How to See List of All Available System Restore Points in Windows
- How to Delete System Restore Points in Windows 10
- How to Add a 'Create Restore Point' Context Menu in Windows 10
- How to Make a 'Create System Restore Point' Shortcut in Windows 10
- How to Create System Protection shortcut in Windows 10
- How to Change System Restore Point Creation Frequency in Windows 10
- How to Add System Protection Context Menu in Windows 10
Automatically Create System Restore Point on Schedule in Windows 10
-
New #1
Does this process create a system restore point and cancel the previous one automatically maintains all system restore points manually is canceled? As we all know the system restore points take up space it from disk
Not this big space filled property of a hard drive?
What's the point of creating a new system save point every time you turn on the computer?
-
New #2
Hello ma3ino, and welcome to Ten Forums. :)
The restore points created by the task will all remain saved until you reach your set maximum storage size in system protection. At this point, older restore points will automatically be deleted to create free space for the next new restore point.
It just depends on if you need to have a restore point created on a specified schedule or not.
-
-
-
New #5
Possible permissions issue
Hello Shawn,
I want to share an experience with a problem that I faced with this task scheduling, which may help someone who might have faced a similar problem.
I tried the task scheduling as you've said and I don't know what happened or what I did wrong but instead of the task creating a restore point (RP), it messed up my System Volume Information (SVI) folder's ownership, leading to not only the RP not getting created, but also making me unable to create one manually from System Protection, which showed - "Access denied", along with the bonus of deleting (or at least making them no more accessible) the existing RPs. Still, the task, as far as I can recall, showed as completed successfully in the Scheduler's history.
After I successfully reset the ownership for SVI to the Administrators and permissions to SYSTEM, I could at least do the manual RP creation. Then I changed the account that's used to run the task to SYSTEM, as I've used previously too for other such permissions-hungry tasks. And the task worked flawlessly.
So, what I understood from this is that probably because by default only SYSTEM (& Administrators too, I think) have read/write permissions for the SVI folder, where the RPs are stored, it's only the SYSTEM account that can do a scheduled creation.
^ I'm not sure if it's a correct conclusion, but it worked for me, so maybe it may help someone else too.
One quick question: Is there a way to understand and manipulate the default RP creation scheduling done by System Protection? As in, I never quite understood when the System Protection chose to create RPs. It'd created one a couple of days ago, but when it'd choose to create another is unknown to me. The system's task in System Restore folder in the Scheduler shows no triggers in the Triggers tab, but it did create an RP, so there must be some trigger, whose frequency if I could manage, I won't at all need a new task to be created to accomplish this.
Thank you for the tutorial Brink and for the infinitely more that you've written (following them since Vista, shamelessly thanking for the first time). Brink, man, you're awesome. Period :)
-
New #6
Hello RS06, and welcome to Ten Forums. :)
The task wouldn't change permissions of anything. Instead, it runs the task with Run with highest privileges for elevated rights using the credentials of the administrator account you entered.
Did you do anything else that may have changed the permissions? Take ownership?
-
New #7
Oh. So the task didn't do it, then. As far as I can recall, I didn't fiddle with the SVI permissions or do anything that might've interfered, until I faced this issue. I did use Run with highest privileges too earlier. The last thing I think I did before running that task was to try creating a manual RP, which worked fine. After the task ran, I was denied access.
So, I don't think I did anything else that might've caused this, but I may have forgot doing something else. What I might try is running it again with user account and see if it works. Will post the result.
Thanks for the reply!
-
New #8
Okay, I checked with the user account instead of SYSTEM. It worked fine! I might've done something else that must've caused it then. Embarrassing. :P Might as well delete the post then.
-
-
New #9
The posts are fine since it may help some one if they come across the same issue.
I'm glad it's working as intended now for you. :)

Automatically Create System Restore Point on Schedule in Windows 10
How to Automatically Create System Restore Point on Schedule in Windows 10Published by Shawn BrinkCategory: Backup & Restore
13 Nov 2023


 Quote
Quote
Tutorial Categories

Related Discussions
